Star Wars Babies

Creative Patching Front

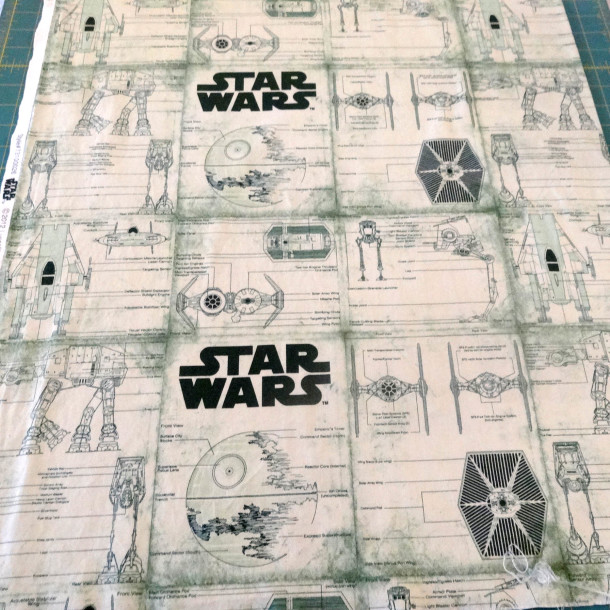
I haven’t always had the best of luck with my Steam-A-Seam adventures, but I was determined to make it work for the sake of Star Wars, and the fact that I would be giving them away therefore not have to deal with the aftermath of failure. Wait….they know where I live…damn!

Out of that first disaster applique craft, I did have one survive without me having to stitch it down. It happens to be the Star Wars onesie. Coincidence? I think NOT!

Star Wars Baby
Star Wars Baby

It’s a bit bubbly and would be better stitched down, but that’s 1 out of 4…that’s a 25% success rate…whatever…look, CUTE BABY!!!

Moving Model
Moving Model

I’m just following modern business culture – when there’s failure, distract!

Not to disappoint you, as per usual, I do everything in Costco amounts – including onesies:

Pile'o'onesies
Pile’o’onesies

One of the new onesies was pre-ruined out of the package! Someone at Target was a little too excited to restock shelves. I can’t get upset about it, though, when I’m technically planning to patch perfectly good onesies.

Box Knife Bastards - My New Band Name
Box Knife Bastards – My New Band Name

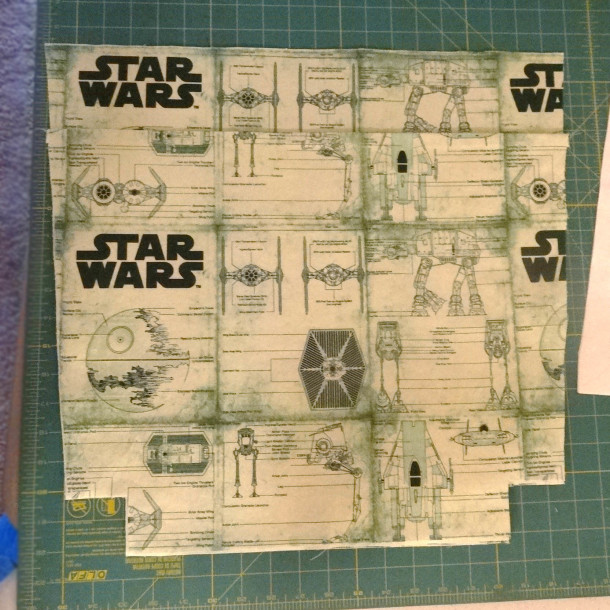
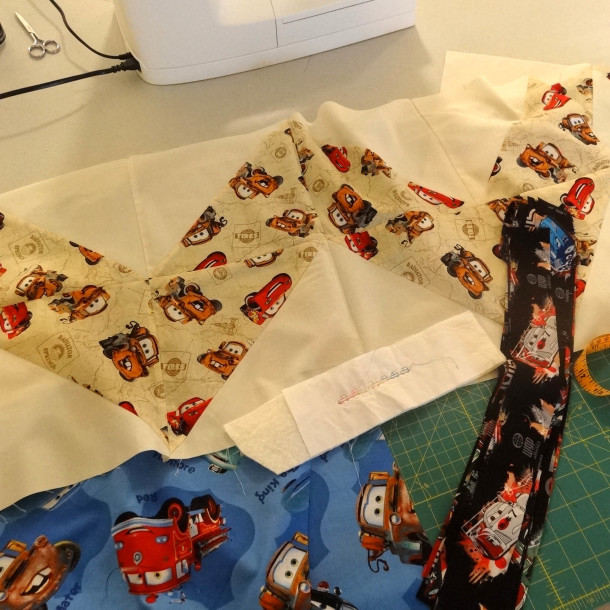
My, how my art board has changed over the years. I cut out the images I wanted from the fabric with great meticulous detail. No, not really. I just cut them out, stuck them to one side of the Steam-A-Seam2 in the most efficient arrangement I could take the time to bother with, and cut them out.

Art
Art

Being that my “canvas” is a 12 or 18 month sized onesie, I did check to make sure my images would fit.

My Artboard Circa 2013

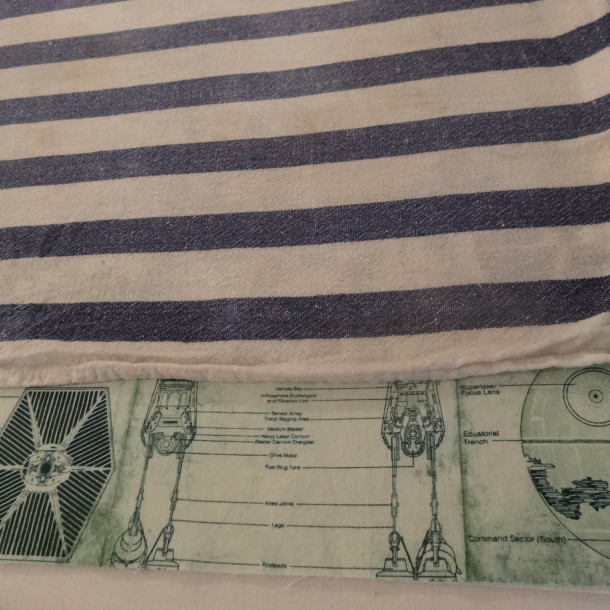
I spent more time making sure I really pressed these down. The Steam-A-Seam2 is this layer of gel-like plastic that takes effort to melt between the layers. I did much better this time. This is a picture of covering the box knife slash that went through the back of the onesie too. The selvage is just too funny not to use.

Creative Patching Back

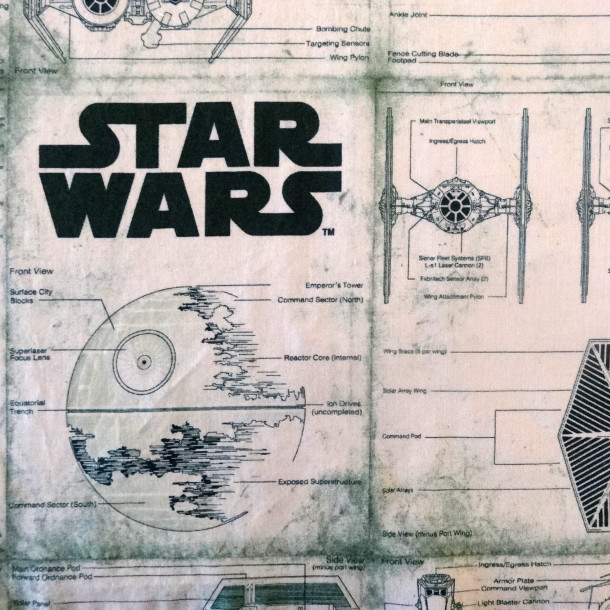
And the Death Star right on the Juice Belly? Yes please.

Creative Patching Front

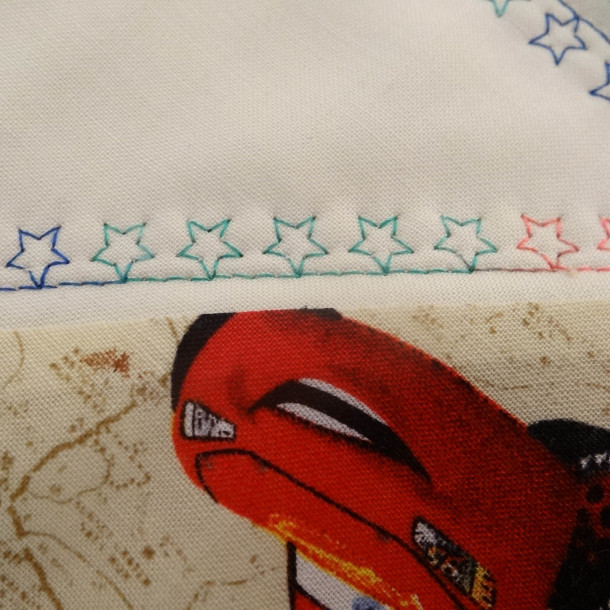
I ironed all the fronts and backs on, then piled them up to Ms. Viking and zig-zag stitched them all down just to keep them extra, extra secure.

Batch Sewing Onesies

Hopefully you have a nice, narrow free-arm option. The onesie is already sewn together, so moving around the knit fabric without tweaking it too bad and getting the woven fabric stitched down one a baby onesie takes some manipulation. My machine is a ‘little bit of everything’ kind of machine, so works great for this, but your mileage may vary.

finagle
finagle

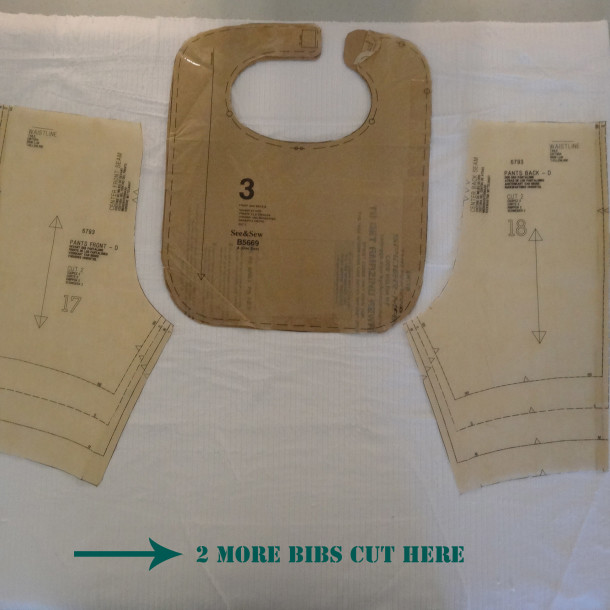
Tomorrow I will post photos of the whole thing – pants, onsies, Star Wars cute overload!

DIY Cheap Babies Clothes Series – Minky!

Brody Lounge Set

In the middle of my Star Wars Series for Brody and Jack, I have a little something to add to the DIY cheap baby clothes series!

As you know, I just make a habit of checking the remnant bins at fabric stores. Joann’s is at minimum 1/2 off the remnant price. So this 3/4 yard of super soft, pinstriped texture minky was maximum $5.83. I’m already ahead.

Remnant
Remnant

I also have a serger – this helps maximize the fabric in that I can fudge seams on patterns to 1/4″ and adjust pattern sizes that I cut to that amount – therefore I get more out of a smaller cut. This piece, folded in half here, is going to be 1 pair of infant pants ~12 month size, and the backs of 4 bibs.

Maximize Fabric
Maximize Fabric

This minky was SOOOOOO linty….serging may have been the only option for it…but it’s also some of the softest minky I’ve ever felt.

Lint Everywhere
Lint Everywhere

Batman and Superman Flannel! This photo is so blurry because Superman is faster than a speeding bullet….

4 Bibs
4 Bibs

Those are both Camelot Fabrics’ flannels I had leftover from some baby gifts last fall that made 2 pairs of pants, so those are zeroed-out money-wise. This photo above is after serging the bibs and turned right side out, pinned on the opening to be top-stitched – there’s more detail to my obsession with bib perfection here.

Here are the finished pants – I’m kinda jealous. After my serger, lint roller and I were done…they look really good. I want a pair…Dear Brody lives in Colorado (brrrrr!) so I think he needs them more than I do right now.

Brody Lounge Pants
Brody Lounge Pants

The bibs are beyond adorable. I’m only sending 2 to Brody, I know some twins that make me swoon that get the other two.

Brody Lounge Set
Brody Lounge Set

I’m really into this variegated thread – it’s functional and cute. What do you think? Is it too wacky or is it cute?

Brody Tag
Brody Tag
Back of Tag
Back of Tag

Alright! Brass Tax!

$5.83 in new fabric. The patterns and the flannel are a wash. I did use $1 in elastic and about another $1 in velcro. 4 bibs+1 pair of pants into $7.83=$1.57 a piece. Even if I added in the cost of the entire spool of thread, I’d be under $2 a piece.

If I were to factor in my time for labor and design and sell these on Etsy, yeah…sure, I think they’re being sold at fair prices, but if you want to take the time yourself to do it…it’s more than worth it.

Star Wars Mania – The Bag

Finished Bag

I have put off making a bag for….well, I bought this Valori Wells book in, I think, 2008. I actually bought it AT the Stitching Post in Sisters, Oregon. I <heart> Valori Wells. The fact that she’s an Oregon native too is an added bonus.

OhSewEasyLifeStyleBk

I bought a TON of Star Wars fabric to ‘make something,’ when I came across this Farmer’s Market tote from one of my favorite blogs, Fresh Lemons. The Valori Wells bag and the FL bag are similar in pattern, but the FL version is a bit smaller, and, HELLO, a fabulous tutorial will get me out of procrastination mode. You know those projects you mean to do, but get caught up in everything else? Yeah. It’s 2013 and I just now got around to my first bag.

This is a really cool Star Wars green schematic fabric from Camelot Fabrics. I can’t find it online anymore!!! I think if you find some of their licensed fabric that you like, you have to get it – it goes so fast!!! I wish I had more of this one, in fact.

Star Wars Green Fabric - full
Star Wars Green Fabric – full

That’s a full shot so you can see the print block in full, albeit a bit blurry.

Here’s a close up:

Star Wars Green Fabric

I don’t think it gets cooler than that – and the green makes it look like it came from an old school plotter. I love it.

I’m not going to reinvent Faith’s tutorial here for you, but just give you a few shots and my notes as I used a single outside fabric.

I cut out all of the pieces – I love the Fresh Lemon’s spreadsheet section with the quantities of each piece and size.

Cut Pattern Pieces
Cut Pattern Pieces

I’m a fan of using the first cut as the template – so I did that instead of measuring every time. Fewer opportunities for ‘user error.’

Template
Template

I went to The Mill End store for the Pellon stabilizer Faith listed, but had to get a substitute. The Mill End on 99E in PDX has ladies/gents that are very experienced and I trust their judgement. I’ve read scathing reviews of the store, but I assure you, a little bit of manners go a long way and they are a treasure of tips and help.

Pellon 809
Pellon 809

The label makes it sound like it’s super stiff, but it was just fine. I kinda suck at iron-on stabilizers – iron on too long, or not long enough, but I did pretty good. I just used a damp kitchen towel for my ‘ironing cloth.’

Damp Dish Towel
Damp Dish Towel

As mentioned, I used all one fabric for the outside….which makes the pocket hard to see and not very interesting.

Pocket No Trim
Pocket No Trim

So, I added a little trim in Kona Bone that I had leftover from labels and quilts, and it looks much better.

Pocket With Trim
Pocket With Trim

This is me getting too distracted with the dang camera while I’m sewing and just NOW realizing I sewed the liner to the wrong side….

Wrong
Wrong

And this is me having sewed it to the correct side. I took a photo because I wanted to show you that instead of leaving a hole in the bottom of the lining as in Faith’s post to turn it all right side out, I prefer to leave it at the top where I’m going to top-stitch it back down anyway. Your mileage may vary, but that is my preference.

Right
Right

I just want to point out here that I prefer the Fresh Lemons method of sewing the gusset to the Valori Wells method – I just prefer the pattern already cut. Again, less room for ‘user error’ on my part.

Valori Wells version:

Valori Wells Gusset
Valori Wells Gusset

Fresh Lemons version:

Fresh Lemons Gusset
Fresh Lemons Gusset

The pre-cut corner is just easier for me to visualize when I’m there to sew the gusset closed.

All of that said, it was a very easy tutorial. VERY easy. And how cute is this?

Finished Bag
Finished Bag
Finished Bag -Top
Finished Bag -Top

Here’s a photo of it next to a Krogers/QFC bag so you can get some perspective. I think they look a little small in Faith’s much prettier shots….I don’t think you can quite tell how substantial it is…so I put it next to a typical bag:

Perspective Shot
Perspective Shot

Here’s a shot of the inside with a bit of a teaser of more to come! Sure, the birthday boy is a bit small to carry around his new bag for now, but I happen to know his mom goes to the farmer’s market in the summer, so in the end it will benefit him!

Inside Bag
Inside Bag

So, that’s it! My first bag! AND it is now a rare Star Wars fabric bag! That totally ups the geek cred.

DIY Labels

Jack Pressed and Rolled

I’ve been thinking for some time about labels for things I sew. I’ve been putting cut-out sock monkey tags in the backs of pants or a piece of grosgrain ribbon…but I need something more…permanent.

While I love the name of my little bloggerverse – it’s very me: a little snarky, a little punny, a little goofy and an acquired taste at times, it’s not necessarily something I want to put on kids’ clothes. So, until I come up with that epiphany (or if you give me some genius idea), it dawned on me that I can embroider custom tags. I have the thread and the machine, as proven. So, theoretically, I can do this.

Enter, Signature Cotton in “Variegated Island Waters.” It’s M18 on this page of Redrock Threads. Kinda blurry there so here’s my photo.

Signature Cotton M18

I am a sucker for Tiffany and tropical blues. No, not that Tiffany, this Tiffany.

I have some Kona Bone that I had already cut into 2″ strips thinking I’d use it for the Pixar pillows, but decided against it….after I cut it (Murphy’s Law), so what a perfect excuse to turn it into tags. I ironed it like I was making open bias-tape…folded the tops to the center to halve it, but did not press in again to quarters.

Then tested the thread…

Thread Test
Thread Test

I thought it turned out really nice and soooooo….

I was in the middle of making two very large gift packages…one for Brody:

Brody Ribbon
Brody Ribbon
Brody Label
Brody Label

And one large pack for Jack…Jack will continue to get items from me throughout his life, so I made a large roll for Jack:

Jack Roll Pre-Press
Jack Roll Pre-Press

That was before I took an iron to it. Here’s the back so you can see the embroidery ‘seals’ the label together.

Back Jack
Back Jack

The tension wasn’t perfect, but it looks fabulous on top so it’s good enough for my purposes.

Here’s Jack’s labels pressed and rolled:

Jack Pressed and Rolled

Pretty cool, huh? How neat would some be tied around a present? Okay, when I have that kind of time, how neat would that be???

What Kind Of Batting To Use?

poly batting

When I was a little girl in the 70s, my mom made a basic patchwork quilt that she tie-quilted with polyester batting. It was fluffy and squooshy and great until I wore it out by the early 80s. I wish I had a photo of it – matching burgundy and cream calicos. The poly batting was just kind of weird and it wasn’t really mendable. My mom made me a second quilt in 1989/90 and it’s a double Irish chain in solids of lavender and white.

Double Irish Chain Quilt

It was hand-quilted with a cotton batting.

80s Lavender
80s Lavender

It is soooo beat up. I feel like such a little sh*t looking at it now. Of course my mom wanted me to use it, but now that I appreciate these things so much more, maybe I wouldn’t have spilled black candle wax on it (no, not on Halloween…I was a teen in the 90s, every day was Halloween, boppy-bop-bop).

Black Spot
Black Spot

I used the paper towel/iron method to get that wax up, but it still stained. I’m such a bastard. It’s so worn out that anymore I just keep it folded and out of harm’s way.

Worn Out Quilt
Worn Out Quilt

I’ve used poly batting for a dragon tail & spines, for a furry bat costume, to save a cuddley here and there and for the Christmas stockings.

Baby's Stocking
Baby’s Stocking

For a craft here and there, I’m ok with it, but it hasn’t been my favorite to work with.

As I was finishing up the pillows for Liam’s chevron bed set, I thought I’d test it out to see if I really didn’t like it or if it was my imagination. Time to set up sewing area as test lab again!

I really don’t like it.

Here is a pillow top pieced, basted with batting and backing, and quilted with the Sulky thread.

poly batting
poly batting
poly batting testing

Here’s a close up of those stars – do you see how wonky they got? Ms. Viking Did Not Like. I tried and tried, but she was not having anything to do with it.

embroidery w poly
embroidery w poly

Compared to how the cotton batting turned out, I think it’s a safe bet to say I’m sticking with cotton batting or bust.

top finished
top finished

Now, I do mention using an organic bamboo/cotton blend here in the baby quilt and in the Liam quilt. If you can afford that every time, more power to you. It is very, very nice to work with and is my favorite so far. I haven’t tried wool yet. If you can’t afford bamboo/cotton every time or just don’t want to, the Warm and Natural cotton works just fine for me and Ms. Viking. You won’t be seeing me buy poly batting again any time soon….well, until I need to make another dragon tail.

Star Wars – The Next Episode

Empire Strikes Back

That’s right. We are having Star Wars mania over here. We have Star Wars Lunch Boxes, we have Star Wars – The Clone Wars books, we have Star Wars coffee mugs (all got for a song on a zulily.com sale), and most importantly we have this:

Star Wars Mania
Star Wars Mania

That’s right, people. There are over a half-dozen yards of Star Wars right there by Camelot fabrics. Oh, and that Pellon?

Bwahahahaha! You don’t know the power of the dark side! Er, sticky side…of Pellon…nevermind. Wait and see.

Last Pixar Post – Chevron Pillows

finished corners

When all was said and done with Liam’s Cars quilt, this is what I had left…about a yard of the blue Cars fabric in pieces, less than a 1/4 yard of the black Cars 2 fabric, 3 chevron blocks and a lot of embroidery thread! Listing it all makes me think there’s a missing character in the Clue game…It was Ms. Saffron the seamstress in the craft room with the glue gun! 

Leftovers
Leftovers

I decided 2 throw pillows in the 18×18″ range ought to do it.

Pillow Tops
Pillow Tops

Here are 3 pillow tops ready to go – 1 extra just in case. I’ll get to that later….yeah….

Anyway, here is the Sulky thread on top and I used a cream Gutterman in the bobbin. This made the tension a lot easier to tweak and adjust for a smoother look. It still got a bit of pull-through here and there, but what are you gonna do? We’re not entering this into the Smithsonian, we’re just having fun.

close up embroidery stitch

It also makes the inside look cleaner to have a solid cream thread in the bobbin.

squaring up
squaring up

I squared it all up, and added the back. I decided against a button closure or zippers in favor of an envelope style…it’s for a kid. Kids roll around and smoosh pillows and my Alex has complained about buttons on bedding before, so I thought it would be best to leave them off.

I embroidered the back to match the front.

front and back embroidery

Here’s a close up of the Sulky thread on top and the bobbing thread on the bottom against the blue so you can see it.

close up
close up

I layered the back on the front so that the shorter part of the envelope would be on top when turned right side out.

layering back
layering back

I decided to serge it together. It’s super thick with the batting and again with the idea that a boy is going to be rolling around on it, even though my sewing machine would easily sew it together….I want it to be sturdy and hold up to big squoooshing and smooooshing and many story times and wrestle matches.

Here’s a finished right-side-out top on a finished inside-out top to see how it looks.

finished corners
finished corners

Here’s the finished back.

Pillow Back
Pillow Back

I made a fairly deep overlap for the envelope – again, with the idea of them being play objects…I know if it’s not deep enough, the pillows will squish out the back.

pillow overlap
pillow overlap

And….the finished top!

top finished
top finished

They’re about 19″x19″, which, with the quilting and seams, should comfortably fit 18″x18″ inserts. I used, as you can see, a star embroidery stitch. I have the Viking Sapphire 835 which is pretty awesome but she’s not a full-on embroidery machine, she’s more of a little-bit-of-everything machine, so corners were a bit tricky but I’m still very happy with it. I went for a simple Cars-LIAM-Cars embroidery motif in the center.