
Ah, the faux chenille baby blanket part of this series. Do you remember a year or two ago, you couldn’t get on the blog-o-sphere without seeing another chenille blanket….and now, nothing. You know why?
Because they’re a pain in the ass.
Seriously. Work and labor-wise…they’re more work than a jelly roll racer quilt….they’re more work than most ‘cheater’ charm pack quilts…but they don’t look like they’re that much work…so, you’re all, “here you go!” and people think you handed them rags sewn together. Sigh.
They’re worth it for someone you love, but if someone random person asked for one, I’d have to say, “sure, for $200.” Yeah. And maybe not even then.
I haven’t seen a circle pattern chenille and I thought it would look really cool. I pulled 4 layers of flannel I had: 2 pastel layers are from the Jennifer gift stash, the pink gift pattern is from my mom, and the floral for on top I had leftover from this past winter.
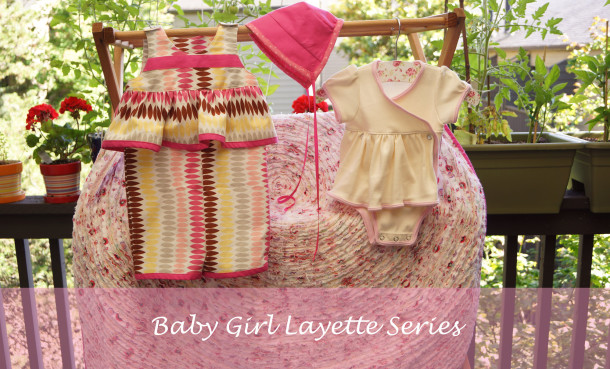
And, of course, the decorator fabric, or the whole side, matches the layette jumper.

I pinned it all together and started in the center…

I used a walking foot – I really didn’t want to draw the circle out and try to trace it with a free motion quilting foot, mostly because I value my sanity. The walking foot keeps things together for the most part and gives an easy guide measurement to just loosely pace the concentric spiral. I was not going for exact symmetry, more going for pretty and fun.

I did make the mistake of quilting with the flannel side up, which made for some pinching on the fabric side. That is bad. I had to rip it out.

I just ripped out the parts where it pinched, drew where I needed to resew and pushed the fabric out while I sewed so as to not resew a wrinkle.

I flipped the quilt at this point and sewed with the fabric side up. Pinching the fabric a bit or warping a bit overall isn’t a big deal as you will see later…when it gets slashed, it will loosen all back up and look fine.

Here it is all sewn together pre-binding and slashing. As you can see, there’s some warping going on. It’s totally ok.


Then you slash the whole thing in between the quilted lines. I used a combination of scissors and a slash tool, which I will explain more in the next post. The slashing process is tedious and prone to many possible disasters. If you’re using scissors, you risk puncturing the top/whole decorator fabric, if you use a slash tool, you’re pushing a tool with a blade through layers of fabric and that may go smoothly one second, and clog and release right into your quilted stitches the next second…yeah. More on that later.
Here it is slashed and bound with Kona hot pink with a little bit of pink with white hearts ala Oh, Fransson! style…however, I think I should have put another section of pink heart fabric because it kinda looks like I just ran out of hot pink Kona. Sigh. Oh well.
Point is, now you can see why the warping isn’t worth fretting over…

Once you cut the flannel side, the quilting integrity is compromised and, essentially, your binding now is keeping the structure. Cool, huh?

It’s sorta hard to imagine what the final outcome will really be like, so here’s the brand new slashed flannel, against a previous chenille blanket that has been washed a dozen times or so:

It become so soft, and squishy and wonderful. Sigh. It’s almost worth it.
After one wash (in cold water) and a tumble in the dryer (just regular medium heat setting), it’s already fluffing up nicely.

And here it is, just casually clipped up on some tomato cages, 3 1/2 stories off the ground. What? The rustic barn scene is played out. HAHAHA.


Hope you enjoyed this episode of Crazy Lady Does Chenille Baby Blanket and I hope to see you next time!
I love this! So beautiful and snuggly. I love your self-deprecating honesty, but I hope you get to pat yourself on the back and gloat a little that you made something so special.
Thank you!
Ok. So I have been searching high and low for someone that didn’t do the diagonal slashes on the bias! Every tutorial says it HAS to be cut on the bias. LIES. Too bad I am already torturing myself and have started my blanket. Unfortunately I will have to tackle this type of blanket again after seeing this much fancier “wow-worthy” circular pattern. Thanks. 🙂