In the name of all that is Stephen Covey and “Sharpen the Saw,” I do try to make myself take time and learn more, refresh what I know, update my tech/knowledge, and make myself a better, more well-rounded person.
Honestly, it’s my ever-supportive husband that is keeping me updated in the tech department, and so I find myself with an iPad Pro & pencil, perfectly timed for my need (want) to update my Adobe skills. Again. This time, my Illustrator and hand-drawing.
Here’s where I’m at NOW:
I’ve never been a hand-drawer. I’ve always relied on CAD, whether CorelDraw or Adobe Illustrator, or heck, you used to be able to break apart Microsoft clipart and manipulate it if you tinkered with it long enough (can you still do that?)… What I’m saying is I’m a dinosaur completely reliant on a mouse. I’ve got mad control with a trackball and the tendinitis to prove it. lol
This is a new series to get where I want to be and:
- keep me accountable
- get any advice from the inter webs you may want to share
- share what I have found as I go along
- I’ve got some hand-drawn patterns and a few ideas up my sleeve. I want to get to the point I can share them.
Now that you know my goals at this juncture, let’s begin.

I signed up for the Craftsy Drawing Fashion Flats class from Laura Volpintesta. I also put out a “help” call on Instagram, and found Laura is not only on Instagram, but she’s sharing really great information there, has a full line of classes, and has a HUGE YouTube playlist.
I’m already learning tons from Linda’s class, but to find out she’s super generous with her knowledge, and very body-positive and diversity-positive, is just the cherry on the sundae.

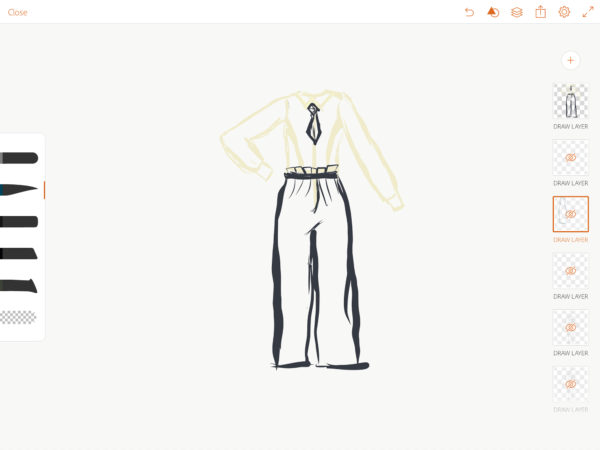
Above is Linda’s croquis imported into the Adobe Draw app on iPad Pro.

This is my first attempt at drawing over Linda’s croquis. I’m hoping to get better – because wow. That’s bad.
Pros of Adobe Draw: I can upload the croquis (or anything) to a library in Adobe Capture, then from that library, put the croquis in a layer to draw over and make visible/invisible as I need. Also, layers. Also, Adobe Draw exports to “real” Adobe Illustrator on my Mac. Ecosystems are a good thing – or at least good relationships between ecosystems. Apple Pencil response is good.
Cons: Brushes are pretty meh and all really the same. Gotta have Adobe Capture (this may or may not be an issue – if you’re used to Adobe, you know there’s always a Suite to anything you want to do…you can never have just one thing.)

This is an app called Paper – just the free version so far. I love the watercolor brush although I can’t help but think it’s hit trendy-status. This is without a croquis and using Linda’s techniques. This is also after a month of (very lackadaisical) practice.
Pros: Apple pencil handles very nicely. Watercolor brush is BOMB, and possibly soon to be as dated as using the word BOMB.
Cons: No upload ability. In fact, I don’t see any import/export capability…other than taking a screenshot. This does not bode well for my continued use. And no layers. AAAAAAAAhhhhhhh. I can’t deal.

This is Adobe Sketch. I just started playing with it last night…so be gentle on my little oil figure.
Pros: That oil brush is fun. I can import/export – see Linda’s croquis underneath my oil girl. Layers, OMG I love layers. I didn’t realize how much I loved layers until I tried to go without them. I like that I can easily change my tools to a series of 5 brushes that I want to use….I think Draw does this too.
Cons: The watercolor brush isn’t as fun or trendy as Paper’s watercolor brush, BUT it has this cool “fan” icon button that you push when you want the water color bleed to stop. So, that’s neat…for 10 minutes (ok, I’m lying, I played with it for like an hour.)
So, what’s next?
That’s only 3 apps. I get it. It’s only February. What should I try next? I see a lot of pros/cons out there for Procreate. Mostly that people not used to, say, the Adobe CC Suite think it’s too complicated, and those used to the Adobe CC Suite think too many tools are being taken away for non-pro usage. Keep in mind, Paper is too…basic for me. Basic? Yeah, I’m sticking with basic. It’s fun, but not fitting my need, how about that? Maybe I’ve already hit what I need in Adobe and need to buckle down on muscle memory/do the work?
Thoughts? Comments? Art critiques?


