Velcro Fails – Making Bibs Part II

After Making Bibs Part I, the rest is really fine-tuning and the pitfalls. Like Velcro. As usual, I’m ahead of myself.

While sewing right-sides together, one must keep a place open to turn the bib right-side-out.

Keep Spot Open
Keep Spot Open


I tried a few places, at first thinking someplace around the neck or fastening area would be less conspicuous, but really found that just an easy 3-4 inches at the bottom of the bib is easiest, and after top stitching, it doesn’t really matter where it is anyway other than the bottom of the bib is the easiest place to line up for top-stitching and turning right-side-out. So,while the photo above shows it at the neckline, I now leave it open on the straight part of the bottom of the bib.

There are all kinds of tools you can buy to turn fabric right-side out and push out corners….

Pushing out fabric corners

The fancy tool I use?

Chopstick
Chopstick

A novelty chopstick. It’s round, has a round top with an aluminum cap so I won’t damage fabric or push through a seam…and it was free. My chopstick and a baby diaper pin is all I ever use to turn fabric inside out, feed elastic or any of those things. Please don’t notice that above, the pattern is upside down. Again. Ha. At the end of the day, as long as I’m using every last bit of the fabric, I really don’t stress about it.

Ok, after turning right side out, press….

Press before top stitching

and top-stitch….

Top Stitch
Top Stitch

Top-stitching is important. Top-stitch ALL THE WAY AROUND. It may seem excessive, especially when you’re making dozens of bibs, but it’s a must. The bib will get ‘poofy’ in the wash, the layers will separate and never quite lay flat together unless you want to iron them every time (oh, hell no!), so this little bit of top-stitching does wonders for the bib to lay flat.

Here’s a photo of a used bib without top-stitching and the insanity of Velcro:

Bib Fail velcro and no top stitch

Velcro. I love Velcro, but it has it’s compromises. Velcro is plastic and there’s just no world where that plastic Velcro isn’t going to eventually chew and slice through the thread that is holding it down. The friction of the pulling, washing and just general usage shimmy that Velcro enough next to the thread, that it will break free. I’ve tried various methods of sewing down the Velcro from zig-zag stitching all around, to the X in the middle that seems popular to my final solution of just going around the outside parameter 3-4 times.

Sewing around outside

As I was making bib after bib and trying them out on my own daughter, her father suggested at one point to make the Velcro longer so that it is adjustable. These are large bibs to give good coverage, and they certainly have room to grow, so it was a brilliant idea to make the neck area adjustable. I sew down the longer side with the “loop” side, or soft side, of the Velcro. This leaves less scratchy, or “hook” side to irritate baby skin.

adjustable velcro
adjustable velcro

And that’s the general method. I buy 1.5 yards of pattern fabric and back it with either flannel or minky, and can usually get a baby blanket and 2-3 bibs out of it. Perfect baby shower gift, charity donation or craft bizarre item.
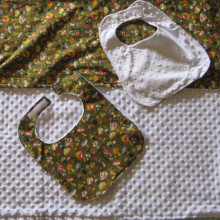
Baby bib and blanket set


Lots of Baby Bibs….Making Baby Bibs Part 1

Portland has had is having a baby boom. A bumper crop of babies. Even friends who didn’t think they could have babies are having babies.

Being that I’ve had a few babies myself and I am also included in this baby boom, I know what I like and what I don’t like out there in the baby product world. One thing I don’t like is the choice of either teeny, tiny baby bibs that are cheap and fall apart or large, comfy baby bibs at the posh boutique for $25 a pop. Riiight. So, I like to make bibs to give away (and keep). I’ve made a few. Okay, I’ve lost count of bibs….

Baby Bibs
Baby Bibs
Boy Bibs
Boy Bibs
Girl Bibs
Girl Bibs

I’ve learned a LOT about sewing bibs. Foremost, I’m not alone in wanting big, comfy bibs! I also learned I cut the fabric pattern upside-down more than I’d like to admit. My baby has a lot of the “factory rejects.”

I started this mecca towards the perfect bib about a year ago when nesting towards the end of my last pregnancy. I borrowed my mom’s 1978 steal body Kenmore and went crazy. I knew of 4 babies on the way and even though I hadn’t done a whole lot of (successful) sewing, I was going to make stuff, dammit.

This is what I turned out in a few days. What you really can’t see, is that the blankets are very eh, I didn’t realize I did most of it with a basting-length stitch (WAY too long) and while the stabilizer worked great with the sock monkey knit, it was not so great with the dots in the minky.

Nesting Pile
Nesting Pile

However, I felt I was really on to something with the bibs.

I had picked up these three pattern packets while at Joann’s with 8 yards of brown and green fine wale corduroy, convinced I have really been bit by this sewing bug after years of my mom praying it would happen:

Sewing Patterns
Sewing Patterns

These three inexpensive pattern packs have been used so many times, over and over. The bibs’ Sew&Sew B5669 has been so used that I lost one pattern of the two in the pack, and the other has been taped to a cereal box. I should explain….I had to make a sturdier template out of it because it wasn’t going to last at this 1-woman-sweatshop rate.

Fruit Loops Bibs
Fruit Loops Bibs
Fruit Loops Bibs 2
Fruit Loops Bibs 2

So….There’s lesson one. Make a cheap template. I can run my rotary cutter around this template and through 3 layers of fabric which cuts my time down. I can pull out this handy template and cut out a pattern from a scrap piece of fabric as I’m seeing there’s enough room as I cut something else.

Superman Bib
Superman Bib

Admittedly, this is when I tend to get patterns upside down – I’m a big fan of words like Pragmatic and Efficient…..and end up biting myself in the butt because I’m too narrowly focused. Makes for a fun learning curve.

Another fun learning curve, PREWASH all cottons. I used some flannel (below) that I had leftover from the faux chenille blanket, which you’re NOT supposed to prewash, and when it shrunk and the prewashed cottons didn’t, it made for some funky curling. It didn’t even occur to me that the flannel wasn’t prewashed because I prewash everything since I never know if it will be clothes or what when I buy it. Le sigh.

Prewash cottons
Prewash cottons

Like I said, with my funky template, I like to cut multiple layers at a time. I just fold the fabric back on itself in 3rds. One of the 3 cut-outs will have the neck-tabs facing the opposite way, but when I cut the backing fabric in a 3 fold the opposite way, they work out matching up.

layers for cutting
layers for cutting
3 cut layers
3 cut layers
matching up the layers

This here is 2 fabrics, each doubled, one with the print on the inside, and then cut all 4 layers at once. Made it a bit wonkier, but the seam allowance is so large on patterns, in my opinion, that it worked out fine.

lots'o'layers
lots’o’layers

Next up….sewing, top-stitching and adventures in Velcro….