Sorbetto Tops Part 2 – Assembly

binding 3, 4, 5

The cons of using a serger mid-project are that, if you don’t have the space to keep your serger out, you have to lug it out. You have to thread it if it’s not already threaded in an appropriately blending color (I often use neutrals and rarely color match thread) and you have to make sure it’s de-fuzzed and oiled and set the tension…all that jazz.

The pros – well. A zig-zag or overcast stitch on my sewing machine takes a LOT longer, do you sew it together first, then overcast it together, then press seam to one side or…I just don’t like doing it anymore. The speed of my serger and efficiency has spoiled me. It’s worth the cons for my usage level.

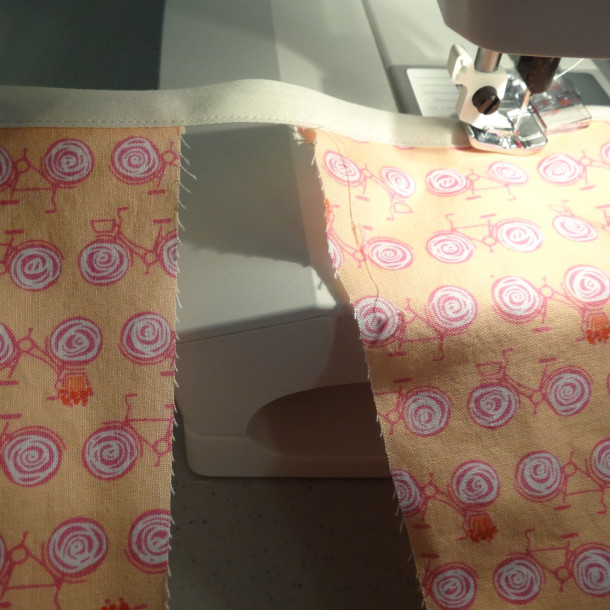
I’ve marked directly on my serger the 1/4, 3/8 and 5/8 inch marks from the knife of the serger. The knife cuts the fabric to the stitch as it goes through.

serger math
serger math

So…if I have a 5/8 inch seam allowance from a pattern, and I serge and cut at the same time to the 3/8 mark, that leaves me the width of the serger stitch, 1/4 inch, to finish the garment.

Knife to needle edge is 1/4 inch:

knife
knife

Finished stitch width:

qtr inch
qtr inch

Not only does it give me a finished edge that will be easy to press open once assembled, it gives me a guide to sew the 1/4 inch seams.

assemble

I removed any serger ‘tails’ of thread by just clipping them instead of threading them back in because it’s going to get sewn back over and encased in bias tape anyway.

I could have sewn the pieces together at the 5/8 inch mark and just done 2 steps in one, but for this light weight fabric and the assembly, I want the seams to be flat on the inside and more polished looking.

Here it is sewn together and you can see the difference between the cream thread which is my sewing machine’s overcast stitch and the gray of my serger:

Overcast
Overcast

And voila, the Sorbettos are now assembled.

ready for binding
ready for binding

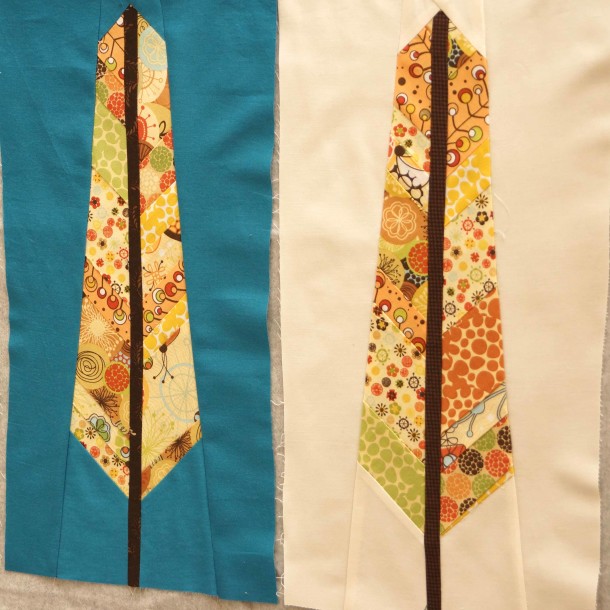
Now, it’s time to choose the finishing bias tape colors. I went through all the solid fabrics I had that might work. I pulled in my (secretly) refined man for a second opinion.

binding 1
binding 1
binding 2
binding 2
binding 3, 4, 5
binding 3, 4, 5
binding 6
binding 6

It was a tough call, but it looks like I’ll be making light gray bias tape. I think it’s called Kona Stone.

winner
winner

Sorbetto Part 1

Sorbetto

So…this mystery fabric is going to be two Colette Sorbetto blouses. One for my daughter, which, by these measurements, is about a size 0-2, and one for me…with my shoulder width on top, I’m going to opt for the size 10.

Details
Details

Now, a note or two about Colette patterns. If you have the choice between printing a Colette pattern, or buying a printed booklet at a store or having it shipped, always go for the booklet. Colette patterns are a thing of beauty and perfection. I’m not just saying that because Sarai is a Portlander too – I don’t even know the lovely lady – I’m saying it because they really are of the highest quality and worth every penny. Regardless, she includes instructions and tips that are unparalleled. I didn’t go to school for fashion or textiles, unfortunately, but Sarai shares her knowledge so that I can be a better seamstress. A Burda pattern is great and everything, but Sarai will remind you always to stay-stitch your neckline or how easy it is to make your own bias tape…complete with free tutorials. How cool is that? Not to mention it’s in a stitch-bound booklet with a pocket to hold the pattern.

Now, after I said all of that…the Sorbetto is a free printable and still includes all of the Colette tips and reminders.

Tip about printing PDFs from online: print from Adobe Reader/Acrobat, NOT FROM BROWSER WINDOW. The browser will most likely want to include the URL line at the top and bottom. Also make sure to click ‘print full size’ when in your print driver window. These are things that will make your print ratio off and that is bad, mmmkay?

The instructions say to print them all, tape them all together and THEN print…you do as you like, this isn’t a complicated pattern and I preferred to cut them all out in the proper size then puzzle piece it together. I did it both ways just to make sure…and yeah, I prefer cutting first.

Pattern
Pattern

This is my uber scientific mathematic way to make sure Haze’s should fit her:

Hazel Pattern
Hazel Pattern

I cut everything out and got ready to do the sewing.

cut and stack
cut and stack

This is me sewing late at night and obviously having a ‘stuck’ moment…’where was I again?’

uuuuhhhh
uuuuhhhh

Oh, that’s right…transferring markings…

markings
markings

This pattern requires 1.5 yards, so for 2, I needed 3 yards. I was a bit short, so I didn’t cut my front piece on the fold. I backed it up, cut it with an added 1/4″ to piece it together. I figure with the sheerness of the fabric, it’s best to have a seam inside the pleat where it won’t show…that’s my theory and I’m sticking to it.

Fudging
Fudging

Here it is pieced together and seam flattened out and pressed….

Fudged together
Fudged together

I think it will be fine.

Oh, more action shots….stay stitching the collar line.

Stay Stitching
Stay Stitching

This is just stitching around the neckline at the 1/8″ mark to keep it from getting wonky as you throw it around and sew it up. That’s Boring, Oregon speak for: to keep the bias of the collar from stretching out and warping the structure of the garment.

I did one dart with it sewn and pressed down:

Darts ironed down
Darts ironed down

And one with the darts trimmed and finished.

darts trimmed and finished

I’m not sure that I have a preference at this point but I’m going to tinker with both.

Do you ever look at markings on a pattern and go, “Yeah, I’ll just put those marks on the fabric right through the pattern! Derp!” No, I’m not breaking out a wheel to perforate and chalk through the pattern. Luckily this pleat isn’t so bad. I marked the top and bottom of the pleat…

Pleat mark
Pleat mark

…then used a ruler to connect my line.

pleat mark close up
pleat mark close up

This is me starting to get really, really tired and happy the pleats are done and sewn down.

Pleats Done
Pleats Done

That’s the one with the seam in the middle…I think my plan worked….

This …this is the point where it is time to sew them together…but first, I’m going to break out my serger and finish my side seams. Handy dandy serger. After some sleep.

Serger Time
Serger Time

Action shots courtesy of Robert Wagner.

Fabrics A to Z by Dana Willard Review

Dana Willard

I went out to Boring, Oregon to hang with my family and the chickens for Easter this year – now that’s a real Easter egg hunt: hanging around a bunch of hens that have free range on a few acres!

My mom had told me she picked up a fabric reference books for me a couple weeks prior….she knows of my fabric habits. As much as I love the remnant bins, they’re not always labeled accurately, if at all, and when you’re donated a box from an attic, it’s anyone’s guess as to what is in it.

So when I got out there for Easter, had already laid out on the lawn for an hour and leafed through the book, I finally really looked at the cover….

Dana Willard
Dana Willard

Of course. It’s Dana Willard. THE Dana Willard of MADE fame. I used her shirt tutorial for the DIY baby clothes, etc. Yeah, so of course it’s great.

I love how it’s set up – it’s clean, concise, categorized by type and has little fast icons up top for what you’d use each fabric for…So often these kinds of guides are verbose, cumbersome and boooorrrring. You know what happens when I get a book like that? I skim it and miss something important or stress on something that is actually not important.

No, this book is perfect.

voile
voile

So perfect, in fact, I used it right away.

In a gifted box, I found this beauty. I didn’t do a burn test (to see if there’s a synthetic in it that melts), but I’m confident it’s cotton from the shrinkage in the wash and the feel. I love the rose, mauve and gray colorway – a muted feminine look to it.

gem
gem

I have no idea how old it is…I know it’s not particularly recent. The selvage isn’t marked with a label. It can’t be a Walmart fabric because I know it was purchased in Oregon and Walmart is too new to Oregon for this to be purchased there….I thought it might be at first because it was pretty stiff/scratchy until I washed it. It softened up quite a bit after washing. So, all of that, it remains a bit of a mystery. According to the Dana Guide (yes, I’m renaming it – my name is better), it fits well enough into the voile or lawn category for me. You can see here, held up to the light, how breezy/sheer it is:

sheer
sheer

There’s just under 3 yards – not made any better by this lovely hack job off the bolt-curve, so, I’ll have to do some creative fabric use to plan around those missing inches…

bolt abuse
bolt abuse

I decided Hazel and I need some matching spring blouses out of it, so I downloaded the free Sorbetto pattern from Colette Patterns. I have the Laurel I purchased, but after quilting so much lately, this will get me back into seamstress mode before I attack the Laurel.

Sorbetto
Sorbetto

I’ll be sharing more of course as I go. For 2 blouses, I need 3 yards, and with that missing chunk that is actually missing on both ends, it will be interesting.

Viking Quilter’s Presser Foot Kit

original FMQ foot

Since I’ve signed up for a few quilting classes and joined the Portland Modern Quilt Guild, I bought the Viking Sapphire Quilter’s Presser Foot Kit. I was mostly looking to add on a walking foot, like I tried to get earlier, but it was less expensive to get the whole kit. Go figure.

It came with a walking foot, a 1/4 inch plastic piecing foot and an open-circle, spring free motion quilting foot. I thought I would be ho-hum about the walking foot, and really into the new FMQ foot, but I’m actually reversed on that.

The walking foot is substantial.

Viking Walking Foot Front
Viking Walking Foot Side

It should have come with a longer bolt to attach it to the machine shank, I’m a bit irked about that, but it works really well. I’ll have to hunt down a longer bolt – right now it stays on if I tighten it down perfectly, but I don’t trust it….there’s just no way there’s enough threads of the bolt in there to sustain it for any lengthy period.

It sure makes for pretty and easy stitching though. These are the feather blocks I’ve been working on, pattern by Anna Maria Horner.

Viking Walking Foot Stitching

I have no idea what those blocks will be turned into; it has batting and stiff canvas as the backing ala Oh, Fransson!, thinking I’ll want a bag or a dust cover for my KitchenAid or something.

Then there’s the spring tension FMQ foot.

spring FMQ foot
spring FMQ foot

I’ve never had a problem with my original FMQ foot….here next to it and I’ve used previously in a few projects….

original FMQ foot
original FMQ foot

but it seems like everyone else uses these spring-loaded ones, so I thought I’d give it a whirl.

It’s….well, it…it makes me scream “WTF??” a LOT.

It will work great…

Viking Spring FMQ Pebbles

And then suddenly my upper tension will go just crazy, like the tension disks are stuck together and will not adjust down no matter what. I didn’t take any photos of the craziness it did on my feather blocks…I just ripped out the crazy stitches put it away before I cried.

But then I used it in class….we intentionally used contrasting threads to watch the tension. I was using 50 wt cotton yellow and gray on white muslin and cotton low-loft batting…

nonono
nonono

Then, there’s the back…see what I mean by WTF?

suckage
suckage

So, then I moved back to my little clip on plastic foot….and it was fine.

Paisley FMQ
Paisley FMQ
Paisley FMQ back
Paisley FMQ back

So…I don’t now. There’s an entire Yahoo Sapphire Group and I swear 90% of the threads (no pun intended) are on this topic alone – the tension and the FMQ foot. I’m seriously considering a Juki for quilting by this time next year….I will not put up with a machine not performing its function. Ms. Viking may just turn into a garment only machine if she keeps this up.

Lastly, it came with a plastic 1/4″ piecing foot. It’s too bad that it’s plastic, but I have to admit, I like it. I’d almost rather switch feet than remember to move the needle to the 1/4″ and back…Ms. Viking resets its needle position all too often, so this is a nice tool. I like the metal guide that comes down and keeps me in place. I like it a lot.

This photo was taken before I forgot I changed to a zig-zag stitch on something else and left this foot on…and put the microtex/sharp needle right through the plastic…so…that hole is a little wider now.

quarter inch foot
quarter inch foot

So….there’s my novella on the Viking Quilt Kit for now. I’ll let you know if that spring foot gets me mad enough to chuck it.

Anna Maria Horner’s Feather Block

Close Up

No one can resist the Feather Block by Anna Maria Horner. It’s whimsical and sophisticated at the same time. It can be used for dedicated fabric or to go through leftover fabric. It has a lot of pieces….but it’s pretty simple.

I have some free motion quilting to practice, but I wanted to practice on things that I was going to use and not just muslin or scrap batting sandwiches. Dangerous? Yes. So…I compromised and made practice blocks to practice quilt on. It all makes sense in my head.

Mom went to McMinnville, Oregon with her BFF to go to antique shops and quilting shops, etc. I love McMinnville. It may be my favorite town in all of Oregon. How can you not LOVE a town that has a sexy Ben Franklin statue?

ben baby
ben baby

Hahahaha. Ew.

Really I do love McMinnville. Mom went to Boersma’s and brought me back a bag of scraps….that doesn’t read nearly as cool as it is…

Boersma's
Boersma’s

Big old bag of really high quality scraps. HAHAHA. She’s going to read this….she knows I love it and that I appreciate it!

Anywho, it was a perfect, already matched up stash to try out the feather block. Most of the fabric was already in perfect width strips for strip-piecing together.

strip piecing
strip piecing

Ms. Horner’s site has the link to the PDF pattern with instructions. Isn’t that SO GENEROUS? I went to FedEx/Kinkos and had them print the pattern pages (2) on 80 lb. card stock so that I’d have a sturdy template for my rotary cutter for a whopping $0.43.

It was really easy, by the way…just walk into Kinkos, ask them their email, email the link from your smart phone, and ask them to print the last two pages on card stock (80 lbs is technically cover stock, if I recall, but whatever – ask for 80 lb weight paper). You can email on their website or whatever, but I find it so much easier to just walk in. No toner/printer/paper fuss. I kept the instructions up on my iPad while I was working. Easy.

pattern
pattern

The instructions are for strips of width of fabric as if you’re cutting strips from a fat quarter or what-have-you, but you can finagle scraps just fine. Sorry about low light photo, whoopsie….but see the lines on the pattern Anna put on? That made it super easy to get the ‘feathers’ lined up so when you piece it, they’re at the same angle to the edge.

cutting pattern
cutting pattern

So, yeah. I started with a Kona Bone/neutral, and tinkered with a bit of teal. I prefer the teal….but if I was going to do a big scrappy quilt and use up all my mismatched scraps, I’d probably stick to the neutral.

Anna Maria Horner's Feather Blocks
Anna Maria Horner’s Feather Blocks
Close Up
Close Up


Target Hacking

Star Wars Framed

As I was making the last round of Star Wars goodies, my daughter asked for some of the green schematic fabric for herself. At that point, it was already almost gone and was sold out everywhere. Ooopsie. I did manage to save 1 print panel for her…meaning, one block of the print as it is repeated on the fabric.

I picked up some clearance frames at Target thinking this would look pretty cool.

Star Wars Framed
Star Wars Framed

Dummy me. Do you KNOW how many D-rings I’ve put in frames and how many photos I’ve set while working for photographers? I know, you don’t, but trust me when I say more than a life time’s worth.

I didn’t even think about it when getting these frames.

I’m slowly, begrudgingly, trying not to kill the cheap particle board frames….eventually, I’ll get these up. But please, be warned, keep this in mind when you see those clearance items at Target and you think, “It’s like I’m losing money if I don’t buy it!!!” So far, with my time included, these are very expensive frames.

Cheap is Cheap
Cheap is Cheap


Easter Dresses And Other Delusions

Old Navy Easter

Theoretically I should be joining the rest of sewing/crafting/quilting bloggerverse and making Easter dresses for my girls and some sort of pastel tie for my boys and man.

That’s just not going to happen.

It’s not that I don’t love making dresses, it’s that I know when I’ve taken on plenty already. Oh, and I’ve taken on plenty.

I’ve got a ‘day job’ that requires at least 50 hours a week not including commute time. It’s a pretty intense job at times that pays alright and gives my family amazing medical insurance – so I kinda have to do that.

There’s also the whole 4 kids thing ranging from 18 yrs to 13 months.

Senior photo by robwagpdx

AND I’ve started my first of many sewing classes. The first to start is the Free Motion Quilting series at Montavilla by Billie Whipple. She’s great. I suspect it will be fun seeing the difference between Billie’s style and the FMQ class I have next month at Modern Domestic. The class at Montavilla is a series of 6 – 2 hour classes. It is so generous of people such as Billie to give their time and knowledge. She’s been quilting for such a long time and has so much experience to give. It’s great. That and my Lordie does she have a feisty sense of humor! That is just perfect for me!

I also have some sort of delusional dream that while doing all of this, I’m going to enter a couple dresses into the Colette Laurel pattern competition.

Colette's Laurel Pattern
Colette’s Laurel Pattern

I’ve started what I’m calling the Julia Prototype. I got a bunch of long sleeve t-shirts on clearance at Target and inspired by some friends from The PDX Breeders Club, I’m making some “semi-homemade” Star Wars dresses.

Julia Prototype
Target Hack!

It’s not quite done. That skirt is just pinned to the top and needs to be serged and top-stitched together still. I’m pretty happy with it though – especially considering I did NO planning and just winged it.

So, back to being an Easter slacker.

I went to Old Navy instead.

Old Navy Easter
Old Navy Easter

April Fools Day Is Coming

action pen

My Clover pen just died. I picked it up at Modern Domestic almost 2 years ago, and the water-erasable fabric pen held out until recently. I really love it. Ink on one side, water on the other, super light touch.

clover buh-bye
clover buh-bye

Of course it was mid-project. Luckily I remembered I had my handy-dandy disappearing ink fabric pen that came with Ms. Viking.

action pen
action pen – photo by robwagpdx

See that label sticking off of it??

no legal documents
no legal documents

Whatever you do, Becky, do NOT leave this at the bank. Or at an H&R Block. Or…at the kids’ school… hee hee hee….

Artistic Director Hates The Props

Home Alone Reboot

I really wanted to take some photos of the Octavia scarf and 3 farmer’s market bags while the rare spring Pacific NW sun was out.

My artistic director had other plans…plans for a really cute mess and modeling with the props.

Chaos Enters
Chaos Enters


A Girl and Her Bags
A Girl and Her Bags


Detail Oriented
Detail Oriented


Did You Want This Here


reset props
reset props


ummmm
ummmm


Who Needs Toys
Who Needs Toys


Life Coach
Life Coach


Infiniwhat
Infiniwhat


Here She Is
Here She Is


I'm Ignoring You
I’m Ignoring You


Home Alone Reboot
Home Alone Reboot


Calliope
Calliope


Gimme The Camera
Gimme The Camera


Enough
Enough

Farmer’s Market Bags – Bias Tape Pockets

spring materials

When I grabbed the peachy pinky bicycle fabric and the pink Kona, I just got 2 yards each because it was a spontaneous purchase and wasn’t sure what to do with it. I knew I plenty of other matching fabric anyway. So, after the infinity scarves, I went with this grouping to make 3 more farmer’s market bags.

spring materials
spring materials

I didn’t quite have enough of each Kona shown to make the bags match and that’s fine. There are 2 bags with the pink bag lining and white pocket lining, and 1 bag with the cream/cream.

What I DID learn this time around is that my binding foot is PERFECT for this project. A little bit of cream bias tape to top the pockets – 3 sets, making 6 total pockets, would appear to be a pain but with magical binding foot it was a breeze.

chain pockets
chain pockets

I just chain-stitched them all together. Once the foot and bias tape was set up, it was just a matter of feeding in each pocket top (after the lining was sewing on of course). It’s kind of like making banners. Or, bunting, I suppose is popular to say now. Thanks a lot Downton Abbey.

feeding binding foot-fitting fabric in
make sure fabric doesn't snag on foot
make sure fabric doesn’t snag on foot

I cut the bias tape a little over an inch from the end and just let it feed through.

end binding
end binding

Then easy peasy snip them apart. The edges get sewn into the bag sides, so it’s really not a fussy add-on.

chop chop
chop chop
binding foot edge
binding foot edge
all pockets
all pockets

Later, after the kids went to bed, I finished the bags up while Robert took action shots.

6 strips for handles
Sewing on Handles
Sewing on Handles
fancy straps
fancy straps
Farmer's Market Bags
Farmer’s Market Bags
fini
fini

Kid Crafts – Backstitch

bin'o'floss

I had this BRILLIANT idea that if I got the 7 and 8 year old little plastic embroidery grids to practice on, they’d be busy crafting while I could sew. HAHAHAHAHA. I am dumb.

bin'o'floss
bin’o’floss

Little did I realize that just because they’re practicing a backstitch for a few hours, does NOT mean they won’t need floss cut every 5 minutes and their needle rethreaded.

They did great for their first time.

Alex Bookmark
Alex Bookmark

Next thing they are going to learn is how to thread those needles. My mom got Hazel this cute sewing basket. Actually, I think it was her church quilting group. Anywho…I need to put one together for Alex too. With needle threaders.

Hazel Bookmark
Hazel Bookmark


How To Iron Pellon

Farmer's Market Bags

As I’m finishing up these farmer’s market bags, based on the Fresh Lemon’s design again,

Farmer's Market Bags
Farmer’s Market Bags – photo by robwagpdx

I thought I’d share my Pellon epiphany.

Stabilizers and I have our moments. I think you have to get a ‘feel’ for them. Er, I think I have to get a feel for them. I think I’m getting it. Steam-A-Seam, I press for a long, long, long time. Think…slow roasting a marshmallow. Takes time to make it gooey and sticky. Pellon on the other hand is more of a quick, hot steam…but not too quick…but the great thing with Pellon, so far, is that I can flip it over and see how I’m doing.

Pellon
Pellon

This helps me get a feel for it and how I’m doing. I’m getting better.

Good thing Oh, Fransson! has put up this bag with a pattern tease.

I will be getting that pattern and obsessing over that next.

BTW, while I’m on the topic of the incredible Ms. Elizabeth Hartman, if you go to her blog and pour over her posts and books, you can see why I’ve signed up for her two upcoming classes at Modern Domestic.

So, when I mentioned upcoming classes, it makes more sense now, huh? There’s a LOT of other classes at MD that I’d like…but it’s a bit of a trek for me from deep SE PDX to NE PDX and child finagling, so this was a good leaping off point. I need to observe/learn some more FMQ and I’ve not done text quilt blocks…that’s going to be fun.

The art-cycle class would be fascinating and I would love the quilt frame basics class…but I think I’ve got enough on my plate for now. Oh, and I want to get the new pattern released from Colette at MD this week too…..so, yeah, that’s enough.