This set is going to deviate a little bit in that I’m adding in a pair of pants for my 8 year old girl, Hazel…my very tall 8 year old girl, that I used a modified size 10/12 same as in the end of this post. So, this is really Cheap Baby Clothes and Big Sister Pants. I have to do this while they still let me make them matchy stuff.
I used only half of my left over knit binding from the previous set:
Roll of Binding
and 2 yards of this glittery green business…I still have about 1/2 yard left…but I’m going to $0 it out for later.
Sparkle Motion
I used the same patterns for the baby that I did in the first two sets of the series. For the girl, I re-used the Burda Kids 9482 pants. I know I got it on sale, because who pays retail when they can avoid it? But I’ve also already used it, so I’m going to $0 it out. In fact, I’ve used it quite a few times. It’s a great basic pattern and beyond easy, not to mention knit fabric and serger friendly.
It was genius, genius I tell you, to get that roll of binding done. I cut my patterns, pinned and sewed them all at once. Easy peasy. Ignore my pinning – I hate pinning unless I have to…and then it’s obvious I’m severely right-handed.
Sleeves With Heart Trim
As you can see…it’s a reverse of the Mill End set.
Sparkle Motion Set
I really think I *may* have made one of those sets that will embarrass them some day. I’m going to hold on to it so I can be sure to get a group shot. I still have some of this dance-troop fabric left…I think I can make Hazel a matching shirt. I’ve already got some gray pants under way for Alex too….oh, they will hate me during the teen angst years. Bwahahaha.
OK, nuts and bolts. This was a bit more at $9 a yard on sale, plus that’s 2 elastic waist bands at $1 each = 3 items at the magic number $6.66 each. Coincidence?
To lighten up THAT little bomb, here’s a photo of my blurry angel in the Mill End set.
Action Shot
And here she is still….but obviously ready for a nap…
Zoe
She had enough of me combing her hair…she took both of the combs away.
People who sew are packrats. We save old clothes and you can’t throw those shredded jeans out and I can use that nasty old single sock for something and…ok, maybe not that last one in my house but I’ve seen it happen.
In this lovely pile are a few things that are 4 years old or more. In it is also a decent quality kids’ pattern knit remnant I picked up at Joann’s. I always scan the remnant bins at Joann’s for fusibles, muslins, knits, ridiculously impractical flowy things for dress up bins and to practice on…because each remnant is 50% off current price. I say decent quality because it has a pretty good thickness/sturdiness to it.
Fruits N Flowers
I don’t recall exactly how much I got it for, but it was only a 3/4 yard, and the fabric is called Fruits N Flowers still at Joann’s…so the MAX I could have paid was $4.86 ((3/4 of 12.99) / 50%).
I sliced up an old nightgown of Hazel’s from a few years ago for the 2″ binding that I would need. The nightgown was from Old Navy and held up pretty well but more importantly it’s really cute cut at an angle and serged with a cream thread.
Hazel’s Old PJs
So, there you go, I “upcycled” an old cheap nightgown! Haha. See, there’s a good reason we’re packrats….eventually.
Finally, I used all the same patterns and steps from the last DIY baby clothes post and voila! Cuteness!
Baby Outfit w Upcycle
Here is the outfit in action at Hopworks Urban Brewery for a lunch date with other ladies and their babies.
Zoe at HUB
Then after lunch, drinking a bottle before nap-time, doing her best Kanye impression…
I’ma Letchu Finish
Now, here’s a little secret. I actually made this one first….it’s true. It was my test run. On the previous post with the next sets…I adjusted the neckline a bit to tighten it up and lengthened to cover the tummy area for these times when the Kanye urge strikes. All the rest will be in order.
Ok, money. I forgot in my last post about elastic for waistbands. I buy my elastic in bulk from Dove. I use about 20″ at a time for the baby and about 24″ at a time for the bigger kids…so 12 yards = 432 inches. I don’t recall, but even if it was $20 total with shipping, $20/432< $0.05 per inch. I’d say it averages out to about an extra $1 per pants/skirt. Obviously does not apply to shirts.
This was 2 garments at $4.86+$1=$2.93 each.
Next up….that leftover fabric from first post made into binding…and some fabric that reminds me of Sparkle Motion….
I want to prove that I can do better for less than even clearance clothes. I picked up some knit pants and a shirt for Zoe in size 18 months at Fred Meyers (aka Krogers) for the clearance price of $4.97 each…let’s round and say $5. It doesn’t get much cheaper than that and they look it – we’re talking hot pink velour and leopard print, hey-oh!
So I pulled out a pile of knits fabric and scraps including a 1 yard remnant at the Mill End Store for $4.99…again, rounding to $5.
Pile of Knits
I took an old onesie in the 9 month size to take apart and make an upsized pattern. Now this part is not an original post, per se, nor is saving money without sacrificing quality. I can’t improve on Dana…I don’t really think anyone can…she is the master of the deconstruction process, and my shirt pattern is based off of her pattern tracing and her 90-minute shirt that she posted almost 5 years ago! So, yeah. This is partially inspired by Dana’s hard work and you can either follow her tutorial or buy a pattern. The pants pattern I already have been using for about 9 months.
An added bonus of working with knits is that the bolts are ~59 inches wide…so a yard is almost 5 feet by 3 feet! Yatzy! On my first cut, I fit 1 baby shirt and 1 pair of pants.
Max Fabric Usage
Note I folded in the pants on the side seems as I only need 1/4″ seem allowance – your mileage may vary. I’m also using a serger for most of my knit construction which makes using a 1/4″ seem allowance a LOT easier. On my second cut, I got another full shirt pattern and approximately 5 yards of 2-inch binding strips which I’ll get back to later.
Max Fabric Usage
Now, if you’ve read Dana’s tutorial, you’ll know I’m loosely following her instructions. I only want 2″ binding strips; I believe she used 4″ strips and ribbed….this is partially just aesthetic so do what you will. Regarding direction of stretch fabric and cutting, I just try to remember which way I want it to stretch over the head/butt and cut that way. I don’t want to get bogged down into what Creative Gemini has already discussed better in a video here.
I cut strips from a sparkly greenish fabric from Joann’s and serged the edges in gray. I used 1/4 yard that I got as a remnant for $2.50 when I bought the rest of a bolt.
2 Inch Binding Strips
When I can, I try to sew in what I call “production mode” and sew in groupings such as serge all the binding, sew on all binding, serge all edges that can be serged at once…etc.
Mass Production BindingSerged SleevesBody Pieces
After constructing the shirt, I did the bottom binding last. I increased it to 3″ and pinned it a bit lower to add a bit more length to keep baby belly covered better. I used a sewing machine to sew on the binding and sew in the sleeves as I know how. I’m only adding in photos of the few things I’ve done a bit differently than Dana, but more or less it’s the same as her tutorial. For the pants, I followed the pattern directions albeit altered for serging.
Bottom Binding
For this project, here’s the final grouping.
Final Amount
Keep in mind that there is a lot of 2 inch binding to use which I will $0-out on a later project. My pants pattern was something like $2-3 a dozen pairs of pants ago, so I’m calling that a wash. I made the Dana tutorial shirt pattern which was free (thank you Dana!)
So, fabric total is $7.50 divided between 3 articles of clothing = $2.50 each
Stay tuned, there will be more. I still have 2 yards of that sparkly, “may crock” fabric, a really bad clearance/remnant bin habit and kids that won’t stop growing. I may even throw in some trendy “upcycling” jargon.
Ok, ok, so the thread is negligible when buying in serger-sized bulk, and my serger happened to be a gift from my awesome mom. My sewing machine was not a gift and is in what is called the mid-price range but I can’t really price machines out or their value as that’s up to the individual user.
Next to my rotary cutters, my bobbin winder is my favorite sewing gadget. I have the Wrights SideWinder I picked up with, you guessed it, a coupon at Joann’s.
I haven’t even figured out how to use the bobbin winder on my Viking – why? This little guy does it fast, easy and I don’t have to rethread my machine, stop a project, change thread colors…and I can do a dozen in a few minutes with no hassle. My Viking has very specific bobbins, but I’ve also used my winder with an old Kenmore and a Janome and it works great on all 3 very different bobbins.
Vikings in particular are very….particular. This is my bobbin.
Viking Bobbin
Most (newer) bobbins have a thread hole you pull the thread through before winding to keep it secure until it has a few rounds of thread in it. My Viking logo has to face down on my winder to get the thread the right direction and depending on your machine, that may not be necessary. My little Swedish bitch is picky, though, and everything has to be name brand.
Empty Bobbin on Winder
I pop the bobbin on, slide the guide to the bobbin – when it reaches thread capacity, it turns the winder off. I lightly hold the string from the hole and let the winding pull it from my fingers – that is my highly technical way of getting the thread started.
Full bobbin
When it’s done, it stops. I pop off the bobbin, trim the thread, and do it again.
Bobbin Winder
Here is the whole machine in action…again, my fussy Viking likes Gütermann thread or better…so I buy the big spools usually in neutral colors like cream and gray – a trick I learned from mom the quilt master.
That should be capped. Mom The Quilt Master. It’s a reverent title.
Your mileage may vary – just do the thread test: if you can pull on the thread and it snaps easily, it’s going to snap in your machine. That is bad. Save it for basting, or what I like to call, hand-sewing that there’s no way in hell I’m going to do.
Pile’O’Bobbins
This pile makes me happy. I will still scream in pain as if I was bit by Cujo every time my bobbin runs out and I notice after I’ve gone several inches along…but it’s a little less dramatic if I know I have a pile of bobbins waiting to fill it.
I don’t know what it is about moving into a new rental, but I always go through the same series of steps:
I don’t do anything to make it “home-y” because it’s temporary.
I get tired of it not being home-y because it’s boring so I do a few things to make it better.
I get really frustrated because I should have just dug in and made it great and now I’m going to put in the effort.
I still will not paint, because I know me…and I know when we leave I’m not going to want to re-paint. I’ve done that and even a little Chinese red guest bathroom is a monumental chore to turn back to white when all you want to do is move on.
These next few months are going to have a lot of ‘fixing the home’ thrown in with my usual sewing/cooking/family adventures.
Today is fabric starching. This is an old, blurry, worn out photo of me in 1979. The wall behind me is not wallpaper, but starched fabric. I’ve mentioned before, my mom is amazing.
1979
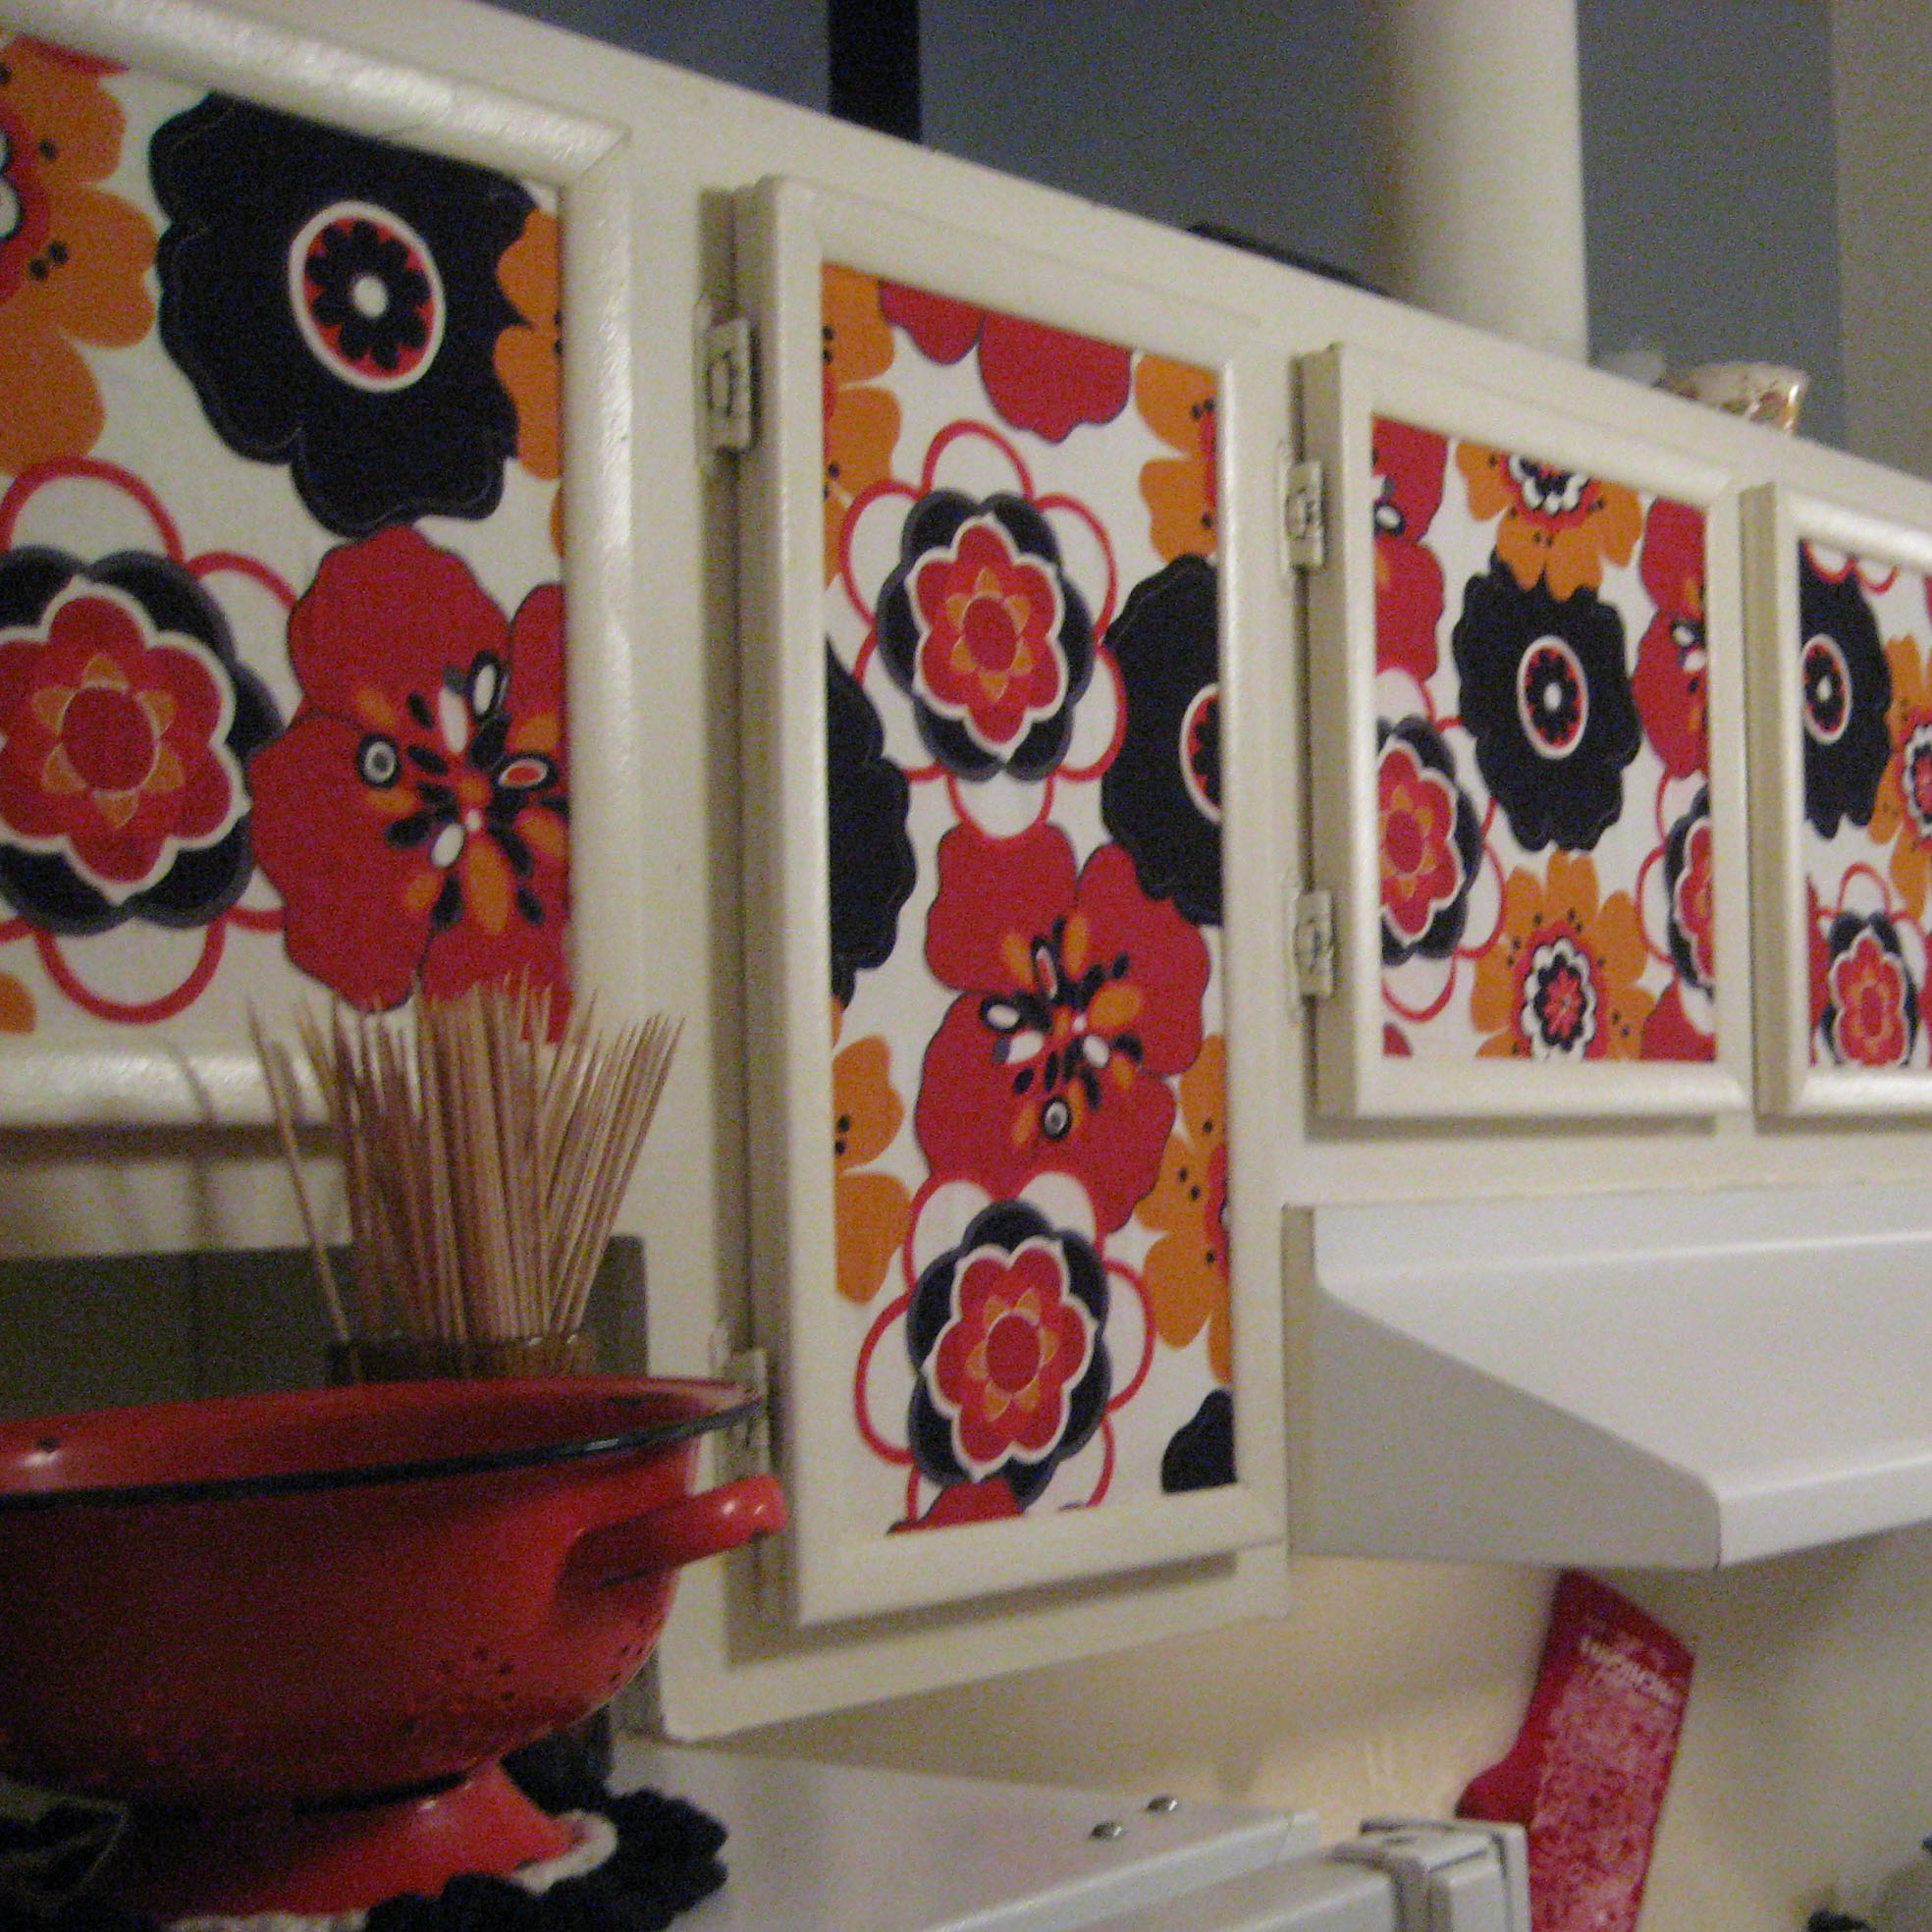
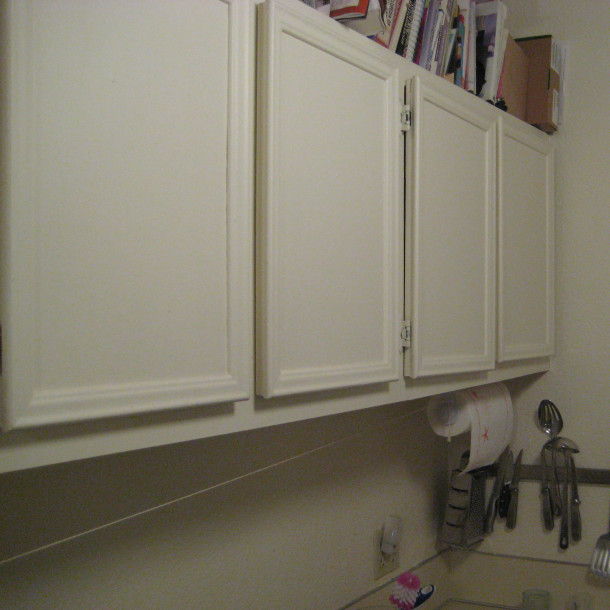
First, start with boring, ugly, beat-up cabinets. Give the surface a good wipe down just to make sure your starch will stick.
Boring Cabinets
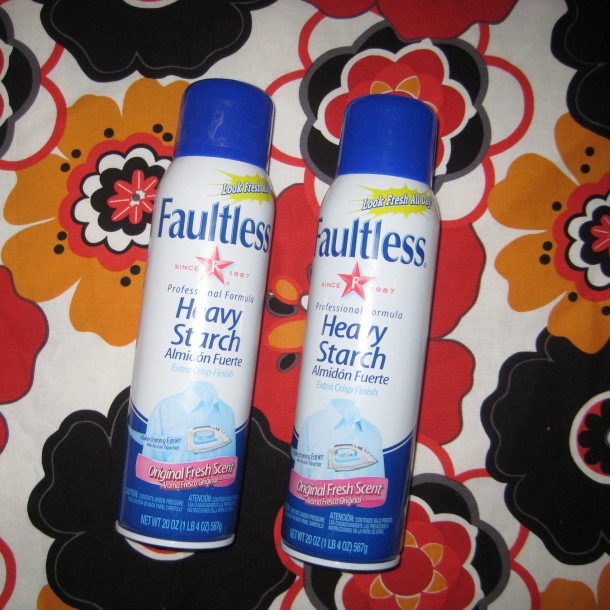
I went to Target to get starch. I wanted to get the liquid in the jug kind to dip the fabric, but they didn’t have any. These 2 cans of spray starch, little did I know, would be even better. They were priced at 95 cents each and had 55 cent coupons on them, so this was less than a buck. I’ve read tutorials where people used cornstarch but I have a healthy fear of insect infestations. Food-based starch = potentially nasty bugs. No thank you. Your phobias may vary.
starch
I used about 4.5 yards of fabric for a mid-sized apartment kitchen. So, at Joann’s, this Alexander Henry fabric is about $13 a yard, and with a 40% off coupon making 5 yards for $25.
Alexander Henry Kleo fabric
I highly recommend pre-washing your fabric. This will help prevent any color bleeding that may occur and put you back at square one for repainting when you leave. Also, it will help prevent shrinkage as it dries after starching.
Measure once, then measure again. Write it down unless your brain has fewer holes than mine.
measure twice
Measure every cabinet. You will be surprised how one is actually a half an inch larger than the one next to it. Superior architecture in apartments and all….my little cabinets over my fridge are a half an inch smaller in width than the little ones over the stove vent. I would have loved to have been at the planning meeting for that one. No, not really.
I didn’t take a photo of me cutting the fabric…I’m pretty sure you can figure out how to cut fabric…I used my mat/rulers/rotary cutter because I’m slick like that, but a pair of scissors and squaring up on a book should do just fine. You’re going to trim the fabric to the cabinet later anyway, so don’t sweat it too much.
Spray the cabinet on the top lightly to ‘tack’ the fabric to it so it will sort of hold…and get ready for your house to smell like “Fresh Laundry Scent” aka turn on a fan.
spray cabinet
Hold the fabric and spray the sh*t out of it. Really saturate it. Like…dripping off the cabinet kind of wet.
hold fabricDrippy Mess
Smooth fabric out and down as gently as possible. I tried using a sponge, but ended up preferring my fingers to smooth out the bubbles versus the lumpy texture of a million layers of apartment paint. Also, I found the sponge stretched the fabric too much. I did use the sponge to dab the excess starch and catch some of the drips.
Gentle Dabbing
Like in this fuzzy picture, use your ridiculously long thumb nail or a butter knife to press into the corners if your cabinets are framed like mine. If not, ignore this part.
Press Into Corners
You’re going to have some overlap as the fabric gets wet and stretches a bit. This is an easy fix. Depending on the quality of your fabric and whether or not you pre-washed it, it will shrink up some after it dries. The rest is easily taken care of.
Overlap
When it’s dry in a couple hours, you are going to take a MF-in’ SHARP box knife and slice the fabric excess. Unless you’re afraid of marring the cabinets…then just pull away slightly and trim. Don’t worry….it’s ok….just wait and see….
SHARP Box Knife
I went through 2 blades, both sides. The fabric peels away SUPER easily.
Easy Peel
And whether you pull away and cut or use this method, you’re going to get some fray and peeling. It’s ok. Don’t freak.
Don’t Freak
You were a genius and got the uber cheap spray starch, right? Right. So just spray that little corner, dab it back down, smooth any threads, and you’re golden.
Check on your adorable helper and make sure they’re doing alright.
This took me a weekend’s time but if you don’t have kids/meals/craziness you would easily get this done in a day and, again, less than $26. You have no excuses. Get off your butt and fix your kitchen!
I’ve updated this post here. Better camera, better photos, better tutorial, less editorial. 😉
I really think that sometimes people like getting offended just for the sake of being offended. Or they like to argue, get their panties in a bundle, feel personally affronted….all because they are bored with their lives. These people must have all kinds of extra time on their hands that I just can’t fathom and, honestly, wouldn’t want. I like being busy.
Let’s take spray baste as an example. You mention spray baste on a quilting forum and you’re going to get a lecture on how you should really put 5000 pins in a quilt while in a cabin in the woods while making your own goat milk cheese because spray baste is so toxic and the fumes and you’re going to die and it’s so bad and evil…from people typing this on plastic computer, using wifi, with minerals from slave labor in the African Congo….yeah. I don’t want to hear it. I just wanted to know how to get off too much spray baste.
I like spray baste. I have a can of June Tailor right now and it’s just fine. At least I think it’s June Tailor…I don’t really care. It works. I sew woven fabric to minky a lot, and it’s a life saver. See. I make cute stuff:
Baby Shower Gift Set
Minky, with all the pins in the world, using whatever foot you want, serger or sewing machine, will stretch, move, go to 7-eleven, and make sewing really difficult. Spray baste solves that. It’s a light, tacky spray that just barely holds the two together long enough to get the job done, which is all I require of it. I can adjust the minky over and over until everything is together, and it stays together through sewing.
spray basted, adjusted and cuttingsewing together
Now, occasionally, I will get a little heavy handed with the spray, as anyone will, and there will be some residue, which will grab lint in the washer and you’ll get something like this.
The Gunk
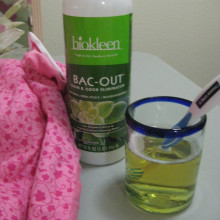
I looked for help, hence the rant about zealots. The most helpful person was Julie at Crafty Quilter but it wasn’t quite enough info as she’s a pro and I screw up. So, I went through a few cleaners, of course all non-toxic, super good for the environment, blah blah blah to find what would work to clean it off…ok, mostly to find what would take off the adhesive but not melt the minky or stain the fabric. I love, LOVE Bio-Kleen products. The Bac-Out is better than Spray’n’Wash x1000 and the cleaner/degreaser stuff is wonderful for everything else and can be quite strong depending on the concentration level. Did. Not. Do. A. Thing.
Bac-Out cleaner
Then! THEN!! I remembered my friend, Sabrina. Oh, Sabrina is a goddess of stage and performance. The woman wrote her college thesis on corsetry. CORSETRY! That blows my mind. I’m not sure I even know how to spell cooorrrssseeetttrrryy. Anyway, Sabrina is the person theatres call for help and one time she was telling me about working backstage at The Lion King, and how they spray down the costumes in between with alcohol in spray bottles. Sometimes, they use 50% diluted cheap vodka in a spray bottle.
Vodka!
I don’t drink because I become an entire episode of Cops if I do, BUT I do have isopropyl alcohol on hand because when you have 4 kids, there will be blood.
Oh, hotdog, that did the trick! Just brush in one direction with toothbrush dipped in booze99% isopropyl alcohol and it comes right up.
toothbrush magicnot VODKA!
Open a window if you get high from the fumes, throw the blanket back in the wash one more time so the baby doesn’t get high from the fumes, and you’re golden.
I was really hoping I could give you some really great post on how “even though you don’t sew, you can make a cute baby shirt” but that isn’t going to happen.
Iron-on appliqué sheets, various types of iron-on stabilizers and iron-on clothing patches are all over fabric and craft stores. I’ve had varying degrees of success with each. The cheap iron-on patches by Dritz are rock-solid. Sure, you’re melting plastic with your iron and making some crazy, stiff, oddly-colored patch, but it works, if you don’t mind feeling a little extra 1970.
Iron-on stabilizers and things like Dritz stitch-witchery for lazy seam repair, while I love, I know do not last more than a wash or two. That’s fine, that’s all I really expect out of them. I often buy the remnants of thin stabilizer in the bins at Joann’s when I see them. I have yet to do any bag or purse projects, so I haven’t really gotten into any of the heavy stabilizers. I mostly buy the stitch-witcher and the light-weight stuff.
So, when I picked up this magical package, I really thought I’d have fun, quick, easy Christmas presents AND a recommendation for all the new moms I know that don’t sew.
Well, I’m not letting these cute pictures go to waste. I cut out my templates and fabric first.
z for zoe
Then, removed the wax paper on the first side of the stabilizer. I arranged the objects to be adhered so that I got quite a few on one sheet.
Stencil Top Side
They advertize that it’s stick for temporary bond – and, yes, it is a little tacky. It’s not as tacky as, say, spray baste or scotch tape, but it has a little stick to it. I cut out my shapes from the stabilizer.
Stencils Cut Out 1
You can see after taking off the 2nd side of wax paper, it’s a plastic stabilizer.
Stencil Cut Out 2
I placed the stencils on the onesies and pressed for the 10 seconds the instructions said to press for – even a bit more on the StarWars appliqué as I did it later. I overlapped, I followed the instructions….and, DAMN, they are cute:
Stencils Ironed On Onesies
So, the next day, I put Z for Zoe on, well, Zoe, and before I even left for work in the morning, her Z was peeling off.
Craft Fail
The Z was some left over minky, and I gave the benefit of the doubt (although it was peeling of the cotton onesie) and put the heart version on her a few days later since it was a simple quilting cotton. It was starting to peel up from the edges by lunch.
I may not understand the meaning of “permanent” or maybe I got a funky batch, but Steam-A-Seam will not be recommended or used by me again. If I’m going to have to sew over a stabilizer anyway, I’m going to use a much lighter weight (and less expensive) version.
UPDATE:January 9, 2013 – as of now, the cotton heart and StarWars patch are still on after multiple wash and wears. It appears that just the edge started peeling up and I don’t know if the heat of the dryer “set” them better or what, but they’re still going strong, albeit stiff feeling. The “Z” got stitched down. There was no saving it. So perhaps the lesson is don’t use it with synthetics?
Portland has had is having a baby boom. A bumper crop of babies. Even friends who didn’t think they could have babies are having babies.
Being that I’ve had a few babies myself and I am also included in this baby boom, I know what I like and what I don’t like out there in the baby product world. One thing I don’t like is the choice of either teeny, tiny baby bibs that are cheap and fall apart or large, comfy baby bibs at the posh boutique for $25 a pop. Riiight. So, I like to make bibs to give away (and keep). I’ve made a few. Okay, I’ve lost count of bibs….
Baby BibsBoy BibsGirl Bibs
I’ve learned a LOT about sewing bibs. Foremost, I’m not alone in wanting big, comfy bibs! I also learned I cut the fabric pattern upside-down more than I’d like to admit. My baby has a lot of the “factory rejects.”
I started this mecca towards the perfect bib about a year ago when nesting towards the end of my last pregnancy. I borrowed my mom’s 1978 steal body Kenmore and went crazy. I knew of 4 babies on the way and even though I hadn’t done a whole lot of (successful) sewing, I was going to make stuff, dammit.
This is what I turned out in a few days. What you really can’t see, is that the blankets are very eh, I didn’t realize I did most of it with a basting-length stitch (WAY too long) and while the stabilizer worked great with the sock monkey knit, it was not so great with the dots in the minky.
Nesting Pile
However, I felt I was really on to something with the bibs.
I had picked up these three pattern packets while at Joann’s with 8 yards of brown and green fine wale corduroy, convinced I have really been bit by this sewing bug after years of my mom praying it would happen:
Sewing Patterns
These three inexpensive pattern packs have been used so many times, over and over. The bibs’ Sew&Sew B5669 has been so used that I lost one pattern of the two in the pack, and the other has been taped to a cereal box. I should explain….I had to make a sturdier template out of it because it wasn’t going to last at this 1-woman-sweatshop rate.
Fruit Loops BibsFruit Loops Bibs 2
So….There’s lesson one. Make a cheap template. I can run my rotary cutter around this template and through 3 layers of fabric which cuts my time down. I can pull out this handy template and cut out a pattern from a scrap piece of fabric as I’m seeing there’s enough room as I cut something else.
Superman Bib
Admittedly, this is when I tend to get patterns upside down – I’m a big fan of words like Pragmatic and Efficient…..and end up biting myself in the butt because I’m too narrowly focused. Makes for a fun learning curve.
Another fun learning curve, PREWASH all cottons. I used some flannel (below) that I had leftover from the faux chenille blanket, which you’re NOT supposed to prewash, and when it shrunk and the prewashed cottons didn’t, it made for some funky curling. It didn’t even occur to me that the flannel wasn’t prewashed because I prewash everything since I never know if it will be clothes or what when I buy it. Le sigh.
Prewash cottons
Like I said, with my funky template, I like to cut multiple layers at a time. I just fold the fabric back on itself in 3rds. One of the 3 cut-outs will have the neck-tabs facing the opposite way, but when I cut the backing fabric in a 3 fold the opposite way, they work out matching up.
layers for cutting3 cut layersmatching up the layers
This here is 2 fabrics, each doubled, one with the print on the inside, and then cut all 4 layers at once. Made it a bit wonkier, but the seam allowance is so large on patterns, in my opinion, that it worked out fine.
lots’o’layers
Next up….sewing, top-stitching and adventures in Velcro….
Freezer paper crafts are all over the internet and that’s all well and good, but what do you do when you didn’t buy the freezer paper when you saw it, and couldn’t find it the next time you went? You buy a ginormous roll of plain white contact paper for $5!!! It will last me well past the adhesive turning to a gummy, sticky mess inside the roll. Uh…that part might not be a bonus.
Anyway, Joann Fabrics and Crafts will have a sale on t-shirts at least every other month or so when they run about $3 a pop. You’re, like, losing money if you don’t buy them for your kids. Kids grow so fast and ruin things so fast that at $3 each, there is no better deal. That, and you can afford to get a $5 pack of fabric paint and some freezer (contact) paper. Honestly, I don’t remember how much the pack of fabric paint was, but here they are at Michael’s Craft Store. Paint pens are really silly when you think about it….they’re impossible to write with…they just make big globs. Anyway, I’m getting ahead of myself.
I printed a few options for the kids to choose from in making their stencils. Hazel did the Autobots Transformers symbol, Alex did a spider and I sorta winged a shot at Totoro. I just did some Google searches in images, tweaked some in PhotoShop to get make them cleaner and black/white, and the spider was actually just a stock Adobe image.
Transformer Stencil
Tape them to the contact paper at the sides. I used a box knife to cut the pattern out, but if you have an X-ACTO set, that might be a lot easier. Obviously, this is a grown-up job. I did it on a self-healing Olfa mat, but, again, cardboard is great. It may not be pretty, but that is what tape is for.
Cutting The Stencil
Peel the backing off the contact paper, and stick it to the shirt. Use tape to fix any cutting errors on the contact paper. The paint will bleed through the fabric, so put something between the layers of front and back, or you’ll have the front glued to the back with the paint that leaked through. I had some plastic wrapped canvas stored for more painting projects from another sale, so I slid those in between. Cardboard would work fine or even a plastic bag flattened out.
Cut, Taped and Ready StencilSpider Stencil
Now it’s time to paint. Like I said, the name “paint pens” is sort of a misnomer in my opinion. You can’t really write with them, however, they do allow for controlled amounts of paint which is a good thing. We each put out a glob of the color we wanted, and used our fingers to smear around in the area to be painted. This works well – just keep in mind, big globs left behind leave big, hard, plasticky dried paint spots. When smeared to a light, but saturated, coating, it dries pretty nicely and is flexible with the fabric.
Painting With Paint Pens
In my experience with this and other stencils, you want to leave the stencil until the paint is still tacky, but not dry. If you wait until it dries, you run the risk of the stencil being glued to the shirt by the paint. If you do it while it’s too wet, there can be smearing or leaking/running paint. We did this on a fairly dry day outside (in Oregon, that’s saying something), and the paint was tacky in an hour. I left some of the detail bits in the Totoro stencil too long and had to pick them off with tweezers and a bit more force, but nor harm/foul assuming I never wanted to use the stencil again. I think one homemade Totoro t-shirt is plenty for me.
Will I do this again? Yes – but I admit I’ll probably try real freezer paper next time to see if it’s a little more wieldy and easier to cut. But the fabric pens were great – really easy, fun to use and what a fun, cheap day.
My amazing man got me an iPad and one of the first books I bought on it was the Burda Style book. It’s really quite the steal….you get the book on your iPad, or Kindle or whatever, and you get the code to go online and download the patterns! At the price of patterns, it’s like buying a book and getting patterns for free. Or..buying the patterns and getting the book for free…
Obviously I have an issue with the whole concept of “what came first, the chicken or the egg” thing. Same goes with patterns and fabric. As I flip through the Burda Style book or any other blog, book, magazine, whatever…it’s like cooking or anything else for me. I sort of make a mental note of what is interesting or the gist of how to do it, then keep perusing at my leisure. Each pattern, or with the analogy of cooking, recipe, states exactly what you need as if I’m going to be a good little girl and notate it all, go to the store and get every exact thing so that I can make it just like it says.
Burda Style book
HAHAHAHAHA. Never!!! My brain doesn’t work that way. I go waltzing into Joann’s or I’ll be online at fabricworm.com, it doesn’t really matter where, and I may go in for something specific, but I’ll also walk out with a fabulous bolt of coral polyester chiffon-type-thing that was on clearance for $4/yd or three yards of this yellow bird fabric even though I only needed one yard because I love it. THEN I find things to do with it. This works for me…it’s a nagging reminder on my shelf of money spent that needs to be put to use. Besides, polyester chiffon-type stuff is my Moby Dick at the moment and who isn’t a glutton for punishment?
I’m quite interested in this process for others…not that it’s going to have a damn bit of impact on me, but I am curious. I also picked up Sunday Morning Quilts while I was laid out sick, wanting some good eye candy, and the authors both discuss their fabric buying habits so I know I’m not alone. I’ve had discussions with friends on the twitters about recipe/grocery buying habits as well, and find it a similarly fascinating subject. I don’t think there’s any wrong or right way as long as it fits to each person’s needs/schedules/personalities/etc. – it’s just a fun thing to think about.
I started reading these darling posts about all of these faux chenille baby blankets and they look sooooo darling and comfy and easy to do, I thought I’d whip up a few. I was so convinced that this was going to be the thing that I was going to make for all of the pregnant people that I know (6!), that I bought the tool at Joann’s to make it easier.
PHFFFFFFT!!!!!!
OK, so maybe I missed the importance of a key word in Dana’s tutorial:
“I must point out that like most quilting, this blanket takes a while to make. It’s not as time-consuming as true quilting. But be prepared for tedious hours of sewing line after line after line and cutting, cutting, cutting. I don’t want to make it sound boring. It really is a fun project (and so cool when you see the final product washed and chenilled up). But just be prepared for the commitment and think of this cuteness laying on top of it. Totally worth it.” (bolded for my satisfaction)
In true Becky fashion, I skimmed right over that and focused on the “really fun project” part. In hindsight I see how those two items contradict SO MUCH that only one can be possible. It isn’t the “really fun project” that is the winner.
Yes, I whine. I just didn’t think that between kids, cooking, cleaning and this, that my entire weekend would be toast. Squeezing this in between all of that may also be the reason why I skim instructions/information as well. Or I read it on my tablet as I’m falling asleep in bed. Either way, I’m not the best destruction instruction follower. This does not in anyway lessen the tedious factor…just maybe explains some of the wonky factor.
So, Wonky Factor 1. I didn’t choose a lined fabric. Joann’s had flannel on sale and I saw this darling brown and light blue polka dot thing and the bill started ticketing up from there. I just moved and can’t find my longer rotary cutter guide for the life of me, so had to draw lines every inch with my smaller guide. I lose.
Teeeeeedious
As you can see, I broke up the tedious line drawing with tedious line sewing and so on. I only drew lines every inch and eye-balled sewing lines in-between. As you can see, my version of a straight line varies. I wasn’t too worried however, the dotted side lends itself to some wavy lines and the white side was going to be shredded, er, chenille.
Wonky Factor 2. Sigh. I skipped the part where she clearly explained to sew the middle line first. It really didn’t end up being a big deal other than I lost more fabric all around than I probably needed to…but not so much that I still didn’t end up with a 42″ square. No, really, this overhang hugeness was mostly from my original cavalier cutting, as I’d knew there’d be shifting. I did lose more than I needed to, admittedly.
overhang hugeness is a phrase now – go forth and enjoy.
Oh, that lame photo from my phone looks even worse once inserted. Oh well.
Here’s where the wonky gets better. This was late Sunday night. I finally got to use my shredder. That is what it should really be called. It has a stationary rotary blade. Stationary. I don’t know why I thought the engineering would be more complicated and that it would work like a regular rotary blade just with it’s own ‘mat’ but I’m not an engineer so I like to think they can make all kinds of things that aren’t really possible. This tool hooks in the layers of fabric and you push it like you would opened scissors on wrapping paper, only with a lot more resistance. ‘Cause it’s fabric. Yeah. On a baby blanket, I rotated that blade at least 5 times to get a ‘fresh’ side…I can’t imagine the blades lasting more than 2 baby blankets at best, however, I’d have given up if I was using scissors. Sorta damned if you do, damned if you don’t situation. Overall, I like the tool ok, but it’s relegated to hot pads if I ever attempt this insanity again. Small, tiny, pre-lined, hot pads.
chenille tool of insanity
I used a dinner plate to round the corners. I’ve never done this before! I will never ever ever miter bias tape corners again! Everything will be rounded!
plate of genius
When all is said and done, it’s a very substantial blanket. It has been taken outside on the grass, it has been spit up on, drooled on, rolled around on, napped on – it’s beyond comfy, cuddly, and soft. It has some weight to it, that’s for certain, which makes it a great play blanket and a lot easier to not give away. That and I want to remember why I’m never, ever doing it again.