I made a lot of sun hats. Specifically, 14 of the Peek-A-Boo 4-in-1 sun hat pattern. They’re a great stash buster, (almost) instant gratification, and a fun gift. That said, I’ve learned a few things along the way.
First off, I’m not affiliated, I’m not getting paid, it’s just a really great pattern. Know that I don’t love printing and assembling PDF patterns, but I love this one. It’s <$5, it’s easy, malleable, and a great way to get through some fabric.
Good to know:

#1. Assuming you’re making a boat load like I did…or maybe just a couple, be organized. I did all my cutting and labeling and piling first. Then I went through and ironed all the stabilizers to the brims. This way, when I got to sewing my piles, I could just concentrate on sewing. There was going to be enough thread changes and other things, I didn’t need more interruptions.

#2. It comes in sizes of head circumference from 15 inches to 22 inches. In translation, that’s tiny newborn baby to hefty toddler. The 22 inch size says it’s for older than toddler, so I guess my peoples have big melons. I dunno. But I made a few in the 22 inch size and all kids were under 3 years old.
#3. The larger the size you’re making, the easier it is to make. See, once you construct the brim, then the inside and outside caps, and the ties, you’re going to mush all the inside itself. Smaller is just harder. Not a big deal, just something to know.
17 inch hat mushed:

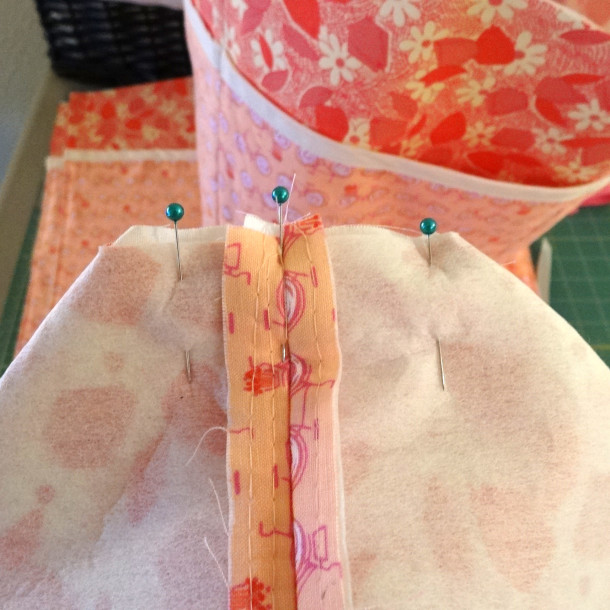
17 inch pinned:

#4. Pin. Pin a lot. See, you’re dealing with a lot of bias edges AND you’re sewing in the round AND part of the construction has stabilizer and others do not. You’re going to be easing your edges together, trying not to get puckers. And you know what, puckers will happen. The kid is going to do so much worse to the hat than the pucker, so just deal.

#5. See that pink pin? That’s so I know where to stop. I skipped the reversible option of the hats, cuz….I just didn’t think they warranted it, but you still need to turn the thing inside out. I color coded with my pins.

#6. Pin…that strap separately. Seriously. Pin the straps first, then line up your seams and then pin on either side through all layers. There’s a lot of bulk there with layers, straps, stabilizers…just do it this way. I forgot once and had a strap slip down inside while sewing. argh. I tried pinning through all the layers. argh. Just use 3 pins. I know my camera focus is off, but you know what I mean. 3 pins.

#7. Nest your seams. I’m a fan of open seams in quilting, but for this in particular, nest your seams. You’re going to be yanking this thing back through itself, kids throw things out of moving vehicles, dogs chew on baby hats… but mostly while you’re sewing this, you’re going to be really hard on those seams, so….nest them the best you can.


#8 This is related to #7 in that you need to back-tack every seam’s start and stop. Again, bias cuts you’re easing to a stabilized brim, pulling it back through itself, all kinds of wrangling in a 15-22 inch space….back-tack. I had a few seams come apart. That sucks.

#9. Bias tape maker. Can we all please quit making tiny little fabric tubes that we pull back over on themselves to make straps and then top-stitch again anyway??? Please? FTS. No thank you. Cut a width of fabric for the straps, make 1/2 double folded bias tape (not technically on the bias, but whatevs), cut in half, top-stitch, done. In a fraction of the time and with no swear words.


#10. A word about fabric. I was gifted some white with green polkadot fabric…I thought it was perfect for some Timbers Army kids. Little did I know it was a poly blend. Ugh. It got all kinds of shiny and funky when ironed esp with the stabilizer. They were meant for novelty anyway, but damn. It sucks. AND they puckered like a …something that rhymes with pucker. BUT I loved quilting cottons for this project and eyelet lace. NOW, eyelet lace is wonky to work with anyway because its structure is already compromised with all of those holes. I have some…questionable seams. I should have pinned more. See #4. Oh, and linen. The Robert Kaufman linen is perfect for this project too.

#11. Also, have fun with patterns. You will need to adjust a bit which way the pattern goes, but as you only flip on the 90 degree and don’t change where the bias ends up, you’re fine.


#12. A word about stabilizers. I used both a fusible web as instructed (Trans-web) and a single-sided stabilizer from Pellon. They both work fine. I have no preference, except maybe the Pellon because I only had to iron it once. It made no difference in the end. Trans-web is a little harder to find, so I’d prefer to save that for when I really need it and just use the Pellon.

#13. Needles. Yeah. Your mileage may vary on this one depending on your machine. I rarely use a universal needle anymore, but ended up finding a Universal 80 to work best. I busted a Microtex and nearly busted a denim needle….the denim needle did this thing where it bent to the point of breaking and I just thought for sure my eyeball was going to be a goner as it all happened in slow motion and I could just imagine it exploding into tiny shards… which also brings me to when you get to the top-stitching and the thick parts, you might want to hand-crank through those. I ended up doing that and found hand-cranking over the layers, stabilizer, straps, etc. thick parts was best. And induced less fear over losing my eyeballs. Oh, and foot pressure, etc. Might want to decrease the foot pressure….but really, hand cranking for a few stitches. yeah. eeek.

#14. I suck at blind stitching. I should have basted the closures shut before top-stitching but I kept thinking I could do it. 14 times. I suck. So, the part along the brim that you leave open to push the hat right-side-out? Well, you close that by top-stitching and then just top-stitching all around. I had to do it over on almost every single one. On some I just made like there’s supposed to be 2 top-stitch lines …yeah, that’s it. I don’t think the kids are going to care, but, yeah. If this was supposed to be for something really nice, I’d baste it. Or just be ok with being lazy. I choose lazy right now.

So, yeah. Great pattern. Super fast and easy. Learn from my dumb dummy dumbness and my lazy efficient changes if you like.
Happy summer!