Ruffler Foot Review

broken needle from ruffler foot

I went in a few months after getting my new machine to get a walking foot and a binding foot. The funny part is the lady that helped me sold me a ruffler foot, not a walking foot, and I can’t blame her because I didn’t look closely at the box before I left the store! When I got home I realized the mistake and called the store to find out they’re out of walking foots. Le sigh. So…I found myself making a Big Sister skirt for a baby shower and thought, what the hell, let’s take that ruffler foot for a ride!

Now, a ruffler foot for a Viking is NOT cheap. We’re talking $70-80 not cheap. But on the other hand, I hate hate hate hand sewing unless it’s embroidery. Hate hate hate it. So…yeah, what the hell!

ruffle foot
ruffle foot


Look at it. That’s a beast of a foot. It has adjustable length between ruffle tucks so you can make it a really loose ruffle or super gathered, it had NO problem making ruffles in minky….and frankly I can’t imagine it would have an issue with any fabric…the mechanism with the teeth that pushes the fabric into tucks as you sew….it’s a beast! I admit it. It scared me a little (LOT).

You can see here some practice ruffle:

variations on ruffle

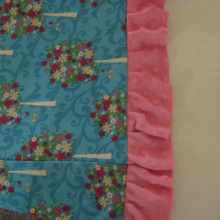
And here’s the ruffle attached to the big girl skirt….super cute if I do say so myself:

big sister skirt
big sister skirt


ruffle sewn on
ruffle sewn on

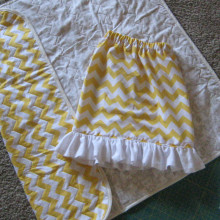
Now compared to the hand-gathered version:

big sister skirt
big sister skirt

I tend to prefer the ruffler foot and I’m not giving it back. Ever.

Ok, I am a bit scared of it and it is a bitch to put on the machine….and if you don’t do it right….like line up the part that holds on to the needle bolt on the shank and tighten it all down really good, you get this:


broken needle from ruffler foot

A needle breaking is a loud, scary thing….and when I’m on a $$ machine with a $$ foot attached to it and I hear the ruffler foot do its “katchunk” thing and then the “SNAP/BANG” sound of a needle breaking….I make some sounds of my own like “Motherf…..!”

All is fine though, and I’m a lot less ginger tightening those bolts now!

Binding Foot Review

close up from above

I have a lovely, glorious, beautiful Husqvarna Viking Sapphire 835 that I bought last fall. It took a lot of money, for me, and a lot of mommy guilt to get over on spending that much on myself so I must refer to it as the lovely, glorious, beautiful….you get the idea.

I went in to the dealer a couple months later to get a walking foot, for knits and quilting, and a binding foot (aka adjustable bias binder) because I read a great review on See Kate Sew. In fact, I highly recommend the See Kate Sew blog, she does lots of cute stuff and regarding the binding foot, she took some great, detailed photos. In fact, she even did a follow up binding foot review for another manufacturer.

Anywho, I love bias tape but have done my share of swearing getting it lined up perfectly, or even close to perfect, all in the name of not having to hand-sew it on. I got this adorable 1-inch binding on clearance at Dove for these procrastination placemats …and they’re back in the procrastination pile because I just can’t stand simple placemats taking a ton of effort on my part.

Procrastination Placemats

So the magical binding foot is going to cure all my binding woes….well, not quite.

It’s a simple foot and with my machine’s click on shank, it pops on pretty easily.

binding foot
binding foot next to regular straight stitch

You’ve got to feed the bias tape into the foot, adjust the gauge to the right size so it continues to feed correctly, attach the foot, move your thread into position through the foot, then slide your fabric in-between the bias tape sides into position to start. Takes some finagling – so much for simple, pop-on shank….

close up from side
close up from side
close up from above
close up from above
close up of feed
close up of feed

Once you have it all lined up and ready to go, it’s amazing. AH-Mazing-ING. I can’t sew this close and straight on my best day, even with a glorious machine. Do you see this perfection?

perfect overlap
perfect overlap

Ok, and now for some caveats. The dismount. Sigh. This is a pair of baby pant hems, so I tried 2 different ways to finish the circle of the cuff. Sewing straight through isn’t going to happen…it just gets hung up on itself and you get this funk:

cutting before end
cutting before end

It seems taking the whole dang thing off, attached to the garment, taking it apart, then lining up and sewing it is the best plan…


removing and finishing after

The pants turned out adorably and are often worn.


Pants of Cute
Pants of Cute

The other issue is that there’s no way one can do a mitered corner with this foot. I don’t even want to think of what a pain that would be…yeah…don’t want to think about it. Now, the procrastination placemats (TM) are oversized and I could conceivably round the corners which I just may do and use the foot….later…

Overall, I’m happy with the purchase. It was under $30 I think, or somewhere in there, and I can see how binding a large (rounded corner) quilt could be very satisfying with being able to pretend I had something to do with my stitching lining up so perfectly. If it was anymore than what I paid, however, I’d be a lot more sour about it.