Pilot FriXion Pen Test & Review

Pilot Frixion Colors

Have you seen these Pilot FriXion pens in the fabric or quilt shops? I bought this multi-pack on Amazon, but the blue and the black can be found in some shops:

Pilot Frixion Colors

That’s, from left to right, brown, hot pink, blue, orange, black, purple, green and red. I got this multi pack from Amazon for $13.58.

So, originally, I heard about this pen that was made to be an erasable office pen, but someone figured out that the friction caused by the FriXion rubber top to erase could also be duplicated with heat…or maybe that was how the engineers who designed originally came up with it…I may never know…either way, a quilter and/or sewist got the info and somehow it got to me and here I am.

The info I had gathered was pretty vague. When you iron it, it disappears. I tested this, and it’s true, although on white fabric you can detect a slight, almost residue line. There was a rumor that it comes back if you freeze it. I’m not in the habit of freezing quilts, nor do I plan on moving anywhere that it may be necessary to brave the elements with only a quilt, but people do leave quilts in cars on cold nights, so ok.

Enter Moda Optic White 200 thread count muslin (that stuff is super bright) quilt sandwich used for FMQ practice with white cotton Aurifil 50wt, and two Bs drawn in FriXion blue.

B-Squared
B-Squared

This muslin sandwich nor any of its components have been washed prior to the alliterated graffiti.

Here, the B on the right has been ironed:

Right B Ironed
Right B Ironed

You can see a little bit of residue there…the photo doesn’t pick it up as well…the photo makes it look like it’s an impression from the pen, but it is most certainly residue or some ink left behind. I used an Oliso Pro on high with steam.

So, I threw it in the washer (cold, mild ‘free and clear’ detergent) and into the dryer (permanent press setting).

I spaced taking a photo, but both Bs were gone! Seriously, duh, Becky, the dryer heat. Anyway, more importantly, the residue was gone! That’s the best part.

I got too excited and just threw it in the freezer to kill this silly freezer rumor.

Hoarding Quilts In Freezer

Priorities in my freezer: Chocolate chips, Chocolate ice cream, meat and quilts. What.

This shot was me pulling it out of the freezer…my man thought I was nuts taking a photo of the inside of our freezer. You can already see it here….

Sure enough, that ink does come back! I totally thought it sounded like some woo-woo rumor, like some skunk-cabbage-voodoo-Aleister-Crowley spell or something but it really does come back.

Close Up After Freezing
They Come Back
They Come Back

So, I thought….if it’s already ruined, so be it…it was a test. But what if….I pressed it again…

Iron After Freezing
Iron After Freezing

Look at that! Not a hint it was ever there. I put a quick iron to it and it’s gone again. So if you’re that person that leaves quilts in cars over night in Alaska, you’re golden – just toss it in the dryer for a quick spin and the ink will disappear!

This is exciting. You have no idea how many times I’ve ironed over ink you’re *not supposed to* iron over! Or maybe you do and you’re as excited as I am.

Honestly, they’re missing out on a market here!! Crazed sewers unite! We have a pen!

I can’t think of any other way to test them. I didn’t use fabric softener or dryer sheets or oxyclean or anything other than just plain Costco/Kirkland detergent, but I wouldn’t anyway in my normal use so I’m safe. I have used them so far for making quilting marks and for garments and they have been great.

Hope that helps you if you’ve been afraid of trying them too! I’m splitting this batch with my mom, but if you are lucky and have a local sewing circle, this would be a bargain.

Pilot Frixion Set
Pilot Frixion Set

No one paid me for this in any way, shape or form. Opinions are my own. Of course, Pilot, if you want to send me a check, please email me from the contact page.

DIY Christmas Stocking – Strip Quilting

The hardest part about making a Christmas stocking, in my opinion, is finding the right-shaped pattern. So many are too pointy, too skinny, too small, too…not what I envision to hold a bunch of fun little gifts.

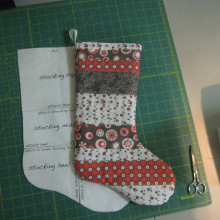
Finally, just weeks before Christmas, I found a pattern I like. Sure, it’s been there since 2010 and it’s on one of my favorite sites, but why make it easy on myself? It’s this one here on the fabricworm.com blog and even has a tutorial, but I’ve discussed before time and again how I have issues with instructions. The shape is perfect, the size is perfect, but I didn’t really want a cuff and I wanted to add in the complication of strip quilting. Ok, strip quilting is really easy, I just like to make it sound hard and all fancy. It’s really just taking some fabric which can be scraps, a bundle of fat quarters or whatever you want, cutting it in strips of whatever size, then sewing it together in stripes. Quilt/top sew it down to the batting – done.

Here’s an example of a pile I gathered:

fabric pile for the man

I had been saving the Moda Japanese-modern looking fabric for ‘just the right project’ for at least 8 years and it’s perfect for my man’s stocking (and I still have > 1.75 yards left to covet.) I cut them in strips, sewed them together, pinned the fabricworm pattern to it, and cut it out.

cut out pattern
cut out pattern

Cut out 2 pieces of batting – I prefer front and back batting, but you may not. I certainly do NOT recommend the synthetic batting you see here, but I have some left over from a Halloween project and decided to use it up. I wasn’t terribly concerned about it not being flat because once I quilted it down, I just trimmed the excess. Not a big deal.

cut out batting
cut out batting

Next, cut 2 of the lining and sew together, wrong sides facing, then turn right side out.

cut out lining x2
cut out lining x2

Put the lining in the sock, right sides facing. Start sewing an inch from where you’re going to insert your loop and stop an inch before. This gives you a hole to turn the thing all right-side-out.

lining in stocking and sew
hole to turn right side out
hole to turn right side out aka birthing

I cut about a 4 inch length of white grosgrain ribbon, folded it in half, and pinned it in the hole.

pin in loop to top-stitch
pin in loop to top-stitch; try not to flip the bird to the camera

Top-stitch around and presto, chango, MAN stocking.


MAN stocking
MAN stocking

He said it looks a little “David Bowie.” I can live with that.

So, maybe you have a kid that really wants a StarWars stocking?

Yoda Stocking
Yoda Stocking

You can’t deny the Yoda. What? You don’t have scorpion camo in your fabric stash? Pfft. here’s a different look at sewing in the right side to right side lining in and MORE Scorpion Camo!

Scorpion Camo!
Scorpion Camo!

Yoda looks completely indignant against paper garland.

Indignant Yoda
Indignant Yoda

Did I stop at just one stocking? NO. Did I stop at two stockings?? HELLS NO. (do people still say hells no?)

Baby's Stocking
Baby’s Stocking

This last one, I had a 4 fat quarter pack that I bought, loved and didn’t know what to do with (familiar theme again) so I thought I’d see if I could make a complete stocking out of it….and BAM!

Fat Quarter Stocking