Nero from Devil May Cry 5 Custom Cosplay

I’m not a gamer. I can’t even play Frogger to save my life. That also dates me, as that is likely the last video game I’ve ever played, not counting Angry Birds after a pitcher of beer. That aside, I do absolutely love themed clothing, costumes, and above all, editorial styling. When I sew or design something, there’s a full editorial spread in my vision.

My kids don’t always get what I can do…they know their mom sews and can make stuff, but that’s really as far as their understanding goes. I don’t often make complicated things, or tell them about it when I do – I’m just a mom at the end of the day to them. So when my college-age kid, Zane, said his cosplay maker closed up shop, I said, “You know…I can do that…. and it won’t cost you shipping & customs, plus I can make it to fit you exactly.” And that is how this challenge was set.

This was a process. I don’t have a male block, only female blocks I use for Workhorse, and I’m not ready to delve into men’s patterns at the moment, so I used the Colette Albion as a block. It’s a solid unisex coat block, and it let me set in all the style lines I needed, plus already had lining pieces. This likely saved me a good week of work.

From there I raised the yoke up 2.5 inches, added in shoulder/arm yokes to line up and match, added a collar, added in front and back shaping seams that have darts built in, a welt zipper pocket, changed the shapes of the pockets, adjusted sleeve fit to be narrower and have zippers to the elbows, changed the lining to have matching shape, made a broad-back adjustment, changed sleeve lining to be pieced and allow for corduroy cuffs, added in a front zipper, drafted side and front buckles/straps, and added side vents.

Whew! So, while I did use a” premade block,” as you can see, it has been completely re-designed and customized. In addition to all of that, there’s shoulder pads (necessary for structure/weight of coat), rivets, industrial & professional equestrian hardware, underlining, and real leather work.

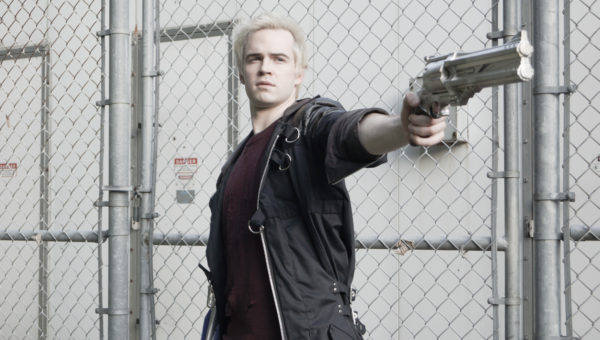
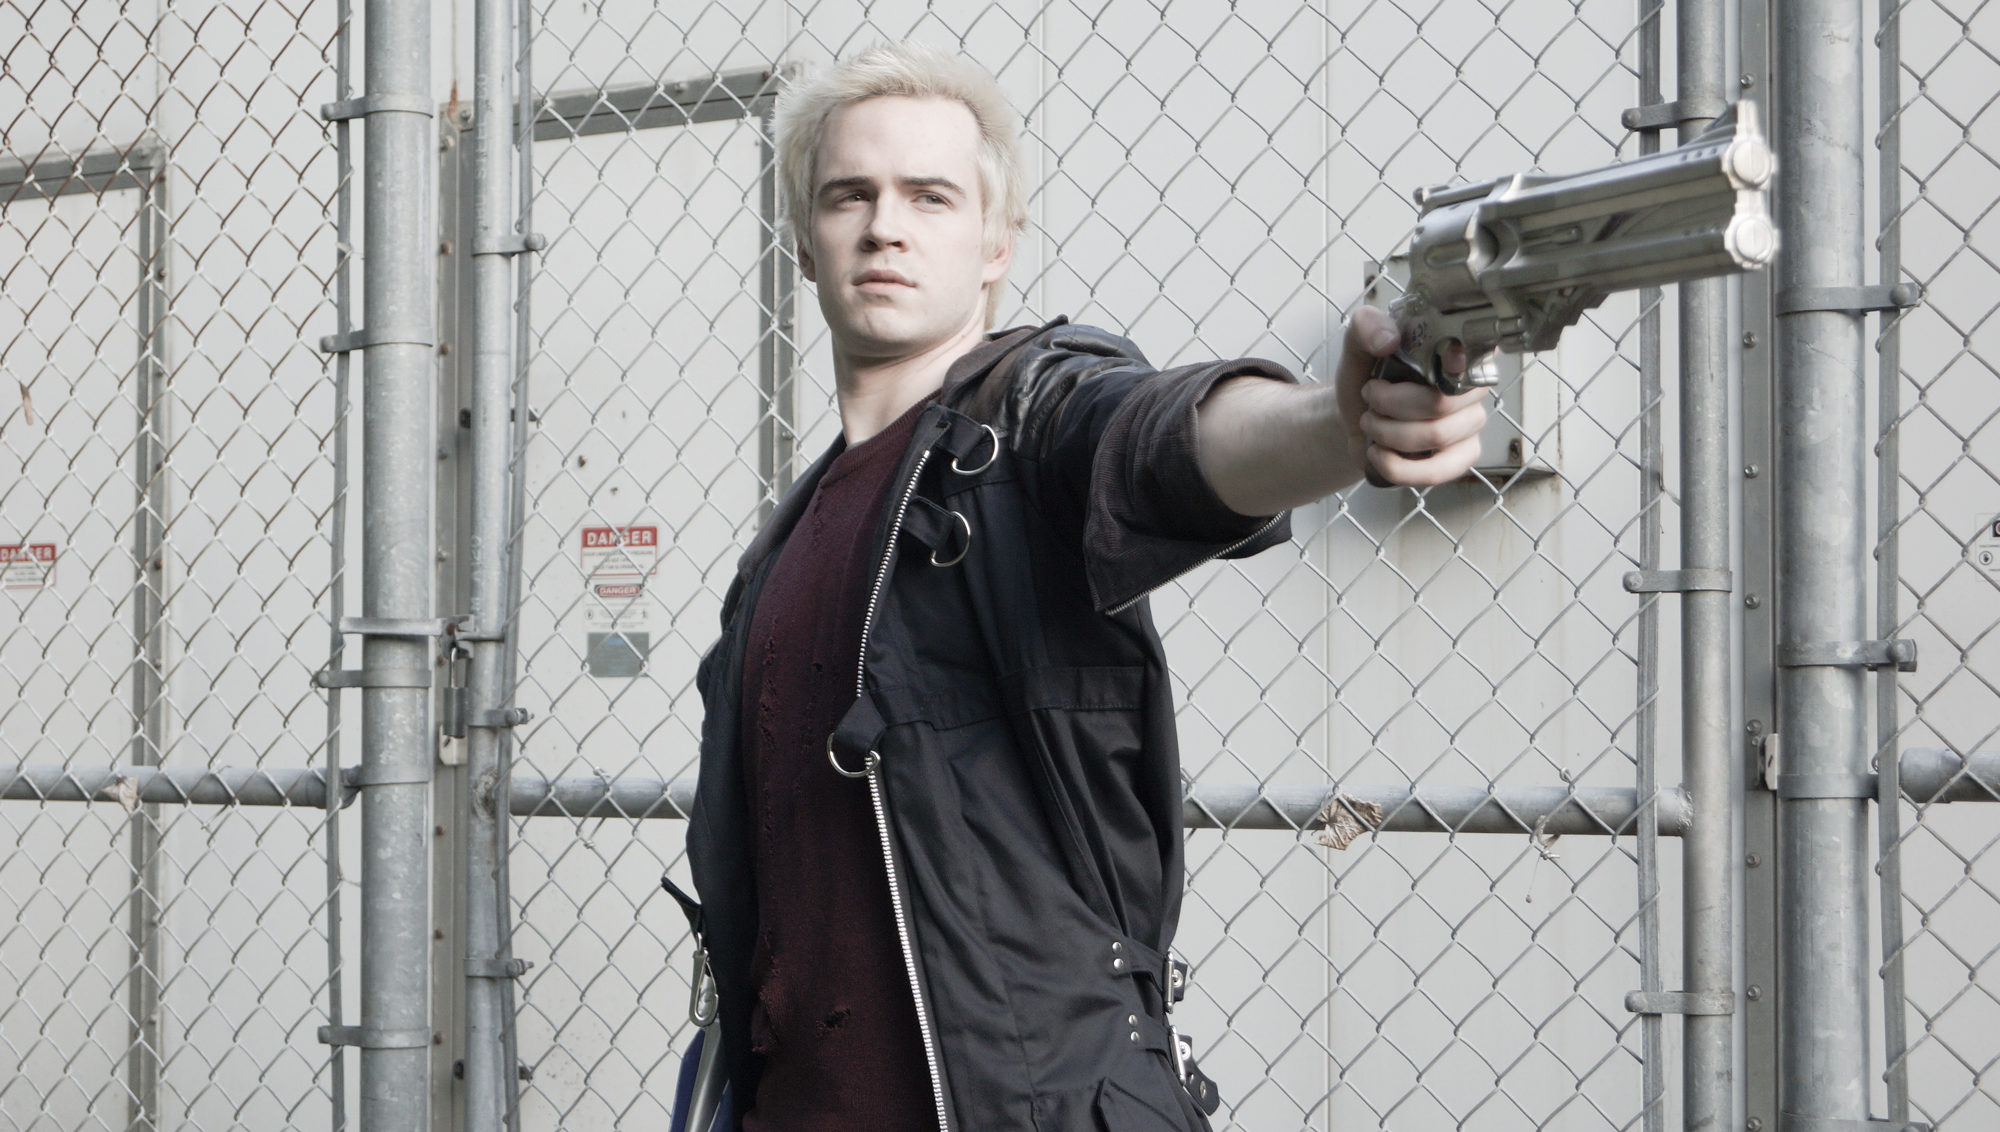
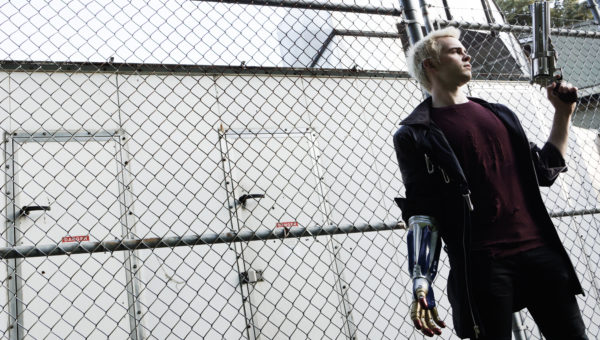
All in, it still cost upward of $500USD in materials including the rivet and grommet dies, the hardware, the leather, the twill, zippers, etc. So, while he didn’t really save money (quote from custom cosplayer was about the same), there’s no way a long distance coat would have fit as well. We did one muslin/trial fit. Here’s a shot from Instagram I posted:

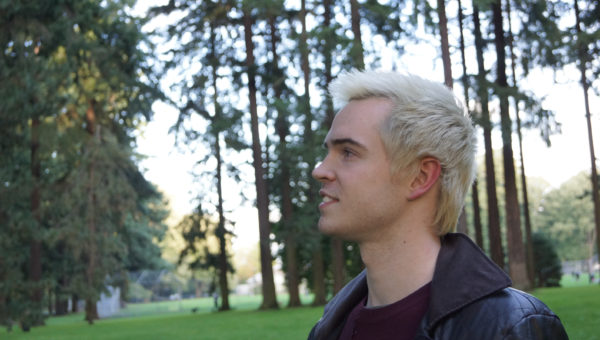
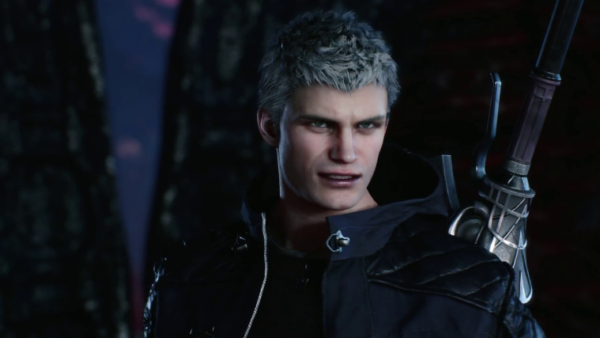
Being that I’m not a gamer, most of my reference material was what I could glean from screenshots and other cosplay on the internet.

This slideshow requires JavaScript.

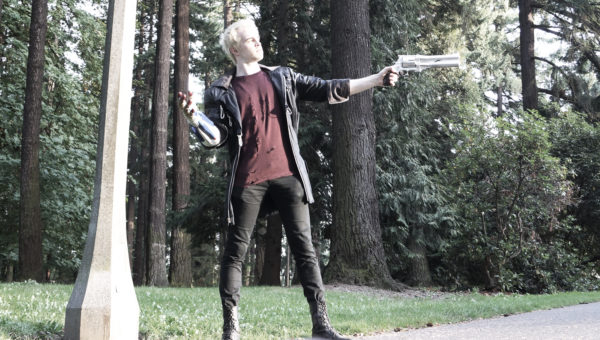
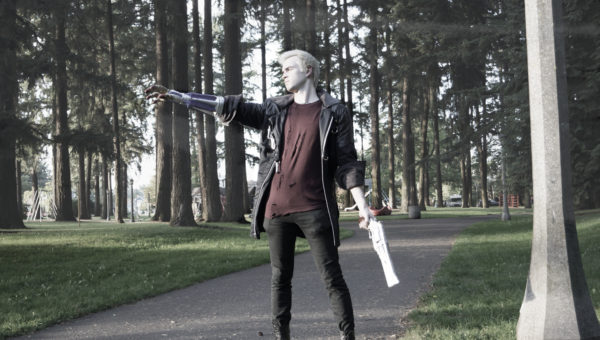
Zane told me, as we were shooting in the park, the backstory of Nero, and how shooting in the park was hilarious. Woops. 😀 Pretend it’s a hell park, ok?

There were some new-to-me challenges. Sewing real leather was a first. Thankfully Karleen, owner of the Sewing Studio, had recently sewing similar weight leather and tipped me off to using a 90 Microtex needle. I’m sure she saved me a few hours of crying there. I had to quilt all of the leather, and once you put a hole in leather, it’s there to stay, so mistakes are not optional. That and I was doing precision work lining up the leather yokes across the chest-back-sleeves. OH! Pro-tip. Easing in leather sleeve heads?!?! HAHAHA. Not like anything else. It took me awhile. Normally I can easy in a sleeve head of any size or type – but steam doesn’t work the same on leather. Noooope.

Here’s some close up photos w/o the stylized desaturation so you can see details:

Also new to me: setting in rivets and grommets. I’ve set grommets in lighter materials, but 10 oz twill, in multiple layers? Not the same at all. Plus I was using professional grade tools from Oregon Leather. Entirely different than your Dritz crafty options.

The coat is entirely lined in Bemberg rayon. I didn’t redraft any part of the hood from the Albion. HUGE props to them – the lining fit is spot on. That hood is damn sexy inside and out. TBH, all of the lining was spot on. I bagged out the lining and it was flawless. I transferred my adjustments to the body/sleeve lining pieces but the main drafting there was all Colette. Ditto armscye and, like I said, basic block was all Colette. So credit where credit is due there. You can see some of my pattern and sewing work on Twitch, but I’m just starting to feel my way around Twitch and haven’t started transferring video to YouTube yet. That’s another post. 

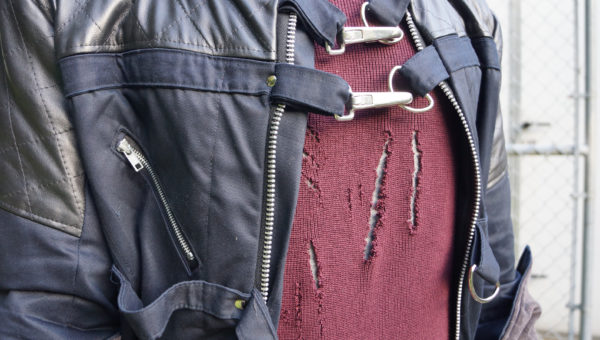
Those buckles are made for saddles/horse leather work, and are a bit too heavy for this twill. I may still swap them out. Undecided there. I can’t really put more layers at the area of attachment without using an industrial machine, which I do not have. The sweater was from a thrift store, and we spent about $50 on hair bleach and toner getting the hair just right.

All materials were bought locally at Sewing Studio, Mill End Store, and Oregon Leather. Even the Colette Albion is local!

So, tell me, do you cosplay? Do you sew in editorial? Have you worked with leather? Currently looking for large round slide buckle to make 80s leather belt the bit leftover. I’m also thinking this tie belt from Burda. I think I have enough leftover. What are your favorite leather projects? I’ve got dies I’ve invested in and hundreds of grommets, and discovered Oregon Leather’s scrap bins!

Zane as Zane

DIY Cheap Baby Clothes Series – Joann’s Fabric Store

Sparkle Motion Set

This set is going to deviate a little bit in that I’m adding in a pair of pants for my 8 year old girl, Hazel…my very tall 8 year old girl, that I used a modified size 10/12 same as in the end of this post. So, this is really Cheap Baby Clothes and Big Sister Pants. I have to do this while they still let me make them matchy stuff.

I used only half of my left over knit binding from the previous set:

Roll of Binding
Roll of Binding

and 2 yards of this glittery green business…I still have about 1/2 yard left…but I’m going to $0 it out for later.

Sparkle Motion
Sparkle Motion

I used the same patterns for the baby that I did in the first two sets of the series. For the girl, I re-used the Burda Kids 9482 pants. I know I got it on sale, because who pays retail when they can avoid it? But I’ve also already used it, so I’m going to $0 it out. In fact, I’ve used it quite a few times. It’s a great basic pattern and beyond easy, not to mention knit fabric and serger friendly.

It was genius, genius I tell you, to get that roll of binding done. I cut my patterns, pinned and sewed them all at once. Easy peasy. Ignore my pinning – I hate pinning unless I have to…and then it’s obvious I’m severely right-handed.

Sleeves With Heart Trim

As you can see…it’s a reverse of the Mill End set.

Sparkle Motion Set
Sparkle Motion Set

I really think I *may* have made one of those sets that will embarrass them some day. I’m going to hold on to it so I can be sure to get a group shot. I still have some of this dance-troop fabric left…I think I can make Hazel a matching shirt. I’ve already got some gray pants under way for Alex too….oh, they will hate me during the teen angst years. Bwahahaha.

OK, nuts and bolts. This was a bit more at $9 a yard on sale, plus that’s 2 elastic waist bands at $1 each = 3 items at the magic number $6.66 each. Coincidence?

To lighten up THAT little bomb, here’s a photo of my blurry angel in the Mill End set.

Action Shot
Action Shot

And here she is still….but obviously ready for a nap…

Zoe
Zoe

She had enough of me combing her hair…she took both of the combs away.

DIY Cheap Baby Clothes Series – Mill End Store

Final Amount

I want to prove that I can do better for less than even clearance clothes. I picked up some knit pants and a shirt for Zoe in size 18 months at Fred Meyers (aka Krogers) for the clearance price of $4.97 each…let’s round and say $5. It doesn’t get much cheaper than that and they look it – we’re talking hot pink velour and leopard print, hey-oh!

So I pulled out a pile of knits fabric and scraps including a 1 yard remnant at the Mill End Store for $4.99…again, rounding to $5.

Pile of Knits
Pile of Knits

I took an old onesie in the 9 month size to take apart and make an upsized pattern. Now this part is not an original post, per se, nor is saving money without sacrificing quality. I can’t improve on Dana…I don’t really think anyone can…she is the master of the deconstruction process, and my shirt pattern is based off of her pattern tracing and her 90-minute shirt that she posted almost 5 years ago! So, yeah. This is partially inspired by Dana’s hard work and you can either follow her tutorial or buy a pattern. The pants pattern I already have been using for about 9 months.

An added bonus of working with knits is that the bolts are ~59 inches wide…so a yard is almost 5 feet by 3 feet! Yatzy! On my first cut, I fit 1 baby shirt and 1 pair of pants.

Max Fabric Usage
Max Fabric Usage

Note I folded in the pants on the side seems as I only need 1/4″ seem allowance – your mileage may vary. I’m also using a serger for most of my knit construction which makes using a 1/4″ seem allowance a LOT easier. On my second cut, I got another full shirt pattern and approximately 5 yards of 2-inch binding strips which I’ll get back to later.

Max Fabric Usage
Max Fabric Usage

Now, if you’ve read Dana’s tutorial, you’ll know I’m loosely following her instructions. I only want 2″ binding strips; I believe she used 4″ strips and ribbed….this is partially just aesthetic so do what you will. Regarding direction of stretch fabric and cutting, I just try to remember which way I want it to stretch over the head/butt and cut that way. I don’t want to get bogged down into what Creative Gemini has already discussed better in a video here.

I cut strips from a sparkly greenish fabric from Joann’s and serged the edges in gray. I used 1/4 yard that I got as a remnant for $2.50 when I bought the rest of a bolt.

2 Inch Binding Strips

When I can, I try to sew in what I call “production mode” and sew in groupings such as serge all the binding, sew on all binding, serge all edges that can be serged at once…etc.

Mass Production Binding
Serged Sleeves
Serged Sleeves
Body Pieces
Body Pieces

After constructing the shirt, I did the bottom binding last. I increased it to 3″ and pinned it a bit lower to add a bit more length to keep baby belly covered better. I used a sewing machine to sew on the binding and sew in the sleeves as I know how. I’m only adding in photos of the few things I’ve done a bit differently than Dana, but more or less it’s the same as her tutorial. For the pants, I followed the pattern directions albeit altered for serging.

Bottom Binding
Bottom Binding

For this project, here’s the final grouping.

Final Amount
Final Amount

Keep in mind that there is a lot of 2 inch binding to use which I will $0-out on a later project. My pants pattern was something like $2-3 a dozen pairs of pants ago, so I’m calling that a wash. I made the Dana tutorial shirt pattern which was free (thank you Dana!)

So, fabric total is $7.50 divided between 3 articles of clothing = $2.50 each

Stay tuned, there will be more. I still have 2 yards of that sparkly, “may crock” fabric, a really bad clearance/remnant bin habit and kids that won’t stop growing. I may even throw in some trendy “upcycling” jargon.

Ok, ok, so the thread is negligible when buying in serger-sized bulk, and my serger happened to be a gift from my awesome mom. My sewing machine was not a gift and is in what is called the mid-price range but I can’t really price machines out or their value as that’s up to the individual user.