I finished the “headboard” piece in time for Valentine’s Day! I’m really happy with the FMQing and have a better feel for it.
Valentine’s Day Bed
Here’s a better close up of the finish.
Close Up
It’s very…uh…organic. Hahaha. But that’s how it goes. Practice, practice, practice. I suppose if I wanted something more homogenized, I wouldn’t be making it myself!
There are certainly things to remember for next time. Like…don’t quilt the binding fabric. I suppose this would be even harder to watch if I didn’t leave enough of the backing fabric in that I could watch it better with the little bit of extra. So, if you’re going to use bias tape, still leave wiggle room when quilting so you can make sure it doesn’t get tucked under like this.
don’t FMQ binding
And once you DO quilt the binding, rip it out, and requilt, don’t go and do it again.
Pay Attention Becky Jo!
I am thick-skulled. I need extra lessons sometimes.
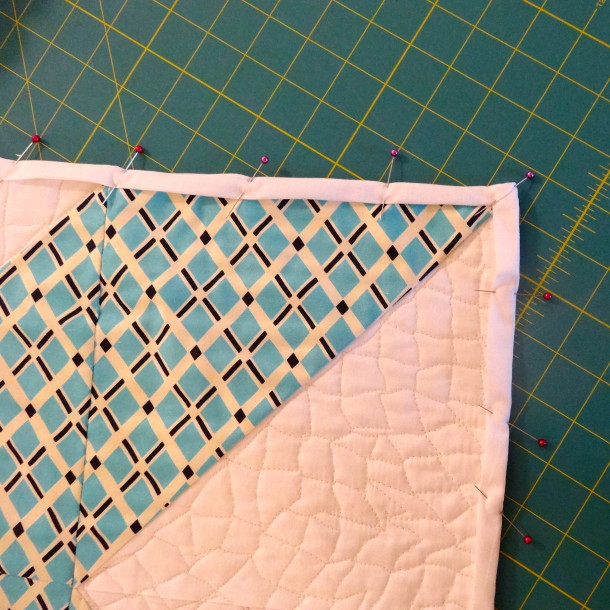
I cut down the backing fabric to 1″ and used it to wrap around for binding.
Backing for Binding
More of my severely right-handed pinning…I try to make them perpendicular, I really do…
Pinning Down the Wrap Around Binding
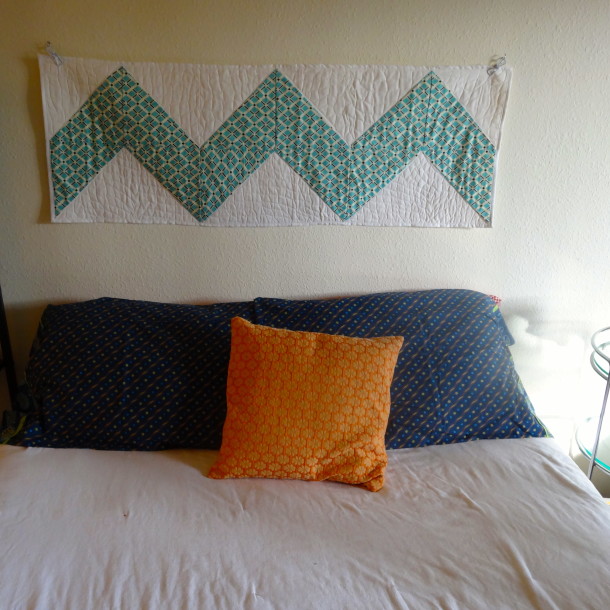
Here it is with some non-Valentine’s Day pillow cases.
Chevron Quilt Headboard
Yeah. I’m really happy with it. It’s about 50 inches wide, so if/when I get tired of it, it would also be a cute table piece…not a full runner, but a good-sized center runner.
If anything, I hope this inspires people who are afraid of the FMQ on their machine. It’s one of those ‘just do it’ things…you have to dig in and go for it. Who cares if it’s a bit wonky, or imperfect? We can go to Target if we wanted perfectly machined, sterile, boringness, but where’s the fun in that? (BTW, I went to Target last night…hahahaha!)
Free motion quilting (FMQ) is a crazy concept. There’s a FMQ’d baby quilt on one of our walls that has these intricate vines with heart-shaped leaves. Now, if you’re not familiar with FMQing, do this: hold a pencil still in one hand, and move a piece of paper under the motionless pencil, and make a border around the paper around little squares complete with heart-shaped leaves. Crazy, huh?
Chevron Quilt Blocks
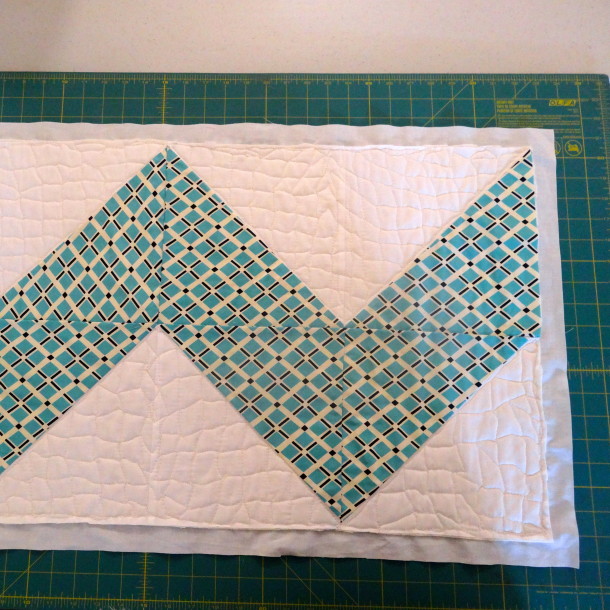
I have a nice pile of blocks leftover from the Chevron Baby Quilt and since I love the fabric so much, I thought I’d make a little wall panel out of the remainder and practice my FMQ skills, or lack thereof.
My Viking prinCESS came with FMQ functionality and an acrylic FMQ foot.
Viking FMQ FootViking FMQ Foot Front
I’ve used it somewhat and I like it quite a bit. I have yet to break it anyway.
FMQ Practice 1FMQ Practice 2
I did some practice and watched some tutorials online before I decided what I wanted to go for on the real deal. I really dig this Leah Day channel on YouTube. She’s really easy going, she’s doing it on a Janome (which I have mad love for as well) and she really gives you the confidence that you can just jump in and do it.
So…I just did it. I’m still doing it….
First Section FMQ
That’s my first section. It’s….creative. HAHAHA. I’m good with it though. This is on Warm and Natural batting…and it’s going well. I can feel the difference between it and the Nature-Fil bamboo/cotton blend, but it’s ok.
Second Section FMQ
And here’s my second section – ignore that I was less picky about the pattern matching up. The FMQing is more uniform, but I got a bit of puckering down at the bottom right. Again, I’m okay with it. As I go along, I can feel what needs improvement, how things need to be approached a bit differently and where I can tweak it to make it better. Also, how I may pick a less geometric patterned fabric next time! I won’t have it done in time for Valentine’s Day, but I think it will be cute as a headboard sort of hanging over our bed. I’ll keep you posted on how it goes, but so far, I’m diggin’ it.
My most fabulous and talented man is from Seattle, and the Seattle cousins are having babies! There are 2 due this spring. We ventured up this weekend for a bit of Zoe’s first birthday, a bit of VIP special delivery, and I took up a baby quilt for Robert’s cousin’s baby shower that we could not attend, but I could not resist making a little something.
It has the silkiest feel to it and is really nice to work with…it’s also never going to make it into my ‘cheap and easy’ category as it’s certainly not cheap, but is sooo very worth it. Besides, when we’re talking a quilt for a family baby, we don’t want cheap to enter into the equation unless it’s happenstance, right? Right. It was 30% off when I bought it, so, for giggles, you’re looking at about 4 yards at around $10 each, and I have a yard leftover…not too bad before batting and all.
I got a 9.5″ square ruler by Omnigrid to make my life a bit easier. I knew I wanted it to be a big, chunky chevron pattern and that I would be repeating the pattern later with the large Disney Cars print, so it was a good buy.
Omnigrid 9.5×9.5
My batting was a baby quilt size 60″x60″ – which gave me plenty of room to work with. When all is said and done, I have 6 half-square triangles (HST) across and down that are 8.25″ once sewn together (6×8.25=49.5″) and that’s plenty of wiggle room.
Cut, Centered & Stacked
Enter the batch sewing. I borrowed this technique from my Craftsy Block of the Month class. My quilting experience hasn’t always resulted in the best end product, but I have been working on it. While apparel remains my more natural mode, I must grow! hahaha. Okay, seriously. Take your stacks of squares, I’m using a Kona white as my contrast, mark the lighter fabric down the center on all of them, stack them all right sides together (not gonna matter with a solid), and get ready to sew, sew, sew.
First Run of Chain
My first run of stitching 1/4″ down one side of the center marked line.
Needle Adjustment for Viking
On my machine, I move the needle to the right 1.8 points to make the edge of my foot 1/4″ – your machine or foot may make that unnecessary, but this is what I choose to do.
Second Run Chain Piecing
Without even cutting anything apart, I stitched the opposite side of each block’s center line next.
Set, Slice, Press & Stack
Alright! Does anyone reading this have any experience with the LEAN manufacturing theories? I always giggle when I’m in this batch-sewing mode and think of that. Anywho, set all of your sewn lines at the same time, cut them all apart, slice along your marked line, and press all of them open. For me, giggling about LEAN and getting it all done in like-batches is easier.
Directional Pattern
Now, this fabric has a directional pattern. Keep this in mind when selecting your fabric – it adds a bit of time to your assembly if you need to make sure the patterns are all going the same way.
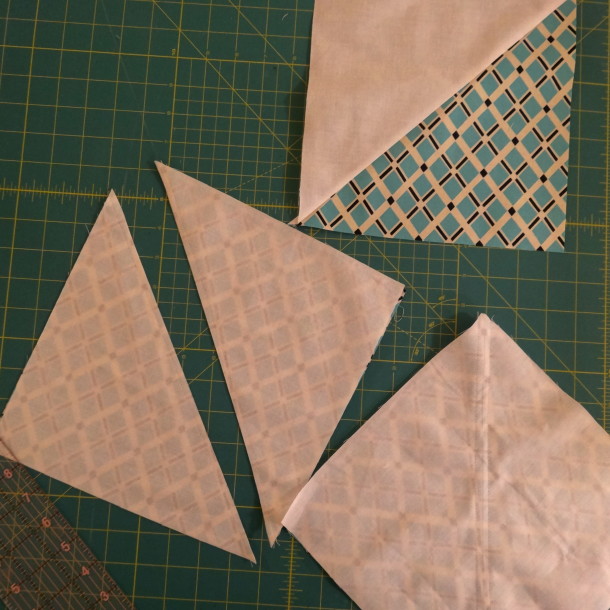
Chevron Block
This is where I leave the Craftsy BOM class instructions and move to something simpler. This is more like the Missouri Quilt Company YouTube tutorial idea. I know, I know, I can’t just stick with one thing; I have to mix and match and make my own. I personally don’t love the Missouri Quilt’s version of making HSTs because they’re too wiggly on the bias afterwards for me and honestly, adding wiggly to geometry doesn’t work for me at this time. Maybe when I get better at it.
Sew It All Up
Sew it all up! I use the more classic quilt construction by making quadrants of blocks that get sewn together, but if you can sew in strips of blocks, more power to you. I tend to get some extra wonkiness when I do that, so I stick to what works best for me. Less wonky works best for me.
Quilt Top
My fabulous and talented man can also hold up quilt tops with ease! Aw, he’s so sweet. Hold on a second while I go give him a kiss.
Okay, I’m back.
Now, you baste your top to your batting and backing fabric. Baste as you like…I use spray baste. To each their own. My usual Warm and Natural batting was out of stock, so I tried a new kind.
Nature-Fil Batting
It’s like buttah, I tell ya. It is Nature-Fil which is 50% bamboo rayon and 50% organic cotton. It’s a bit more pricey than my usual, but damn was it easy to quilt. Vikings are great machines…better at some things than others, and she can be a persnickety one at times, but she didn’t blink an eye at this batting.
Quilt the Quilt
Purred like a kitten right through it all, and didn’t even need a walking foot. I just traced the patterned chevron on the white for quilting – kept it simple and fast.
Trimming For Binding
I’m a big fan of the backing wrap-around binding – especially if I’m going to have mitered corners. I trimmed down to 2 inches after quilting. If your quilt is wonky and didn’t stay square after quilting, this may not work as well, but I did minimal quilting and it stayed square.
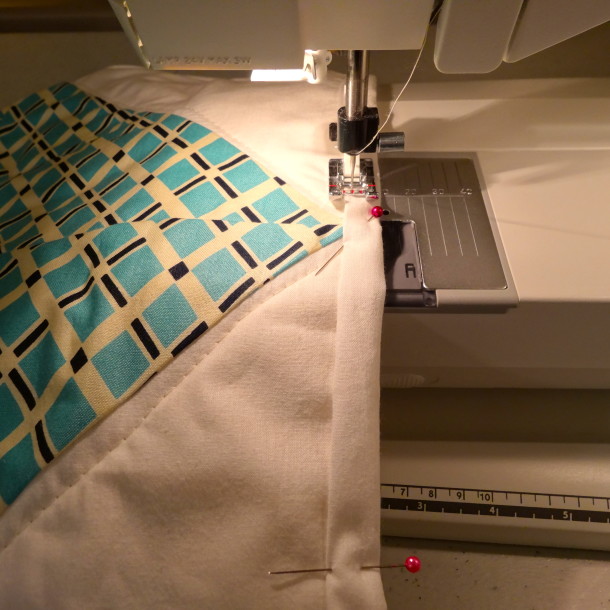
Sew Down Binding
I wrapped the raw edge of the binding edge in itself, and pinned it down. Again, Ms. Viking had no problems at all purring through through it.
Front Finished
Here’s the front, all finished and pretty.
Baby Quilt Back Finished
Here’s the back. I had some blocks leftover that I incorporated. I think it looks a little nautical, which is fitting for Pacific NW families.
Altogether, it only took about….10-12 hours I’d guess, including the extra fussing needed for the fabric directional pattern. If you’re curious, with getting some of the fabric and the batting on sale, you’re looking at about $60-70 dollars for this finished baby quilt, not including labor :). I think that’s pretty good. Sure, you can get 3 or 4 blankets at Target for that, but they won’t be nearly as nice or have that special family love sewn in. And like I said, while this may not fall into the cheap category, it was certainly easy.
I’m definitely glad I found a way to make this pattern work for me, and I’m definitely going to do it again. I’m not quite pro yet….here’s leaving you with a close up of a block that did get wonky…
There’s a VIP in Seattle. When he says, “Aunt B…” I listen. You don’t understand. He has these giant eyes….and adorable smile….I can’t resist. Then, you know what he does? He has his mom send me these photos in the pj pants I made him.
VIP Liam 1
Look at that face. Could you say no to that face? I mean…he just got done with a cupcake sugar binge with his cousin for her birthday, and he’s still the definition of adorable.
Liam The Charmer
Doesn’t that smile just slay you? Sigh. I have to go. I have to make Liam more things so he’ll keep sending me pictures like this.
My plan here was to finish up the green sparkle motion fabric and use a remnant of sweatshirt fleece I picked up at Joann’s for some clothes for Hazel and Alex.
Starter Pile
In the pile above is the remaining bit of green fabric, the rest of the waffle knit heart binding role, a pair of pants made for Alex and the remaining bit from that. The remnant for Alex’s pants was during a 40% off sale, plus the 50% off remnants, so $12.27-40%-50% (obviously not in proper algebraic form) = $3.68 + $1 for elastic = $4.68 for his pants. I used the same Burda pattern I used for the previous Hazel pants, so freebie!
This left the rest of the pile at $0….however, after sewing with the fleece, I found that making a tank for Hazel with it just wasn’t going to happen. It barely has any stretch to it, so there was no way it would work in a knit pullover top.
I didn’t like any of the store-bought patterns for the Hazel top, so I took one of her favorite tank-tops and traced it on some taped-together recycle-pile paper.
Basic French Curve Ruler
I don’t trust my tracing to be without wobbles, so I lined up a vary basic French curve ruler on the curvy parts and used it as my guide. That and I just know I’d get Sharpie on Hazel’s shirt and then she’d hate me forever. I don’t need that kind of stress.
Make Your Own Pattern
Voila! Free pattern! I marked them with the cut-on-fold parts and front/back because I know I’ll be using these again and I’m forgetful.
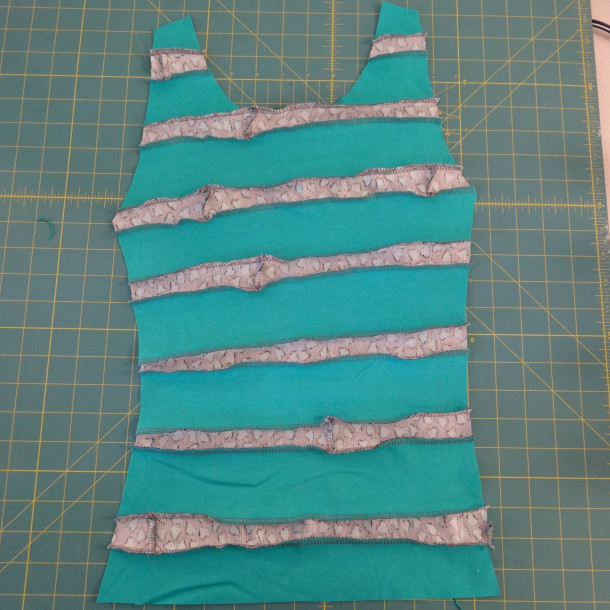
I didn’t quite have enough green fabric to make the tank (Hazel is a tall one), and I couldn’t use the gray fleece as the stretchy wasn’t there…so I decided to make my own fabric.
Make Your Own Fabric
I cut the green in strips and serged it to matching strips of the green-heart binding until I had enough to fit the pattern.
Ready To Cut
I’m playing around with a new camera. Can you tell? hahaha.
Okokok, so after it’s cut, it looks like this….and I’m yet again blessed to have a serger….
Front Cut
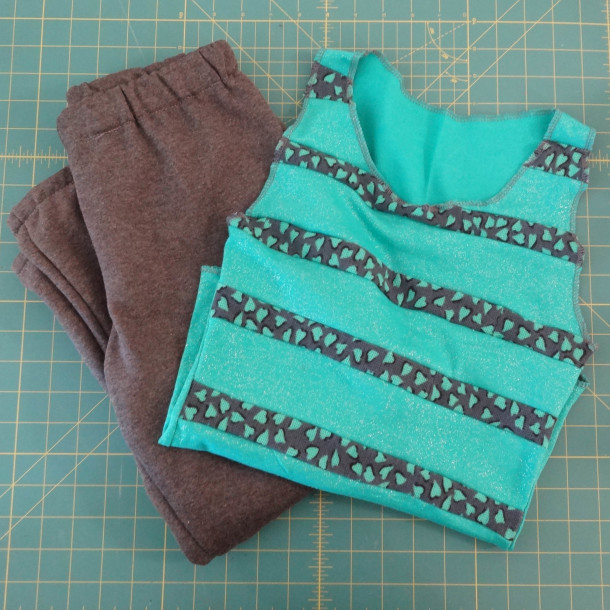
I had enough of the green to make the back solid green, and it’s darn cute.
DIY Girl’s Tank
I’m leaving the edges raw-serged like this..it’s cute and casual, and the fabric barely has enough stretch. I think if I added a hem, it might just rip out.
I put notes on my pattern for next time to adjust as such:
Add Notes To Pattern
So, with that is the end of the green and grays for awhile. I have a nice pile from this session.
Boy Pants and Girl Tank
Total for both, with the tank being $0 is just the cost of the pants at $4.68.
I’m saving the pile for an outing later this month to *hopefully* get a photo of them in motion and in the Valentine’s Day/Zoe’s birthday spirit!
The Final Pile
I’m thinking I need a new color theme for the next batch. This was fun, if a little too Pantone-orrific. I can’t imagine Alex would be thrilled with spring pastels….thoughts? Suggestions?
I was reading this sewing blog I quasi-follow and read the opinion by the owner that she likes to sew because her kids then don’t have to wear ‘commercial prints’……uh, ok. That’s cool. Whatevs. To each their own.
I’m not sure if ‘commercial prints’ meant not mass production, because then…you have to turn down those Moda fat quarter prints that you got comped, hon. Yeah. Does it mean not advertising for Disney? Pshaw. I’m the first person to say I’ll never carry a Coach bag – it’s just not my thing….but this is for kids and fun and…well, it’s about them and not imposing some false sense of anti-establishment BS. I remember my mom making Teen Age Mutant Ninja Turtle sets for my brothers’ beds and I still have somewhere these photos of them just beaming with joy on those beds. I’ll post it some day to be a horrible big sister.
AND I have this nephew…. in Seattle…. that looks at me with these giant eyes, calls me Aunt B, and LOVES the Disney Cars movies. He asked for some Cars pants.
So I bought all the Disney Cars fabric. I didn’t leave any for you.
Cars Fabric
OKOKOK, just one of those is fleece for pj pants. The others are cottons for a quilt. I’m thinking a chunky chevron pattern (these prints are huge) with a solid to break up the crazy print. We shall see how it goes, but I just know I can’t deny the boy.
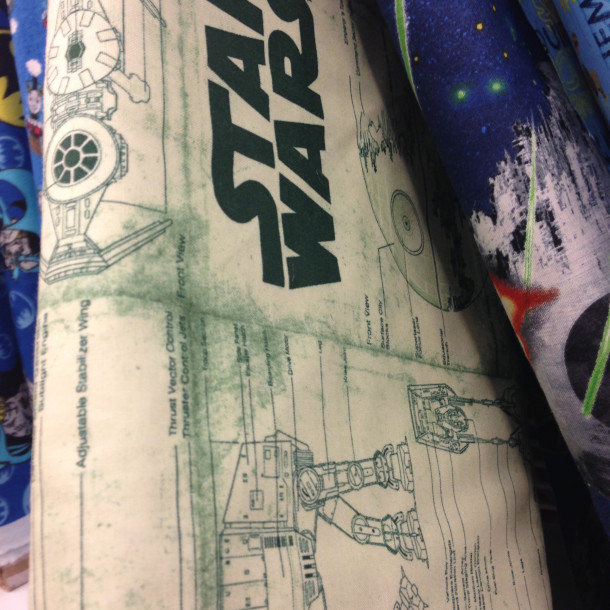
And you know what? Star Wars is rad. And so is Star Trek. Especially in fabric form.
Star Wars Schematic Fabric
I love this green Star Wars fabric so hard. I need it. I KNOW I’m not the only one that takes photos of fabric that needs to be bought….and I may need some of the old school Star Trek fleece.
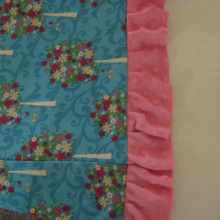
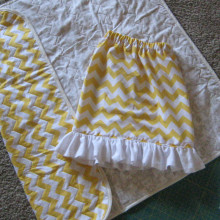
There’s also 2 Seattle family babies due this spring. I’m thinking a trip to the local Cool Cottons quilt store is in order for that one. This is one of my most favorite baby sets for my friend Rose: blanket for baby, skirt for big sister…I’m thinking I can make something like that before we head up. It’s super simple, clean and not-fussy. I FMQ’ed the zig-zag instead of pivoting on the needle…it’s a bit more wiggly but I dig it. We’ll see how much time I can squeeze in sewing.
Elliott’s Blanket
And a few MORE things still. I still have more Cheap Baby Clothes (and Big Kids) on the horizon. I have a kimono blouse to do a pattern trace and recreate with. There’s a top secret post coming out this month someplace else that I’m super excited about.
I’m hoping to do some salt dough crafts this spring….that keeps on moving on to the next month’s list…as does the kimono shirt.
And finally, I’ve been tinkering with this pattern.
Burda 9562
While it is an ‘easy’ pattern, I’d say it’s more on the top end of easy. It shouldn’t be anyone’s beginner pattern. The front cover must have been created before final pattern adjustments because it doesn’t show the top is lined. Which is awesome, just not super beginner if that’s what you need.
To test it I used a fabric I have a LOT of just in case I needed to tweak it.
Jumper 1st Set
It got a little squirrelly when I sewed the bodice to the pants and was blind-sewing….no, of course I didn’t pin it. Yes, I realize that’s my problem. I’m thinking some cute ribbon to cover it up and also break up the dots? Or even lace ribbon?
Squirrelly Seam
Here it sits….still on a hanger. I think it’s cute and I want to make more….but….
Burda Jumper
The pattern has 2 snaps for the top of each strap. I can’t decide if I like that or not. Or if I want to invest in the whole snap-punch thing. Do I just put on cute buttons instead? There’s barely enough length for that….I would alter that for future patterns to have more strap-double up for buttons. Definitely NOT ties or anything complicated as this is still in diaper-wearing age range but does not have an open-crotch area. This pattern is roomy enough for cloth diaper users and is versatile enough for alterations into a dress or a boy version.
This set is going to deviate a little bit in that I’m adding in a pair of pants for my 8 year old girl, Hazel…my very tall 8 year old girl, that I used a modified size 10/12 same as in the end of this post. So, this is really Cheap Baby Clothes and Big Sister Pants. I have to do this while they still let me make them matchy stuff.
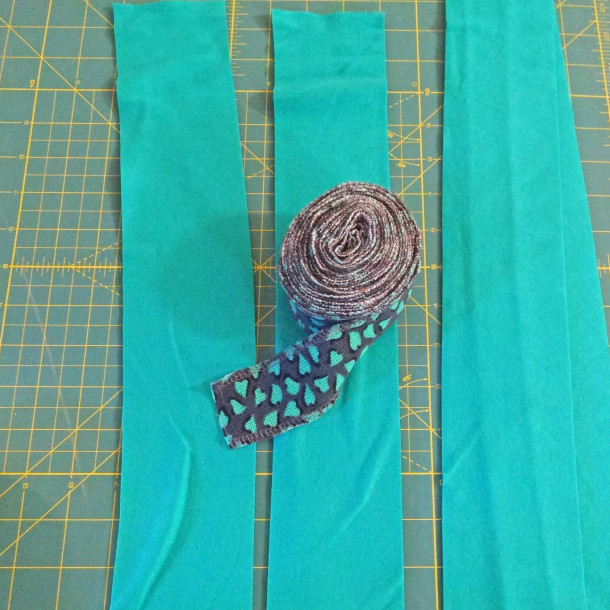
I used only half of my left over knit binding from the previous set:
Roll of Binding
and 2 yards of this glittery green business…I still have about 1/2 yard left…but I’m going to $0 it out for later.
Sparkle Motion
I used the same patterns for the baby that I did in the first two sets of the series. For the girl, I re-used the Burda Kids 9482 pants. I know I got it on sale, because who pays retail when they can avoid it? But I’ve also already used it, so I’m going to $0 it out. In fact, I’ve used it quite a few times. It’s a great basic pattern and beyond easy, not to mention knit fabric and serger friendly.
It was genius, genius I tell you, to get that roll of binding done. I cut my patterns, pinned and sewed them all at once. Easy peasy. Ignore my pinning – I hate pinning unless I have to…and then it’s obvious I’m severely right-handed.
Sleeves With Heart Trim
As you can see…it’s a reverse of the Mill End set.
Sparkle Motion Set
I really think I *may* have made one of those sets that will embarrass them some day. I’m going to hold on to it so I can be sure to get a group shot. I still have some of this dance-troop fabric left…I think I can make Hazel a matching shirt. I’ve already got some gray pants under way for Alex too….oh, they will hate me during the teen angst years. Bwahahaha.
OK, nuts and bolts. This was a bit more at $9 a yard on sale, plus that’s 2 elastic waist bands at $1 each = 3 items at the magic number $6.66 each. Coincidence?
To lighten up THAT little bomb, here’s a photo of my blurry angel in the Mill End set.
Action Shot
And here she is still….but obviously ready for a nap…
Zoe
She had enough of me combing her hair…she took both of the combs away.
People who sew are packrats. We save old clothes and you can’t throw those shredded jeans out and I can use that nasty old single sock for something and…ok, maybe not that last one in my house but I’ve seen it happen.
In this lovely pile are a few things that are 4 years old or more. In it is also a decent quality kids’ pattern knit remnant I picked up at Joann’s. I always scan the remnant bins at Joann’s for fusibles, muslins, knits, ridiculously impractical flowy things for dress up bins and to practice on…because each remnant is 50% off current price. I say decent quality because it has a pretty good thickness/sturdiness to it.
Fruits N Flowers
I don’t recall exactly how much I got it for, but it was only a 3/4 yard, and the fabric is called Fruits N Flowers still at Joann’s…so the MAX I could have paid was $4.86 ((3/4 of 12.99) / 50%).
I sliced up an old nightgown of Hazel’s from a few years ago for the 2″ binding that I would need. The nightgown was from Old Navy and held up pretty well but more importantly it’s really cute cut at an angle and serged with a cream thread.
Hazel’s Old PJs
So, there you go, I “upcycled” an old cheap nightgown! Haha. See, there’s a good reason we’re packrats….eventually.
Finally, I used all the same patterns and steps from the last DIY baby clothes post and voila! Cuteness!
Baby Outfit w Upcycle
Here is the outfit in action at Hopworks Urban Brewery for a lunch date with other ladies and their babies.
Zoe at HUB
Then after lunch, drinking a bottle before nap-time, doing her best Kanye impression…
I’ma Letchu Finish
Now, here’s a little secret. I actually made this one first….it’s true. It was my test run. On the previous post with the next sets…I adjusted the neckline a bit to tighten it up and lengthened to cover the tummy area for these times when the Kanye urge strikes. All the rest will be in order.
Ok, money. I forgot in my last post about elastic for waistbands. I buy my elastic in bulk from Dove. I use about 20″ at a time for the baby and about 24″ at a time for the bigger kids…so 12 yards = 432 inches. I don’t recall, but even if it was $20 total with shipping, $20/432< $0.05 per inch. I’d say it averages out to about an extra $1 per pants/skirt. Obviously does not apply to shirts.
This was 2 garments at $4.86+$1=$2.93 each.
Next up….that leftover fabric from first post made into binding…and some fabric that reminds me of Sparkle Motion….
I want to prove that I can do better for less than even clearance clothes. I picked up some knit pants and a shirt for Zoe in size 18 months at Fred Meyers (aka Krogers) for the clearance price of $4.97 each…let’s round and say $5. It doesn’t get much cheaper than that and they look it – we’re talking hot pink velour and leopard print, hey-oh!
So I pulled out a pile of knits fabric and scraps including a 1 yard remnant at the Mill End Store for $4.99…again, rounding to $5.
Pile of Knits
I took an old onesie in the 9 month size to take apart and make an upsized pattern. Now this part is not an original post, per se, nor is saving money without sacrificing quality. I can’t improve on Dana…I don’t really think anyone can…she is the master of the deconstruction process, and my shirt pattern is based off of her pattern tracing and her 90-minute shirt that she posted almost 5 years ago! So, yeah. This is partially inspired by Dana’s hard work and you can either follow her tutorial or buy a pattern. The pants pattern I already have been using for about 9 months.
An added bonus of working with knits is that the bolts are ~59 inches wide…so a yard is almost 5 feet by 3 feet! Yatzy! On my first cut, I fit 1 baby shirt and 1 pair of pants.
Max Fabric Usage
Note I folded in the pants on the side seems as I only need 1/4″ seem allowance – your mileage may vary. I’m also using a serger for most of my knit construction which makes using a 1/4″ seem allowance a LOT easier. On my second cut, I got another full shirt pattern and approximately 5 yards of 2-inch binding strips which I’ll get back to later.
Max Fabric Usage
Now, if you’ve read Dana’s tutorial, you’ll know I’m loosely following her instructions. I only want 2″ binding strips; I believe she used 4″ strips and ribbed….this is partially just aesthetic so do what you will. Regarding direction of stretch fabric and cutting, I just try to remember which way I want it to stretch over the head/butt and cut that way. I don’t want to get bogged down into what Creative Gemini has already discussed better in a video here.
I cut strips from a sparkly greenish fabric from Joann’s and serged the edges in gray. I used 1/4 yard that I got as a remnant for $2.50 when I bought the rest of a bolt.
2 Inch Binding Strips
When I can, I try to sew in what I call “production mode” and sew in groupings such as serge all the binding, sew on all binding, serge all edges that can be serged at once…etc.
Mass Production BindingSerged SleevesBody Pieces
After constructing the shirt, I did the bottom binding last. I increased it to 3″ and pinned it a bit lower to add a bit more length to keep baby belly covered better. I used a sewing machine to sew on the binding and sew in the sleeves as I know how. I’m only adding in photos of the few things I’ve done a bit differently than Dana, but more or less it’s the same as her tutorial. For the pants, I followed the pattern directions albeit altered for serging.
Bottom Binding
For this project, here’s the final grouping.
Final Amount
Keep in mind that there is a lot of 2 inch binding to use which I will $0-out on a later project. My pants pattern was something like $2-3 a dozen pairs of pants ago, so I’m calling that a wash. I made the Dana tutorial shirt pattern which was free (thank you Dana!)
So, fabric total is $7.50 divided between 3 articles of clothing = $2.50 each
Stay tuned, there will be more. I still have 2 yards of that sparkly, “may crock” fabric, a really bad clearance/remnant bin habit and kids that won’t stop growing. I may even throw in some trendy “upcycling” jargon.
Ok, ok, so the thread is negligible when buying in serger-sized bulk, and my serger happened to be a gift from my awesome mom. My sewing machine was not a gift and is in what is called the mid-price range but I can’t really price machines out or their value as that’s up to the individual user.
Next to my rotary cutters, my bobbin winder is my favorite sewing gadget. I have the Wrights SideWinder I picked up with, you guessed it, a coupon at Joann’s.
I haven’t even figured out how to use the bobbin winder on my Viking – why? This little guy does it fast, easy and I don’t have to rethread my machine, stop a project, change thread colors…and I can do a dozen in a few minutes with no hassle. My Viking has very specific bobbins, but I’ve also used my winder with an old Kenmore and a Janome and it works great on all 3 very different bobbins.
Vikings in particular are very….particular. This is my bobbin.
Viking Bobbin
Most (newer) bobbins have a thread hole you pull the thread through before winding to keep it secure until it has a few rounds of thread in it. My Viking logo has to face down on my winder to get the thread the right direction and depending on your machine, that may not be necessary. My little Swedish bitch is picky, though, and everything has to be name brand.
Empty Bobbin on Winder
I pop the bobbin on, slide the guide to the bobbin – when it reaches thread capacity, it turns the winder off. I lightly hold the string from the hole and let the winding pull it from my fingers – that is my highly technical way of getting the thread started.
Full bobbin
When it’s done, it stops. I pop off the bobbin, trim the thread, and do it again.
Bobbin Winder
Here is the whole machine in action…again, my fussy Viking likes Gütermann thread or better…so I buy the big spools usually in neutral colors like cream and gray – a trick I learned from mom the quilt master.
That should be capped. Mom The Quilt Master. It’s a reverent title.
Your mileage may vary – just do the thread test: if you can pull on the thread and it snaps easily, it’s going to snap in your machine. That is bad. Save it for basting, or what I like to call, hand-sewing that there’s no way in hell I’m going to do.
Pile’O’Bobbins
This pile makes me happy. I will still scream in pain as if I was bit by Cujo every time my bobbin runs out and I notice after I’ve gone several inches along…but it’s a little less dramatic if I know I have a pile of bobbins waiting to fill it.
I went in a few months after getting my new machine to get a walking foot and a binding foot. The funny part is the lady that helped me sold me a ruffler foot, not a walking foot, and I can’t blame her because I didn’t look closely at the box before I left the store! When I got home I realized the mistake and called the store to find out they’re out of walking foots. Le sigh. So…I found myself making a Big Sister skirt for a baby shower and thought, what the hell, let’s take that ruffler foot for a ride!
Now, a ruffler foot for a Viking is NOT cheap. We’re talking $70-80 not cheap. But on the other hand, I hate hate hate hand sewing unless it’s embroidery. Hate hate hate it. So…yeah, what the hell!
ruffle foot
Look at it. That’s a beast of a foot. It has adjustable length between ruffle tucks so you can make it a really loose ruffle or super gathered, it had NO problem making ruffles in minky….and frankly I can’t imagine it would have an issue with any fabric…the mechanism with the teeth that pushes the fabric into tucks as you sew….it’s a beast! I admit it. It scared me a little (LOT).
You can see here some practice ruffle:
variations on ruffle
And here’s the ruffle attached to the big girl skirt….super cute if I do say so myself:
big sister skirt
ruffle sewn on
Now compared to the hand-gathered version:
big sister skirt
I tend to prefer the ruffler foot and I’m not giving it back. Ever.
Ok, I am a bit scared of it and it is a bitch to put on the machine….and if you don’t do it right….like line up the part that holds on to the needle bolt on the shank and tighten it all down really good, you get this:
broken needle from ruffler foot
A needle breaking is a loud, scary thing….and when I’m on a $$ machine with a $$ foot attached to it and I hear the ruffler foot do its “katchunk” thing and then the “SNAP/BANG” sound of a needle breaking….I make some sounds of my own like “Motherf…..!”
All is fine though, and I’m a lot less ginger tightening those bolts now!