Colette Laurel – Mommy and Me Version

Burgerville In The Park

I finally finished! I had plans and schemes to do more than just 2 Colette Laurel dresses but with all I took on in the last month, I’m very happy with the 2 I finished!

Mommy & Me Colette Laurel

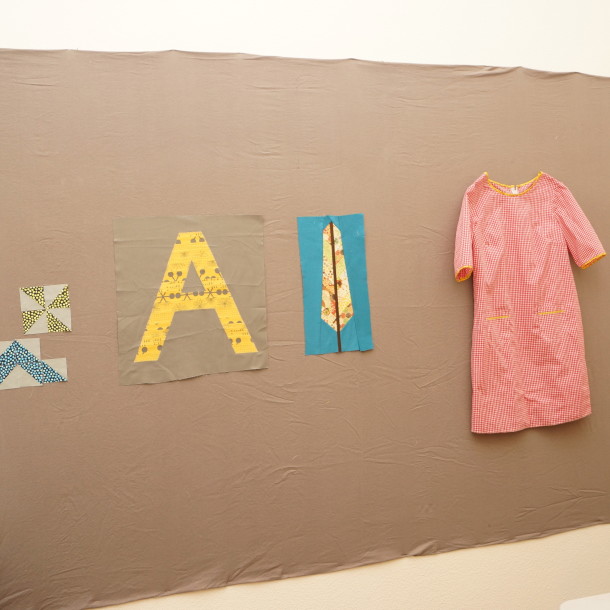
These are both underlined in the bodice with the main fabric, which is a very light weight gingham. It’s a poly-cotton blend and before you say “Ew!”, it’s not like that. It’s super light, on the pretty sheer side, and very breathable. In fact, the only obvious ‘polyester’ thing going on is that it unravels wicked fast. I was inspired by a yard of some early 80s Concord calico I was gifted.

Laurel Pocket
Laurel Pocket

Yeah. I went full Country Bumpkin. I grew up in a town called Boring. I can do that.

My Darling Hazel
My Darling Hazel

Can you believe how tall she is? I’m about 5’9″ and she’s only 8 years old….this is the size 2 of the pattern.

50% Smile
50% Smile

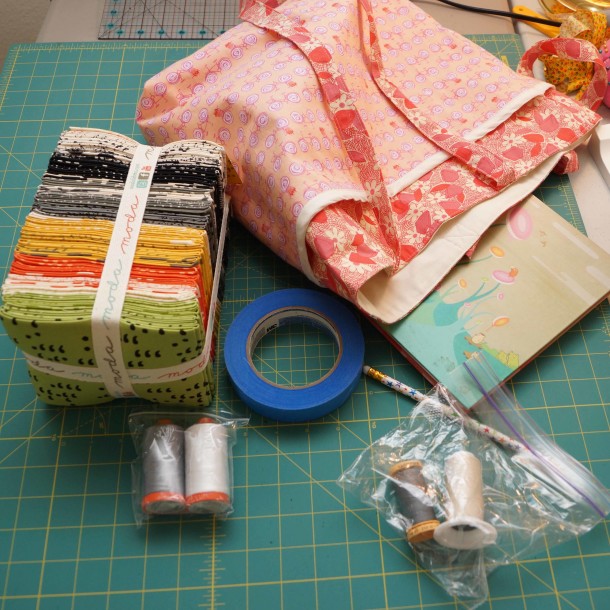
I used the #1 pattern and added the pockets as well. I used the vintage calico for the 1/4″ double-folded bias tape – smaller to keep it a bit more subtle.

Neck Detail
Neck Detail
Neck Detail Up-Close
Arm Detail
Arm Detail
The Hem
The Hem

I could have moved the invisible zipper up a smidge, but overall the installs on the Laurel is really smooth.

Back Neckline
Back Neckline
Invisible Zipper Install

Ok, so I did get the zipper flipped on one of the installs and had to redo a side. It’s true. It’s easy to do. I was distracted by baby cuteness.

I’m a bit rusty at embroidery. I contemplated some chicken-scratch cross stitch or something more elaborate, but stuck with simple double herringbone on the pockets with a super light weight stabilizer.

Choosing Colors
Choosing Colors
Double Herringbone
Double Herringbone
The Pockets
The Pockets
Pocket Detail
Pocket Detail

I entered the dress into the Flickr group for the Laurel dress competition. There are some amazing, amazing, amazing dresses in there. Cross your fingers for me.

We went to Burgerville today for some fast food picnic action and Hazel tested out the dress at the park. You can say all you want about a dress, but one that still looks good in this much movement and play…you know it’s a good dress. I’ve said it before about the Sorbetto, but Colette makes fabulous patterns. I used Swedish tracing paper to trace the 2 sizes without actually cutting the pattern, but I really think if you can get the print book, it’s the way to go.

Action Colette Laurel Dress Montage:

Monkey Bar Test 1
Monkey Bar Test 1
Monkey Bart Test 2
Monkey Bart Test 2


Monkey Bar Test 3
Monkey Bar Test 3
Teeter
Teeter
Totter
Totter
Swing Test 1
Swing Test 1
Swing Test 2
Swing Test 2
Swing Test 3
Swing Test 3
Burgerville In The Park

Quilting and Sewing Design Board

I finally did it. I put up a design board.

Lone Feather
Lone Feather

Okay, I bought a staple gun and 2 yards of 108-inch quilt backing flannel and stapled it to a wall. After putting it up, I wondered with the amount of gray I use in sewing (or am going to use since I bought so much), if gray was a good idea….

A - Feather
A – Feather

I don’t care. I love it. We have one, long, continuous white wall, and this is now taking up 72 inches by 108 inches of that space right in the middle. It’s great.

I was a bit worried that not using the batting-wall method would backfire in that maybe the flannel alone wouldn’t grab enough, but here it is holding up one of the Laurel dresses I’m working on just fine. I was considering putting up foam-core wrapped in batting, then wrapped in flannel…but I like the cheap and easy method better…for now anyway.

Laurel In Progress
Laurel In Progress

These photos show the wrinkles in it a bit more than in real life, and gravity will take care of the rest. I pre-washed the flannel so the threads would ‘bloom’ aka get fuzzy and then projects would stick better. Just think…even if you’re not a sewing crazy obsessed nutcase like me, and you wanted to DIY cover a wall in a non-committal way but didn’t want to deal with the mess of use the starch method, this would work great. This would be great for a rental or apartment or even just a small panel of cute flannel for a kid’s room!!

I got the fabric online at Fabric.com. This sea foam green and this natural color are great too. Maybe I’ll just cover the whole place in design boards….at an average about $10 a yard….and each yard is more than double the width of a normal yard of even ‘home fabrics,’ it’s a steal. seriously – this giant piece was under $20. If one wanted to be fancy or fussy, it could easily be framed and made a bit more formal. (alliteration FTW)

And look – it’s my avant-garde art wall…

My Gallery
My Gallery

Elizabeth Hartman Classes Tomorrow…and other stuff

Mustard and Slate

This Saturday, TOMORROW, is the start of the two, count them, TWO classes by Elizabeth Hartman at Modern Domestic. I feel kind of selfish leaving for what will amount to 2 whole Saturdays…hopefully everyone will survive at home. EEEK.

I prepped my ‘school bag’ for class this weekend.

Packing Bag
Packing Bag

For the Text Quilt workshop, I picked up the Comma by Zen Chic for Moda Fabrics from the Fat Quarter Shop. It looks like they might be out of the fat quarter pack….but they still have a large stock. I do love it.

Comma by Zen Chic
Comma by Zen Chic

It’s was hard to settle on which fabrics to pick…

Choices
Choices

I almost didn’t, and almost grabbed the pink and purple Konas I have like in the Sorbetto post, but I settled on the mustardy-yellows with the gray print and also from FQS.

Mustard and Slate
Mustard and Slate

What do you think? I have two classes, so next week I can take a different color combo…maybe I’ll venture back to my purples and pinks then?

I also picked up some Elizabeth Hartman patterns…how can you NOT want this bag? And if you don’t have any of her books, her Modern Patchwork book is great. I have the iBook version, it’s available for Kindle, and I know lots of local shops have it.

Oh, wow. Between that and working on the Laurel pattern, I seem all local stalker-y. Before you go there, go here. I am SOOOO getting the Pavlova pattern next for my knits. The lovely StephC is alllll the way in Australia now, and look how simple it is! I’ll tell you, like with music, more complicated is not necessarily better. I prefer a good, simple pattern. With pockets.

Mommy & Me Sorbetto Blouses

Mommy & Me Blouses

Robert, Hazel and I braved the crazy spring weather to take photos in the Colette Sorbetto blouses. It rained buckets right after this, but luckily we got some fun(ny) shots in.

If you’re on the fence about sewing apparel, this is a great starting place and it’s incredibly versatile if you’re a bit more advanced. Or maybe you just want a half-dozen more tops for spring/summer ’13 – this will do it!

Hope you enjoy…and many thanks to our photographer!

Mommy & Me Blouses
Mommy & Me Blouses
Spring Rain Dodge
Spring Rain Dodge
Colette Patterns Sorbetto
Colette Sorbetto Sizes 2 & 10

Easy Upcycle T-Shirt

Sleeve

I had gotten some hand-me-down jeans for Hazel that I had just finished hemming with that fancy variegated cotton thread….

GAP shortened
GAP shortened

when I realized the $2.50 Joann’s Fabric sale t-shirt could use some bedazzling. These shirts regularly go on sale, and like I’ve said before, if you’ve got kids, there’s no better deal.

Boring to a T
Boring to a T

Hazel is like my own little Punky Brewster in that the more it clashes, the better. With that in mind, you can see why she would not let me toss this horrible bedazzling knit dress. We picked up the dress during the Christmas season at Walmart in a panic for clothes to wear to the Nutcracker.

Bedazzled
Bedazzled

So, it’s time for a mish-mash up cycle! That, and much like Hazel, I’m easily distracted from what I should be working on.

The dress fabric caused a huge mess, but I did manage to remove the bottom ruffle and enough two inch strips to make new binding for the t-shirt.

Fuzzy Mess
Fuzzy Mess
Ruffle
Ruffle
Hot Binding
Hot Binding

More distractions…

The Boy
The Boy

Now, to LA-style this shirt….cut off the sleeves in a sort of cap-sleeve angle…and cut out the neck line…

Cap'n
Cap’n
Ringer
Ringer

Pin classy ruffle to the bottom of the shirt and run it through the serger or zig-zag/overcast stitch.

pinned
pinned
Serged
Serged

Laugh at how it looks like a big, pink mouth.

Feed Me, Seymour
Feed Me, Seymour

Fold 2 inch strips in half, pin to sleeves on right side…both of these you want to pin to the right side, because that’s how you then flip the seam under and top-stitch it down.

Sleeve 1
Sleeve 1

Do not let serger feed dogs eat your pins. That is bad. Also, try to ignore how much lint cheap fabric is causing.

Hungry Dogs
Hungry Dogs

Ok, once they’re all attached…see how poofy the seams are? You’re going to want to top stitch those down.

Bulky
Bulky

Like so:

Neckline
Neckline
Sleeve
Sleeve
Butt Ruffle
Butt Ruffle

Now, take a photo of your proud daughter making a goofy face.

Cutie Pie
Cutie Pie

Then get distracted again by other cuteness…

Baby
Baby

and more…

The Boy
The Boy

2013 Northwest Quilters Show

The Northwest Quilters group is putting on their annual quilt show this weekend. Mom and I dragged the kids to the Portland Expo center for the show. I took a few shots with my phone while there – many much more blurry than I’d like, but I thought I’d share in case you’re still on the fence about going.

Zoe was not thrilled…

IMG_0863

Owl made with strips. Pretty clever.

IMG_0864

Quarter circle pattern with batiks…

IMG_0865

A “Hazel Quilt” – certainly her style.

IMG_0869

One of Alex’s favorites…

IMG_0875

There were a few in this optical illusion style…this was by far the simplest version and in that, I preferred it.

IMG_0876

I’m really bummed this is blurry however with the blurry it’s easier to see the ribbon effect the colors of the half square triangles produced. Makes me start singing, “Cinderelly, Cinderelly…”

IMG_0878

This hexagon pattern quilt…well, again, my photos don’t do it justice. The boarder alone is fantastic…and what you can’t see is each diamond/rhombus/flower/whatever you want to call it around each yellow hexagon was fussy cut and/or arranged so each one has a design…it was truly one of those quilts where you keep on noticing new details.

IMG_0879


I dunno…tiny triangles got me…this was not the tiniest or the most tiny triangles in a quilt there…I just thought it was a neat concept.

IMG_0882

This was Alex’s favorite quilt.

IMG_0883

I have a thing for late 60s/early 70s aesthetic.

IMG_0884

IMG_0885

IMG_0888

This is a popular Tula Pink alphabet pattern done, I think, exceptionally well. The background quilting was truly impressive and oh, my, really fine taste in fabrics.

IMG_0889

IMG_0890

Oh, come one. You have to appreciate it. It’s cute. See the bombers in the triangles?

IMG_0892

This….this I love. Simple, clean, yet surprising.

IMG_0893

A few others in the same series…they were color studies…

IMG_0894

IMG_0895

IMG_0898

I’m bummed this one is blurry. This has been a prediction of mine – more die cut, 3 dimensional quilts will be getting popular. I’m not in love with it…but it will happen all the same.

IMG_0899

I’m a sucker for Bavarian and Swedish folk art stylings.

IMG_0903

Fabric as painting…

IMG_0904

Fun with wearable art…

IMG_0906


IMG_0908

I should have gotten a better photo of that Baltimore appliqué in the background. Oh well. Also a weakness – good indigos and sashiko.

IMG_0911


I didn’t get a photo of the kids doing the crafts available at the show because I’m easily distracted (long story), but there was a Build A Block for Habitat for Humanity in the back of the Expo, and station set up for the kids to learn how to tie a quilt. They also had these little passports they had to answer questions in as they toured around which made it a little less boring for them (see green hint sign on brown optical illusion quilt at top). We were there for 3 hours without any major meltdowns.

There were also a few vendors, including the show sponsor, Montavilla Sewing, that had machines up for trial including long arm free motion quilting machines by Gammill, Juki and BabyLock. Many small quilt shops had booths with lots of goodies for sale and the volunteers were infinitely kind and helpful.

It’s only $5 if you use the coupon on the Montavilla site, and children under 12 are free, so there’s really no reason not to go and support our many fine, local quilt shops (like Boersma’s). There are booths specializing in imported fabrics, embroidery, chenille and anything else your heart desires….even iron-on crystals if that’s your thing.

2 Sorbettos Done – Part 3

2 Sorbettos

Ah. I really love finishing a project. That moment of ‘done’ before I go off into other directions.

2 Sorbettos
2 Sorbettos

There was a bias tape snafu, oh…and I wasn’t paying attention when sewing the 2nd bottom seam and let the feed dogs do this number:

Oh Sh*t
Oh Sh*t

Nothing a seam ripper can’t handle, and overall it was a very simple and clean process, even doing 2 at once. In fact…the (free from Colette here) Sorbetto pattern is so easy and such a great wardrobe builder, I’d have a hard time justifying sewing one at a time.

Other than minor pleat snag above, I really was extra diligent and good about using my seam gauge and pins in the tiny hem. In this light-weight cotton and in this form, it’s important in order to get the correct drape in the final blouse.

obsessive
obsessive
extra obsessive
extra obsessive

I’m happy with how the bias tape edging turned out and super in love with the light gray color on the pattern – I think it keeps it sophisticated and keeps it from being too fussy.

finished

front finished

collars

I’ll get some Mommy & Me photos taken this weekend, I hope, with Hazel and I in our tops. Pacific NW weather isn’t always so predictable for such things. I think I have enough of the fabric leftover to put a little something together to have Zoe match too. We shall see.


Bias Tape Blunder

bias tape by hand

Sigh. So…while working on the Sorbetto tops, I was ready for the bias tape section and to finish them off.

You know, when I plan out a project, that includes a mental timeline of how long things will take. While I have no problem making bias tape by hand the slow way, and I’m pretty darn good at it, I thought I’d try out a handy dandy Clover tool instead to cut my time down. I’ve seen them used on blogs and they seem so easy and carefree….yeah. Sounds good.

clover 12
clover 12

You know where I’m going with this?

Standardization of labeling bias tape needs to happen. Seriously.

Bias tape, say, if it’s a 1/2 inch, that can mean folded or open 1/2 inch. It really needs to be consistently labeled on ALL things OR we as a sewing community need to decide that a 1/2 inch bias tape is ALWAYS folded or ALWAYS open. I don’t care which of the above options it is. Really. I don’t.

See this spool of bias tape I bought from Dove – it’s marked. 1/2″ …and see the D-F? Double folded.

dove spool
dove spool

And this labeling needs to include bias tape tools. And patterns.

The Sorbetto pattern states a 1/4 inch seam allowance and 1/2 inch bias tape without differentiating between folded or open bias tape. Looking at the photo, I guessed 1/2 inch folded and made and executive decision to go with 1/2 inch folded for my own aesthetic reasons. I think for the most part, we can assume we mean folded. I would think so anyway.

Not so with Clover. JUST SO YOU KNOW….a 1/2 inch bias tape tool means 1/2 inch open.

See, I made a pile of 2″ strips for my 1/2″ folded bias tape…

2 inch strips

I figured my time to make it to be about a half an hour…

clover tool
clover tool

That’s right. That’s a 1/2 inch coming out of that tool. Without the center fold. Sigh.

See….this line up…The Dove 1/2″ spool, 1/2″ bias tape made by me by hand, 1/4″ bias tape made with the 1/2″ Clover tool (see what is wrong there?), some 1″ bought from Dove as well, and a WHOLE BUNCH of hand made 1/2″ bias tape.

bias tapes
bias tapes

But, hot damn, I make fine bias tape. Even if it does take me awhile.

bias tape by hand
bias tape by hand

I had plenty of time while making the bias tape to geek out in my head about the physics of bias tape, versus cutting on the grain. It’s pretty neat when you think about it….the weakened edge of the diamond shape flexes better around curves of a garment. Where as, if you cut with the grain, you’re fighting the square of the weave if you try to ease it around a curve…this is why, when binding a quilt with square edges, it’s not such a big deal to cut on the bias in many quilters’ opinions…you can make binding with grain-cut strips and it may even be sturdier for the whole quilt….Pretty neat to geek out on if you ask me.

I should draw something in Illustrator to show what I mean, maybe? I dunno. I assume people get the physics of it, but you never know.

Yellow

help with color combos
Gutermann Yellow
Gutermann Yellow

I picked up this spool of yellow thread the other day because I really liked the yellow. No other reason, really. I needed a ‘contrasting thread’ for my FMQ class and it made me smile. I’m not usually one to pick yellow unless we’re talking kitchen paint….almost every kitchen looks great in yellow…but here it is…nonetheless.

I think I can blame the baby. We were playing with her blocks…

block play
block play

and as we were playing…I was also doing a bit of color play…

no blocks for you
no blocks for you

when, of course, she’d let me…

stacking
stacking

I guess they are hers, after all….

help with color combos

My little helper.

Sorbetto Tops Part 2 – Assembly

binding 3, 4, 5

The cons of using a serger mid-project are that, if you don’t have the space to keep your serger out, you have to lug it out. You have to thread it if it’s not already threaded in an appropriately blending color (I often use neutrals and rarely color match thread) and you have to make sure it’s de-fuzzed and oiled and set the tension…all that jazz.

The pros – well. A zig-zag or overcast stitch on my sewing machine takes a LOT longer, do you sew it together first, then overcast it together, then press seam to one side or…I just don’t like doing it anymore. The speed of my serger and efficiency has spoiled me. It’s worth the cons for my usage level.

I’ve marked directly on my serger the 1/4, 3/8 and 5/8 inch marks from the knife of the serger. The knife cuts the fabric to the stitch as it goes through.

serger math
serger math

So…if I have a 5/8 inch seam allowance from a pattern, and I serge and cut at the same time to the 3/8 mark, that leaves me the width of the serger stitch, 1/4 inch, to finish the garment.

Knife to needle edge is 1/4 inch:

knife
knife

Finished stitch width:

qtr inch
qtr inch

Not only does it give me a finished edge that will be easy to press open once assembled, it gives me a guide to sew the 1/4 inch seams.

assemble

I removed any serger ‘tails’ of thread by just clipping them instead of threading them back in because it’s going to get sewn back over and encased in bias tape anyway.

I could have sewn the pieces together at the 5/8 inch mark and just done 2 steps in one, but for this light weight fabric and the assembly, I want the seams to be flat on the inside and more polished looking.

Here it is sewn together and you can see the difference between the cream thread which is my sewing machine’s overcast stitch and the gray of my serger:

Overcast
Overcast

And voila, the Sorbettos are now assembled.

ready for binding
ready for binding

Now, it’s time to choose the finishing bias tape colors. I went through all the solid fabrics I had that might work. I pulled in my (secretly) refined man for a second opinion.

binding 1
binding 1
binding 2
binding 2
binding 3, 4, 5
binding 3, 4, 5
binding 6
binding 6

It was a tough call, but it looks like I’ll be making light gray bias tape. I think it’s called Kona Stone.

winner
winner

Sorbetto Part 1

Sorbetto

So…this mystery fabric is going to be two Colette Sorbetto blouses. One for my daughter, which, by these measurements, is about a size 0-2, and one for me…with my shoulder width on top, I’m going to opt for the size 10.

Details
Details

Now, a note or two about Colette patterns. If you have the choice between printing a Colette pattern, or buying a printed booklet at a store or having it shipped, always go for the booklet. Colette patterns are a thing of beauty and perfection. I’m not just saying that because Sarai is a Portlander too – I don’t even know the lovely lady – I’m saying it because they really are of the highest quality and worth every penny. Regardless, she includes instructions and tips that are unparalleled. I didn’t go to school for fashion or textiles, unfortunately, but Sarai shares her knowledge so that I can be a better seamstress. A Burda pattern is great and everything, but Sarai will remind you always to stay-stitch your neckline or how easy it is to make your own bias tape…complete with free tutorials. How cool is that? Not to mention it’s in a stitch-bound booklet with a pocket to hold the pattern.

Now, after I said all of that…the Sorbetto is a free printable and still includes all of the Colette tips and reminders.

Tip about printing PDFs from online: print from Adobe Reader/Acrobat, NOT FROM BROWSER WINDOW. The browser will most likely want to include the URL line at the top and bottom. Also make sure to click ‘print full size’ when in your print driver window. These are things that will make your print ratio off and that is bad, mmmkay?

The instructions say to print them all, tape them all together and THEN print…you do as you like, this isn’t a complicated pattern and I preferred to cut them all out in the proper size then puzzle piece it together. I did it both ways just to make sure…and yeah, I prefer cutting first.

Pattern
Pattern

This is my uber scientific mathematic way to make sure Haze’s should fit her:

Hazel Pattern
Hazel Pattern

I cut everything out and got ready to do the sewing.

cut and stack
cut and stack

This is me sewing late at night and obviously having a ‘stuck’ moment…’where was I again?’

uuuuhhhh
uuuuhhhh

Oh, that’s right…transferring markings…

markings
markings

This pattern requires 1.5 yards, so for 2, I needed 3 yards. I was a bit short, so I didn’t cut my front piece on the fold. I backed it up, cut it with an added 1/4″ to piece it together. I figure with the sheerness of the fabric, it’s best to have a seam inside the pleat where it won’t show…that’s my theory and I’m sticking to it.

Fudging
Fudging

Here it is pieced together and seam flattened out and pressed….

Fudged together
Fudged together

I think it will be fine.

Oh, more action shots….stay stitching the collar line.

Stay Stitching
Stay Stitching

This is just stitching around the neckline at the 1/8″ mark to keep it from getting wonky as you throw it around and sew it up. That’s Boring, Oregon speak for: to keep the bias of the collar from stretching out and warping the structure of the garment.

I did one dart with it sewn and pressed down:

Darts ironed down
Darts ironed down

And one with the darts trimmed and finished.

darts trimmed and finished

I’m not sure that I have a preference at this point but I’m going to tinker with both.

Do you ever look at markings on a pattern and go, “Yeah, I’ll just put those marks on the fabric right through the pattern! Derp!” No, I’m not breaking out a wheel to perforate and chalk through the pattern. Luckily this pleat isn’t so bad. I marked the top and bottom of the pleat…

Pleat mark
Pleat mark

…then used a ruler to connect my line.

pleat mark close up
pleat mark close up

This is me starting to get really, really tired and happy the pleats are done and sewn down.

Pleats Done
Pleats Done

That’s the one with the seam in the middle…I think my plan worked….

This …this is the point where it is time to sew them together…but first, I’m going to break out my serger and finish my side seams. Handy dandy serger. After some sleep.

Serger Time
Serger Time

Action shots courtesy of Robert Wagner.

Fabrics A to Z by Dana Willard Review

Dana Willard

I went out to Boring, Oregon to hang with my family and the chickens for Easter this year – now that’s a real Easter egg hunt: hanging around a bunch of hens that have free range on a few acres!

My mom had told me she picked up a fabric reference books for me a couple weeks prior….she knows of my fabric habits. As much as I love the remnant bins, they’re not always labeled accurately, if at all, and when you’re donated a box from an attic, it’s anyone’s guess as to what is in it.

So when I got out there for Easter, had already laid out on the lawn for an hour and leafed through the book, I finally really looked at the cover….

Dana Willard
Dana Willard

Of course. It’s Dana Willard. THE Dana Willard of MADE fame. I used her shirt tutorial for the DIY baby clothes, etc. Yeah, so of course it’s great.

I love how it’s set up – it’s clean, concise, categorized by type and has little fast icons up top for what you’d use each fabric for…So often these kinds of guides are verbose, cumbersome and boooorrrring. You know what happens when I get a book like that? I skim it and miss something important or stress on something that is actually not important.

No, this book is perfect.

voile
voile

So perfect, in fact, I used it right away.

In a gifted box, I found this beauty. I didn’t do a burn test (to see if there’s a synthetic in it that melts), but I’m confident it’s cotton from the shrinkage in the wash and the feel. I love the rose, mauve and gray colorway – a muted feminine look to it.

gem
gem

I have no idea how old it is…I know it’s not particularly recent. The selvage isn’t marked with a label. It can’t be a Walmart fabric because I know it was purchased in Oregon and Walmart is too new to Oregon for this to be purchased there….I thought it might be at first because it was pretty stiff/scratchy until I washed it. It softened up quite a bit after washing. So, all of that, it remains a bit of a mystery. According to the Dana Guide (yes, I’m renaming it – my name is better), it fits well enough into the voile or lawn category for me. You can see here, held up to the light, how breezy/sheer it is:

sheer
sheer

There’s just under 3 yards – not made any better by this lovely hack job off the bolt-curve, so, I’ll have to do some creative fabric use to plan around those missing inches…

bolt abuse
bolt abuse

I decided Hazel and I need some matching spring blouses out of it, so I downloaded the free Sorbetto pattern from Colette Patterns. I have the Laurel I purchased, but after quilting so much lately, this will get me back into seamstress mode before I attack the Laurel.

Sorbetto
Sorbetto

I’ll be sharing more of course as I go. For 2 blouses, I need 3 yards, and with that missing chunk that is actually missing on both ends, it will be interesting.